事务

一、事务(Transaction)

Transaction 其实指的一组操作,里面包含许多个单一的逻辑。只要有一个逻辑没有执行成功,那么都算失败。 所有的数据都回归到最初的状态(回滚)。

使用命令行方式演示事务

  • 开启事务

    start transaction;

  • 提交/回滚事务

    commit—-提交事务(数据将会写到磁盘上的数据库)
    rollback—-数据回滚,回到最初的状态。

  1. 关闭自动提交功能。

  1. 演示事务

使用代码方式演示事务(针对连接)

1
2
3
4
5
1. 关闭自动提交的设置  conn.setAutoCommit(false )

2. 提交事务 conn.commit();

3. 回滚事务 conn.rollback();

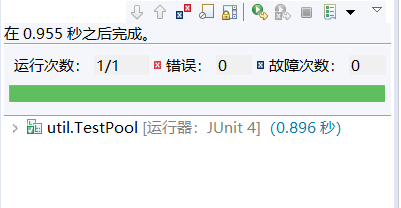
单元测试代码(只是在连接前关闭自动提交,然后操作结束后关闭事务,然后错误的时候提示回滚)

1
2
3
4
5
6
7
8
9
10
11
12
13
14
15
16
17
18
19
20
21
22
23
24
25
26
27
28
29
30
31
32
33
34
35
36
37
38
39
40
41
42
@Test  //使用单元Junit测试
public void testTransaction(){
Connection conn = null;
PreparedStatement ps = null;
ResultSet rs = null;

try {
conn = JDBCUtil.getConn();

//连接,事务默认就是自动提交的。 关闭自动提交。
conn.setAutoCommit(false);

String sql = "update account set money = money - ? where id = ?";
ps = conn.prepareStatement(sql);

//扣钱, 扣ID为1 的100块钱
ps.setInt(1, 100);
ps.setInt(2, 1);
ps.executeUpdate();

int a = 10 /0 ;
//加钱, 给ID为2 加100块钱
ps.setInt(1, -100);
ps.setInt(2, 2);
ps.executeUpdate();

//成功: 提交事务。
conn.commit();

} catch (SQLException e) {
try {
//事变: 回滚事务
conn.rollback();
} catch (SQLException e1) {
e1.printStackTrace();
}
e.printStackTrace();

}finally {
JDBCUtil.release(conn, ps, rs);
}
}

二、事务知识点

事务特性(ACID)

  • 原子性

指的是 事务中包含的逻辑,不可分割。

  • 一致性

指的是 事务执行前后,数据完整性.

  • 隔离性

指的是 事务在执行期间不应该受到其他事务的影响

  • 持久性

指的是 事务执行成功,那么数据应该持久保存到磁盘上。

事务的安全隐患

不考虑(×)隔离级别设置,那么会出现以下问题:

脏读:一个事务读到另外一个事务还未提交的数据
不可重读: 一个事务读到了另外一个事务提交的数据,造成了前后两次查询结果不一致。
幻读

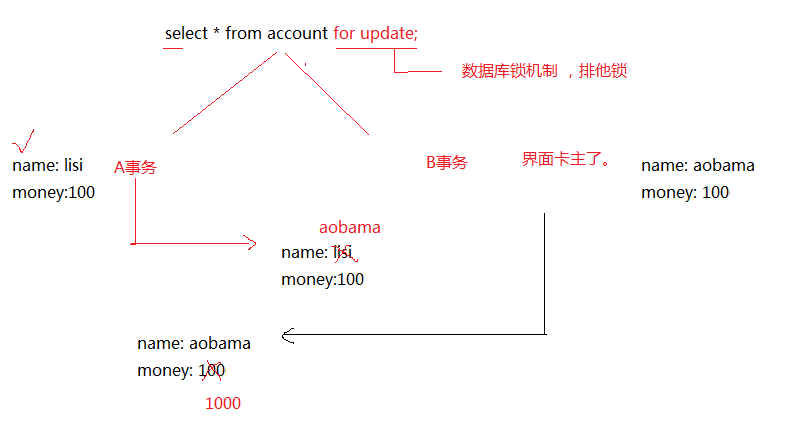
丢失更新:两个事物对同一个事务进行更改,A事务更改之后B更改/B回滚,A更改的被覆盖。

解决方法:

  1. 悲观锁

    可以在查询的时候,加入 for update(A更改之后让B停止更改,然后B之后可以改)

  1. 乐观锁

    要求程序员自己控制(添加version版本)

可串行化(顺序)

  如果有一个连接的隔离级别设置为了串行化 ,那么谁先打开了事务, 谁就有了先执行的权利, 谁后打开事务,谁就只能得着,等前面的那个事务,提交或者回滚后,才能执行。
  但是这种隔离级别一般比较少用。 容易造成性能上的问题。 效率比较低。

  • 效率划分,从高到低

读未提交 > 读已提交 > 可重复读 > 可串行化

  • 拦截程度 ,从高到底

可串行化 > 可重复读 > 读已提交 > 读未提交

两种数据库默认隔离级别:

mySql 默认的隔离级别是 可重复读

Oracle 默认的隔离级别是 读已提交


学生管理系统

一、分析具体功能

概述图

具体分析

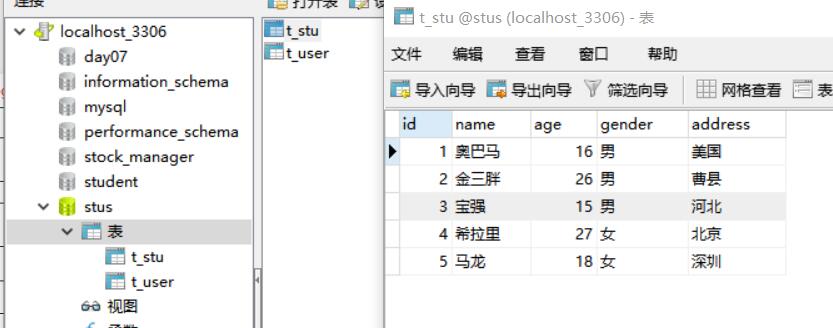
  第一步:我们可以通过分析得到,我们需要建立数据库stus(用户表t_user和学生表t_stu),通过Navicat配合mysql5.0建立表。

  • 此为学生表

  • 此为用户表

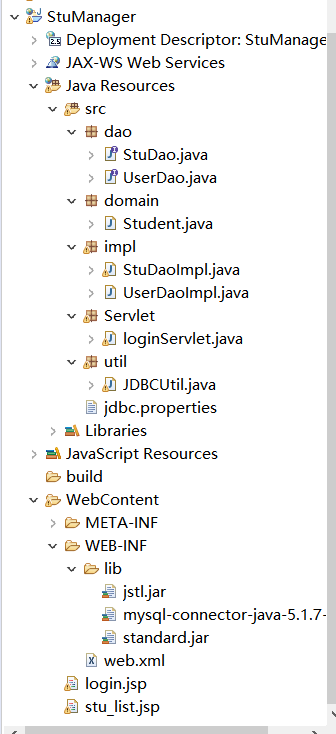
  第二步:我们需要建立两个jsp文件:一个需要写注册的login.jsp页面,另外一个是通过判断之后弹出得到的学生信息stu_list.jsp页面。
而对于登录的界面需要去写三个input标签分别是账号密码和提交。然后学生信息界面我们这次做的是展示所有信息,其中就需要有一个form表单,然后表单里面对于展示所有信息就需要使用EL表达式配合JSTL的内置标签c:forEach去遍历结果,但是需要先导包。

  第三步:我们需要去做一个前两步之间的login_servlet类,通过servlet需要获取信息(通过request.getParameter()方法),查询数据库(利用之前学过的jdbc用过的javaee结构),之后判断信息是否与数据库匹配(利用方法去查),最后给出判断(跳转还是给出提示)。
  
  第四步:我们去完成jdbc关于查询数据库的操作。需要对于用户建立UserDao(写数据库操作的方法)/UserDaoImpl(通过获取后面这个类的属性,然后达到查询的功能)/JDBCUtil类(套之前写过的模板主要去创建属性配置对象,利用类加载器获取外部文件jdbc.properties,然后加载读取的信息)

  第五步:去完成关于学生的操作,需要stuDao(和用户一样去写操作的代码)/Student(写每个学生信息项的get和set方法)/StuDaoImpl(和用户类一样,主要是查询)


二、具体代码:

StuDao类

1
2
3
4
5
6
7
package dao;
import java.util.List;
import domain.Student;
public interface StuDao {
//查询出来所有的学习信息
List<Student> findAll();
}

UserDao类

1
2
3
4
5
package dao;
//该Dao定义了对于用户表访问的规则
public interface UserDao {
boolean login(String username,String password);
}

Student类

1
2
3
4
5
6
7
8
9
10
11
12
13
14
15
16
17
18
19
20
21
22
23
24
25
26
27
28
29
30
31
32
33
34
35
36
37
38
39
40
41
package domain;
public class Student {
//到底有多少成员,想要在页面上显示多少
private int id;
private String name;
private int age;
private String gender;
private String address;

//鼠标右键-源码-生成get和set方法
public int getId() {
return id;
}
public void setId(int id) {
this.id = id;
}
public String getName() {
return name;
}
public void setName(String name) {
this.name = name;
}
public int getAge() {
return age;
}
public void setAge(int age) {
this.age = age;
}
public String getGender() {
return gender;
}
public void setGender(String gender) {
this.gender = gender;
}
public String getAddress() {
return address;
}
public void setAddress(String address) {
this.address = address;
}
}

StuDaoImpl类

1
2
3
4
5
6
7
8
9
10
11
12
13
14
15
16
17
18
19
20
21
22
23
24
25
26
27
28
29
30
31
32
33
34
35
36
37
38
39
40
41
42
43
44
45
46
47
48
49
50
package impl;
import java.sql.Connection;
import java.sql.PreparedStatement;
import java.sql.ResultSet;
import java.sql.SQLException;
import java.util.ArrayList;
import java.util.List;
import dao.StuDao;
import domain.Student;
import util.JDBCUtil;
public class StuDaoImpl implements StuDao {
@Override
public List<Student> findAll() {
List<Student> list=new ArrayList();
Connection conn = null;
PreparedStatement ps =null;
ResultSet rs=null;
try {
//1.得到连接对象
conn = JDBCUtil.getConn();

String sql="select * from t_stu";

ps = conn.prepareStatement(sql);

rs = ps.executeQuery();

//数据多了用对象装,对象多了用集合装
while(rs.next()) { //循环

Student stu=new Student(); //创建学生
//调用Student类里面的set get方法
stu.setId(rs.getInt("id"));
stu.setAge(rs.getInt("age"));
stu.setName(rs.getString("name"));
stu.setGender(rs.getString("gender"));
stu.setAddress(rs.getString("address"));

list.add(stu);
}

} catch (SQLException e) {
// TODO 自动生成的 catch 块
e.printStackTrace();
}finally{
JDBCUtil.release(conn,ps,rs);
}
return list; //需要返回装学生信息的集合
}
}

UserDaoImpl类

1
2
3
4
5
6
7
8
9
10
11
12
13
14
15
16
17
18
19
20
21
22
23
24
25
26
27
28
29
30
31
32
33
34
35
36
37
38
39
40
41
package impl;
import java.sql.Connection;
import java.sql.PreparedStatement;
import java.sql.ResultSet;
import java.sql.SQLException;
import dao.UserDao;
import util.JDBCUtil;
public class UserDaoImpl implements UserDao {
@Override
public boolean login(String username,String password)
//用finally所以将三个都提出来
Connection conn = null;
PreparedStatement ps =null;
ResultSet rs=null;
try {
//1.得到连接对象
conn = JDBCUtil.getConn();

//预先对sql语句执行语法的校验, ? 对应的内容,后面不管传递什么进来,都把它看成是字符串。 or select
String sql="select * from t_user where username=? and password=?";

//2.创建ps对象
ps = conn.prepareStatement(sql);
//? 对应的索引从 1 开始。
ps.setString(1, username);
ps.setString(2, password);

//3.开始执行
rs = ps.executeQuery(); //调用查询语句

//如果能成功移到下一条记录,那么表明有这个用户
return rs.next();
} catch (SQLException e) {
// TODO 自动生成的 catch 块
e.printStackTrace();
}finally{
JDBCUtil.release(conn,ps,rs);
}
return false;
}
}

loginServlet类

1
2
3
4
5
6
7
8
9
10
11
12
13
14
15
16
17
18
19
20
21
22
23
24
25
26
27
28
29
30
31
32
33
34
35
36
37
38
39
40
41
42
43
44
45
46
47
48
49
50
51
52
53
54
55
56
57
package Servlet;
import java.io.IOException;
import java.util.List;
import javax.servlet.ServletException;
import javax.servlet.http.HttpServlet;
import javax.servlet.http.HttpServletRequest;
import javax.servlet.http.HttpServletResponse;
import dao.StuDao;
import dao.UserDao;
import domain.Student;
import impl.StuDaoImpl;
import impl.UserDaoImpl;
/**
*用于处理登录的servlet
*/
public class loginServlet extends HttpServlet {
protected void doGet(HttpServletRequest request, HttpServletResponse response) throws ServletException, IOException {
//提交的数据可能有中文: 1.在tomcat里面永久改 2.request方式
request.setCharacterEncoding("UTF-8");
response.setContentType("text/html;charset=utf-8");

//1.获取客户端login里面的账号和密码
String username = request.getParameter("username");
String password = request.getParameter("password");

//左父右子(面向接口)创建对象

//2.去数据库访问有没有这个用户
UserDao dao=new UserDaoImpl();
boolean isSuccess = dao.login(username, password);

//3.针对Dao的结果做出响应
if(isSuccess)
{
//1.查询出来所有的学生信息
StuDao stuDao=new StuDaoImpl();
List<Student> list = stuDao.findAll();

//2.先把这个集合存到作用域
request.getSession().setAttribute("list", list);


//2.response的重定向 --跳转到学生的jsp
response.sendRedirect("stu_list.jsp");

}
else
{
response.getWriter().write("登录失败!请重新输入用户名和密码!");
}

}
protected void doPost(HttpServletRequest request, HttpServletResponse response) throws ServletException, IOException {
doGet(request, response);
}

}

JDBCUtil类

1
2
3
4
5
6
7
8
9
10
11
12
13
14
15
16
17
18
19
20
21
22
23
24
25
26
27
28
29
30
31
32
33
34
35
36
37
38
39
40
41
42
43
44
45
46
47
48
49
50
51
52
53
54
55
56
57
58
59
60
61
62
63
64
65
66
67
68
69
70
71
72
73
74
75
76
77
78
79
80
81
82
83
84
85
86
87
88
89
90
91
92
93
94
95
96
97
98
99
100
101
102
103
104
105
106
107
108
package util;
import java.io.FileInputStream;
import java.io.InputStream;
import java.sql.Connection;
import java.sql.DriverManager;
import java.sql.ResultSet;
import java.sql.SQLException;
import java.sql.Statement;
import java.util.Properties;
public class JDBCUtil {
static String driverClass = null;
static String url = null;
static String name = null;
static String password= null;
static{
try {
//1. 创建一个属性配置对象
Properties properties = new Properties();
// InputStream is = new FileInputStream("jdbc.properties");


//使用类加载器,去读取src底下的资源文件。 后面在servlet
InputStream is = JDBCUtil.class.getClassLoader().getResourceAsStream("jdbc.properties");
//导入输入流。
properties.load(is);

//读取属性
driverClass = properties.getProperty("driverClass");
url = properties.getProperty("url");
name = properties.getProperty("name");
password = properties.getProperty("password");

} catch (Exception e) {
e.printStackTrace();
}
}

/**
* 获取连接对象
*/
public static Connection getConn(){
Connection conn = null;
try {
Class.forName(driverClass);
//静态代码块 ---> 类加载了,就执行。 java.sql.DriverManager.registerDriver(new Driver());
//DriverManager.registerDriver(new com.mysql.jdbc.Driver());
//DriverManager.getConnection("jdbc:mysql://localhost/test?user=monty&password=greatsqldb");
//2. 建立连接 参数一: 协议 + 访问的数据库 , 参数二: 用户名 , 参数三: 密码。
conn = DriverManager.getConnection(url, name, password);
} catch (Exception e) {
e.printStackTrace();
}
return conn;
}

/**
* 释放资源
* @param conn
* @param st
* @param rs
*/
public static void release(Connection conn , Statement st , ResultSet rs){
closeRs(rs);
closeSt(st);
closeConn(conn);
}
public static void release(Connection conn , Statement st){
closeSt(st);
closeConn(conn);
}


private static void closeRs(ResultSet rs){
try {
if(rs != null){
rs.close();
}
} catch (SQLException e) {
e.printStackTrace();
}finally{
rs = null;
}
}

private static void closeSt(Statement st){
try {
if(st != null){
st.close();
}
} catch (SQLException e) {
e.printStackTrace();
}finally{
st = null;
}
}

private static void closeConn(Connection conn){
try {
if(conn != null){
conn.close();
}
} catch (SQLException e) {
e.printStackTrace();
}finally{
conn = null;
}
}
}

需要导入的外部文件jdbc.properties

1
2
3
4
driverClass=com.mysql.jdbc.Driver
url=jdbc:mysql://localhost/stus
name=root
password=njdxrjgc7777777.

stu_list.jsp文件

1
2
3
4
5
6
7
8
9
10
11
12
13
14
15
16
17
18
19
20
21
22
23
24
25
26
27
28
29
30
31
32
33
34
35
36
37
38
39
40
41
<%@ page language="java" contentType="text/html; charset=UTF-8"
pageEncoding="UTF-8"%>

<!-- 导入jsp的JSTL包 -->
<%@ taglib prefix="c" uri="http://java.sun.com/jsp/jstl/core" %>

<!DOCTYPE html PUBLIC "-//W3C//DTD HTML 4.01 Transitional//EN" "http://www.w3.org/TR/html4/loose.dtd">
<html>
<head>
<meta http-equiv="Content-Type" content="text/html; charset=UTF-8">
<title>学生信息管理系统</title>
</head>
<body>
<br>学生列表:</br>
<table bordent="1" width="700px">

<tr align="center">
<td>编号</td>
<td>姓名</td>
<td>年龄</td>
<td>性别</td>
<td>住址</td>
<td>操作</td>
</tr>

<!-- JSTL里面的标签-->
<c:forEach var="stu" items="${list}">
<tr align="center">
<td>${stu.id}</td>
<td>${stu.name}</td>
<td>${stu.age}</td>
<td>${stu.gender}</td>
<td>${stu.address}</td>
<td><a href="#">更新</a> <a href="#">删除</a></td>
</tr>
</c:forEach>

</table>

</body>
</html>

login.jsp文件

1
2
3
4
5
6
7
8
9
10
11
12
13
14
15
16
17
<%@ page language="java" contentType="text/html; charset=UTF-8"
pageEncoding="UTF-8"%>
<!DOCTYPE html PUBLIC "-//W3C//DTD HTML 4.01 Transitional//EN" "http://www.w3.org/TR/html4/loose.dtd">
<html>
<head>
<meta http-equiv="Content-Type" content="text/html; charset=UTF-8">
<title>Insert title here</title>
</head>
<body>
<h2>欢迎使用黑马学生管理系统</h2>
<form action="loginServlet" method="post">
账号:<input type="text" name="username"></br>
密码:<input type="text" name="password"></br>
<input type="submit" value="登录">
</form>
</body>
</html>

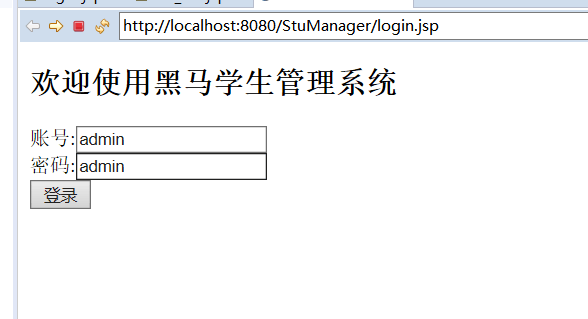
登录界面:

成功后弹出界面:

JSTL

一、JSTL(JSP Standard Tag Library )

  简化jsp的代码编写,替换JSP中<% %>写法.与EL表达式(${})配合

二、使用步骤

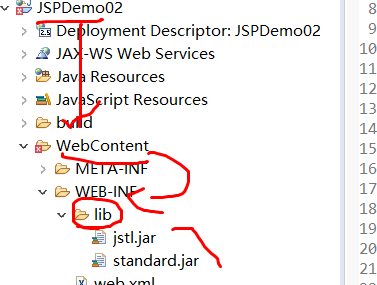
  1. 导入jar文件到工程的WebContent/Web-Inf/lib
    (文件在我的f盘的jar里)

  1. 在jsp页面上,使用taglib指令,来引入标签库
1
2
3
4
5
6
	<%@ taglib prefix="c" uri="http://java.sun.com/jsp/jstl/core" %>
```
**注意**: 如果想支持 EL表达式,那么引入的标签库必须选择1.1的版本,1.0的版本不支持EL表达式。

---
# 二、常用标签(set/if/forEach) #
<c:set></c:set>
<c:if test=""></c:if>
<c:forEach></c:forEach>
1
## c:set ##
<!-- 声明一个对象name, 对象的值 zhangsan , 存储到了page(默认) , 指定是session -->
    <c:set var="name" value="zhangsan" scope="session"></c:set>

<!-- 使用EL标签的内置对象sessionScope取出 -->
    ${sessionScope.name }
1
2

## c:if ##
<!-- 声明一个对象age,对象的值 18 ,存储到了page(默认)-->
<c:set var="age" value="18" ></c:set>

    <c:if test="${ age > 26 }">
        年龄大于了26岁...
    </c:if>

    <c:if test="${ age <= 26 }">
        年龄小于了26岁...
    </c:if>

定义一个变量名 flag  去接收前面表达式的值,然后存在session域中

<c:if test="${ age > 26 }" var="flag" scope="session">
    年龄大于了26岁...
</c:if>
1
2

## c:forEach ##
从1 开始遍历到10 ,得到的结果 ,赋值给 i ,并且会存储到page域中, step , 增幅为2, 
    <c:forEach begin="1" end="10" var="i" step="2">
        ${i}
    </c:forEach>

<c:forEach var="user" items="${list}">
    ${user.name } ----${user.age }
</c:forEach>

```

EL表达式

一、概述#

是为了简化jsp代码,具体一点就是为了简化在jsp里面写的那些java代码。

二、写法格式

1
${表达式}

如果从作用域中取值,会先小的作用域开始取,如果没有,就往下一个作用域取。 一直把四个作用域取完都没有, 就没有显示。

三、简单使用

简单取数:##

1
2
3
4
5
6
7
8
9
10
11
12
13
14
15
16
17
18
19
20
<% 
pageContext.setAttribute("name","pageContext");
request.setAttribute("name","request");
session.setAttribute("name","session");
application.setAttribute("name","application");
%>

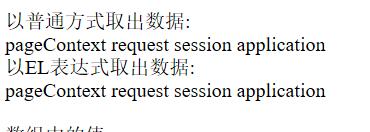
以普通方式取出数据:</br>
<%=pageContext.getAttribute("name")%>
<%=request.getAttribute("name")%>
<%=session.getAttribute("name")%>
<%=application.getAttribute("name")%>
</br>

以EL表达式取出数据:</br>
${pageScope.name} //直接精确的去找name
${requestScope.name}
${sessionScope.name}
${applicationScope.name}
</br>

细节:
   ${ name }:找寻顺序是:page –> request –> session –>application
   ${ sessionScope.name } :精确地寻找(Scope) 到session的

数组

1
2
3
4
5
6
7
8
9
10
11
12
<% 
String[] a={"aa","bb","cc","dd"}; //注册一个a数组
pageContext.setAttribute("array",a); //将a数组的存到array数组
%>
</br>

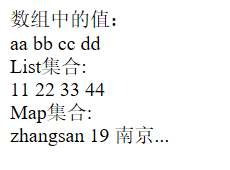
数组中的值:</br>
${array[0]} //然后利用下标找(有下标通过 [] )
${array[1]}
${array[2]}
${array[3]}
</br>

List集合

1
2
3
4
5
6
7
8
9
10
11
12
13
14
15
16
<% 
List list=new ArrayList(); // alt+/ 提示出然后加import

list.add("11"); //list集合添加元素是add()方法
list.add("22");
list.add("33");
list.add("44");
pageContext.setAttribute("array",list); //将list数组的存到array数组
%>

List集合:</br>
${array[0]} //然后利用[]找(有下标通过 [] )
${array[1]}
${array[2]}
${array[3]}
</br>

Map集合

1
2
3
4
5
6
7
8
9
10
11
12
13
14
15
<% 
Map map=new HashMap(); // alt+/ 提示出然后加import

map.put("name","zhangsan"); //map集合添加元素是put()方法
map.put("age","19");
map.put("address","南京...");

pageContext.setAttribute("array",map); //将map数组的存到array数组
%>

Map集合:</br>
${array.name} //然后利用.找(没有下标通过 . )
${array.age}
${array.address}
</br>

总结

1
2
3
4
5
6
7
8
9
10
11
12
13
14
15
16
17
18
19
1.如果这份值是有下标的,那么直接使用[]

<%
String [] array = {"aa","bb","cc"}
session.setAttribute("array",array);
%>

${ array[1] } --> 这里array说的是attribute的name


2.如果没有下标,直接使用 .的方式去取

<%
User user = new User("zhangsan",18);
session.setAttribute("u", user);
%>

${ u.name }
${ u.age }

四、EL表达式的11个内置对象

  相对于JSP的9个内置对象而言,EL加强了其中的几个方面得到了11个内置对象。

使用模板:

1
${ 对象名.成员 }
  • pageContext

作用域相关对象(JSP对应的作用域pagecontext/request/session/application)

  • pageScope
  • requestScope
  • sessionScope
  • applicationScope

头信息相关对象

  • header
  • headerValues

参数信息相关对象

  • param
  • paramValues
  • cookie
    全局初始化参数
  • initParam

JSP

一、JSP(JAVA Sever page)

从用户看待–网页
从程序猿看待–java类继承了servlet

jsp和html的区别:

html:大多数显示静态内容。
jsp:里面可以写java代码,动态改变东西可以展示在页面内。

我们在web文件内新建JSP文件(初始):

1
2
3
4
5
6
7
8
9
10
11
12
<%@ page language="java" contentType="text/html; charset=UTF-8"
pageEncoding="UTF-8"%>
<!DOCTYPE html PUBLIC "-//W3C//DTD HTML 4.01 Transitional//EN" "http://www.w3.org/TR/html4/loose.dtd">
<html>
<head>
<meta http-equiv="Content-Type" content="text/html; charset=UTF-8">
<title>Insert title here</title>
</head>
<body>

</body>
</html>

二、 page指令(第一行)

分析第一行的<%%>代码

1
2
<%@ page language="java" contentType="text/html; charset=UTF-8"
pageEncoding="UTF-8"%>
  1. language:表明jsp页面用什么书写(java)
    1
    language="java"
  2. contentType:表明什么类型的文件,用什么编码(response里面文字编码就用的这个)
    1
    contentType="text/html; charset=UTF-8"
  3. pageEncoding:jsp内容编码(body里面的内容)
    1
    pageEncoding="UTF-8"
  4. extends:用于指定jsp翻译成java文件后,继承的父类是谁,一般不用改。
  5. import:导包使用的,一般不用手写。
    1
    <%@ import.java.util %>
  6. *session *:
    1
    session="true/false"

    用于控制在这个jsp页面里面,能够直接使用session对象。
    如果是true:那么会有getSession()的调用,
    如果是false:那么就不会有该方法调用,也就是没有session对象了。在页面上自然也就不能使用session了。

  7. errorPage:指的是错误的页面,值需要给错误的页面路径
  8. isErrorPage:上面的errorPage 用于指定错误的时候跑到哪一个页面去。 那么这个isErroPage , 就是声明某一个页面到底是不是错误的页面。

三、include指令(包含其他的jsp内容)

包含另外一个jsp的内容(也包括标签元素的内容)进来。

1
<%@ include file="other02.jsp" %>

四、taglib指令

1
<%@ taglib prefix=""  uri=""%>

perfix: 标签库路径
uri: 标签库路径


五、JSP动作标签(只介绍三个)

1
2
3
4
5
<jsp:include page=""></jsp:include>

<jsp:param value="" name=""/>

<jsp:forward page=""></jsp:forward>

jsp:include(包含)

包含指定的页面,这里是动态包含而是把它的运行结果拿过来。

1
2
3
4
5
//include动作标签(运行结果):
<jsp:include page="other02.jsp"></jsp:include>

//include指令(标签元素):
<%@ include file="other02.jsp" %>

jsp:forward(跳转)##

1
2
3
4
5
6
//jsp动作标签
<jsp:forward page="other02.jsp"></jsp:forward>
//可以用请求转发(request)替换
<%
request.getRequestDispatcher("other02.jsp").forward(request, response);
%>

jsp:param(添加参数)

意思是: 在包含某个页面的时候,或者在跳转某个页面的时候,加入这个参数。

1
2
3
4
5
6
7
	
<jsp:forward page="other02.jsp">
<jsp:param value="beijing" name="address"/>
</jsp:forward>

//在other02.jsp中获取输出参数
<%= request.getParameter("address")%>

六、JSP内置对象(JSP页面直接使用)

九个JSP内置对象整体概述

第一部分:四个作用域

  • pageContext 【PageContext】
  • request    【HttpServletRequest】
  • *session *    【HttpSession】
  • application  【ServletContext】

第二部分:两个对比

  • out     【JspWriter】
  • response   【HttpServletResponse】
    如果同时拥有response和out的输出,那么会把out整合到response里面。先输出response的,后是out的

第三部分:不常用
-** exception** 【Throwable】

  • page    【Object】 就是这个jsp翻译成的java类的实例对象
  • config   【ServletConfig】

四个作用域:

pageContext 【PageContext】
  request   【HttpServletRequest】
  session   【HttpSession】
application 【ServletContext】

这些对象可以存值(setAttribute),但是他们的取值范围(getAttribute)有限定.

1
2
3
4
5
6
7
8
9
10
11
12
13
存储<br>
<%
pageContext.setAttribute("name", "page");
request.setAttribute("name", "request");
session.setAttribute("name", "session");
application.setAttribute("name", "application");
%>

取出<br>
<%=pageContext.getAttribute("name")%>
<%=request.getAttribute("name")%>
<%=session.getAttribute("name")%>
<%=application.getAttribute("name")%>

四个作用域的大小

  • pageContext 【PageContext】

仅限于当前的页面

还可以获取到其他八个内置对象。

  • request 【HttpServletRequest】

仅限于一次请求,只要服务器对该请求做出了响应。 这个域中存的值就没有了。

  • session 【HttpSession】

限于一次会话(多次请求与响应)当中。

  • application 【ServletContext】

整个工程都可以访问,服务器关闭后就不能访问了。

Session实现购物车

一、购物车实现分析

  首先分为四个部分:分别是jsp的商品列表、CartServlet判断类,然后可以跳转商品列表的jsp界面和Cart.jsp界面(购物车结算)

CartServlet判断类:

1.先通过request.getParameter("id")获得jsp代码里面href里面的id号;然后通过names数组存放对应的手机名字
2.通过map集合存放对应的 手机号 数量
3.判断购物车有没有这个物品
4.跳转到对应的jsp页面去

二、购物车例子(Servlet实现)

jsp代码如下(使用三个标签跳转)

1
2
3
4
5
6
7
8
9
10
11
12
13
14
15
16
17
18
19

<%@ page language="java" contentType="text/html; charset=UTF-8"
pageEncoding="UTF-8"%>
<!DOCTYPE html PUBLIC "-//W3C//DTD HTML 4.01 Transitional//EN" "http://www.w3.org/TR/html4/loose.dtd">
<html>
<head>
<meta http-equiv="Content-Type" content="text/html; charset=UTF-8">
<title>Insert title here</title>
</head>
<body>

<a href="CarServlet?id=0"><h3>Iphone 8</h3></a><br>
<a href="CarServlet?id=1"><h3>小米6</h3></a><br>
<a href="CarServlet?id=2"><h3>三星Note8</h3></a><br>
<a href="CarServlet?id=3"><h3>魅族7</h3></a><br>
<a href="CarServlet?id=4"><h3>华为9</h3></a><br>

</body>
</html>

CarServlet代码如下:

map在session里面:

1
2
3
4
5
6
7
8
9
10
11
12
13
14
15
16
17
18
19
20
21
22
23
24
25
26
27
28
29
30
31
32
33
34
35
36
37
38
39
40
41
public class CarServlet extends HttpServlet {	
protected void doGet(HttpServletRequest request, HttpServletResponse response) throws ServletException, IOException {
response.setContentType("text/html;charset=utf-8");

//1.先获取要添加到购物车的商品id
int id = Integer.parseInt(request.getParameter("id"));
String[] names= {"Iphone 8","小米6","三星Note8","魅族7","华为9"};
//获取到id对应的商品名字
String name=names[id];

//2.获取购物车存放东西的session-----Map<String ,Integer> 比如Iphone7 3
Map<String,Integer> map=(Map<String, Integer>) request.getSession().getAttribute("cart"); //取值getAttribute
if(map==null)
{
map=new LinkedHashMap<String,Integer>();
request.getSession().setAttribute("cart", map); //存值
}

//3.判断购物车有没有这个物品
if(map.containsKey(name)) //map里面有一个遍历的方法
{
//在原来基础上+1
map.put(name, map.get(name)+1);
}
else
{
//从来没买过直接设置为1
map.put(name, 1);
}

//4.输出界面(跳转)
response.getWriter().write("<a href='product_list.jsp'><h3>继续购物</h3></a>");
response.getWriter().write("<a href='cart.jsp'><h3>去购物车结算</h3></a>");

}

protected void doPost(HttpServletRequest request, HttpServletResponse response) throws ServletException, IOException {
doGet(request, response);
}

}

点击对应的名字之后会弹出:


三、 展示购物车的东西:#

刚才就是点进去之后我们需要实现去购物车结算的功能,因此完成cart.jsp文件

1
2
3
4
5
6
7
8
9
10
11
12
13
14
15
16
17
18
19
20
21
22
23
24
25
26
27
28
29
30
31
32
33
34
35
<%@ page language="java" contentType="text/html; charset=UTF-8"
pageEncoding="UTF-8"%>
<%@page import="java.util.Map"%>
<!DOCTYPE html PUBLIC "-//W3C//DTD HTML 4.01 Transitional//EN" "http://www.w3.org/TR/html4/loose.dtd">
<html>
<head>
<meta http-equiv="Content-Type" content="text/html; charset=UTF-8">
<title>Insert title here</title>
</head>
<body>

<h2>您的购物车的商品如下:</h2>
<%
//1.先获取map
Map<String,Integer> map=(Map<String,Integer>)session.getAttribute("cart");

//2.遍历map
if(map!=null)
{
for(String key:map.keySet()) //map.keySet()获取所有
{
int value=map.get(key);
//key:商品名称
//value:商品个数
//<h3>名称:Iphone 数量:6</h3>
%>
<h3>名称:<%=key %> 数量:<%=value %></h3> <br>
<%
}
}
%>

</body>
</html>

一开始我们设定一定量的苹果手机数量,然后点击小米-点击继续购物(添加到里面)-不停的重复-最终可以选择去购物车结算


四、清空购物车#

  1. 在cart.jsp页面里面加一行清空购物车的按钮(按到展示页面之后可以选择清空购物车按钮,然后按钮可以跳转到clearCartServlet类,然后完成功能)
1
<a href="clearCartServlet"><h4>清空购物车</h4></a>
  1. 而clearCartServlet类需要完成获取session然后移除掉之后可以重定定位跳转到product_list.jsp页面重新选择

清空session两种方式:

1
2
3
4
5
6

//1.强制干掉会话,里面存放的任何数据就都没有了。
session.invalidate();

//2.从session中移除某一个数据
//session.removeAttribute("cart");

clearCartServlet类代码如下:

1
2
3
4
5
6
7
8
9
10
11
12
13
14
15
16
public class clearCartServlet extends HttpServlet {
protected void doGet(HttpServletRequest request, HttpServletResponse response) throws ServletException, IOException {

//获取session
HttpSession session = request.getSession();

//移除值
session.removeAttribute("cart");

//使用重定位
response.sendRedirect("product_list.jsp"); //跳到product_list.jsp
}
protected void doPost(HttpServletRequest request, HttpServletResponse response) throws ServletException, IOException {
doGet(request, response);
}
}

五、完整分析和整理:

代码框架:

  • product_list.jsp页面:主要是用来写首页的样子(手机名称)
  • CarServlet类:主要是用来完成具体的操作;主要是完成点击商品之后获取商品id一存放商品,判断有没有然后增加可以跳转到继续购物(继续跳到首页)/购物车结算(cart.jsp页面)。
  • cart.jsp页面:主要是完成跳转后看到购物车里面有哪些东西,然后可以选择清空购物车
  • clearCartServlet类:主要是完成cart.jsp页面内的清空购物车,然后退出到首页。

六、具体代码如下

product_list.jsp页面

1
2
3
4
5
6
7
8
9
10
11
12
13
14
15
16
17
18
<%@ page language="java" contentType="text/html; charset=UTF-8"
pageEncoding="UTF-8"%>
<!DOCTYPE html PUBLIC "-//W3C//DTD HTML 4.01 Transitional//EN" "http://www.w3.org/TR/html4/loose.dtd">
<html>
<head>
<meta http-equiv="Content-Type" content="text/html; charset=UTF-8">
<title>Insert title here</title>
</head>
<body>

<a href="CarServlet?id=0"><h3>Iphone 8</h3></a><br>
<a href="CarServlet?id=1"><h3>小米6</h3></a><br>
<a href="CarServlet?id=2"><h3>三星Note8</h3></a><br>
<a href="CarServlet?id=3"><h3>魅族7</h3></a><br>
<a href="CarServlet?id=4"><h3>华为9</h3></a><br>

</body>
</html>

首页效果如下:

CarServlet类

1
2
3
4
5
6
7
8
9
10
11
12
13
14
15
16
17
18
19
20
21
22
23
24
25
26
27
28
29
30
31
32
33
34
35
36
37
38
39
40
41
public class CarServlet extends HttpServlet {	
protected void doGet(HttpServletRequest request, HttpServletResponse response) throws ServletException, IOException {
response.setContentType("text/html;charset=utf-8");

//1.先获取要添加到购物车的商品id
int id = Integer.parseInt(request.getParameter("id"));
String[] names= {"Iphone 8","小米6","三星Note8","魅族7","华为9"};
//获取到id对应的商品名字
String name=names[id];

//2.获取购物车存放东西的session-----Map<String ,Integer> 比如Iphone7 3
Map<String,Integer> map=(Map<String, Integer>) request.getSession().getAttribute("cart"); //取值getAttribute
if(map==null)
{
map=new LinkedHashMap<String,Integer>();
request.getSession().setAttribute("cart", map); //存值
}

//3.判断购物车有没有这个物品
if(map.containsKey(name)) //map里面有一个遍历的方法
{
//在原来基础上+1
map.put(name, map.get(name)+1);
}
else
{
//从来没买过直接设置为1
map.put(name, 1);
}

//4.输出界面(跳转)
response.getWriter().write("<a href='product_list.jsp'><h3>继续购物</h3></a>");
response.getWriter().write("<a href='cart.jsp'><h3>去购物车结算</h3></a>");

}

protected void doPost(HttpServletRequest request, HttpServletResponse response) throws ServletException, IOException {
doGet(request, response);
}

}

商品点击后的二级页面如下:

cart.jsp页面

1
2
3
4
5
6
7
8
9
10
11
12
13
14
15
16
17
18
19
20
21
22
23
24
25
26
27
28
29
30
31
32
33
34
35
36
37
<%@ page language="java" contentType="text/html; charset=UTF-8"
pageEncoding="UTF-8"%>
<%@page import="java.util.Map"%>
<!DOCTYPE html PUBLIC "-//W3C//DTD HTML 4.01 Transitional//EN" "http://www.w3.org/TR/html4/loose.dtd">
<html>
<head>
<meta http-equiv="Content-Type" content="text/html; charset=UTF-8">
<title>Insert title here</title>
</head>
<body>

<h2>您的购物车的商品如下:</h2>
<%
//1.先获取map
Map<String,Integer> map=(Map<String,Integer>)session.getAttribute("cart");

//2.遍历map
if(map!=null)
{
for(String key:map.keySet())
{
int value=map.get(key);
//key:商品名称
//value:商品个数
//<h3>名称:Iphone 数量:6</h3>
%>
<h3>名称:<%=key %> 数量:<%=value %></h3> <br>
<%
}
}
%>

<a href="clearCartServlet"><h4>清空购物车</h4></a>

</body>
</html>

商品点击清空购物车的页面如下:

clearCartServlet类

1
2
3
4
5
6
7
8
9
10
11
12
13
14
15
public class clearCartServlet extends HttpServlet {
protected void doGet(HttpServletRequest request, HttpServletResponse response) throws ServletException, IOException {

//获取session
HttpSession session = request.getSession();
//移除值
session.removeAttribute("cart");
//使用重定位
response.sendRedirect("product_list.jsp"); //跳到product_list.jsp
}

protected void doPost(HttpServletRequest request, HttpServletResponse response) throws ServletException, IOException {
doGet(request, response);
}
}

Cookie获取商品浏览记录

一、前期准备

  1. 拷贝第一天html那天的资料-WEB01-将所有的文件全部拷贝到Web工程里面的WebContent里面。
  2. 在WebContent新建一个product_list.jsp的jsp文件,然后拷贝原来product_list.html的html标签内容替换掉jsp里面的html。(方便后面可以进行实现和消除浏览记录的操作)
  3. 将product_info.html的手机数码的超链接改为product_list.jsp(为了能够点进去商品之后退出到刚才的很多商品列表)

  1. 将首页index.html里面的手机数码的跳转位置改为product_list.jsp

二、servlet代码编写

  1. 将商品列表里面的product_list.jsp每个class下面的herf改成<a href="ProductInfoServlet?id=1/2/3/4/5/6">(其中每个ProductInfoServlet是xml注解里面url路径)

  1. 去写一个关于存储浏览过哪些的页面的类:

由getValue获得以前的cookie的值,然后使用setValue将原来new的id和现在ids加在一起,其实就是形成1#2#3#4等这种形式,然后在浏览记录(jsp中写java代码)中要实现显示出对应的图片

1
2
3
4
//1.获取以前的cookie(在19行代码已经匹配判断过)
String ids = cookie.getValue();
//2.让现在浏览的商品和以前的商品形成cookie新的值 -----可以展示 1#2#4#3等等的样子表明我已经点击过哪些
cookie.setValue(id+"#"+ids);

完整的代码:

1
2
3
4
5
6
7
8
9
10
11
12
13
14
15
16
17
18
19
20
21
22
23
24
25
26
27
28
29
30
31
32
33
34
35
36
37
public class ProductInfoServlet extends HttpServlet {
protected void doGet(HttpServletRequest request, HttpServletResponse response) throws ServletException, IOException {

//获取当前用户准备浏览的商品ID
String id = request.getParameter("id");

Cookie[] cookies = request.getCookies();
Cookie cookie = CookieUtil.findCookie(cookies, "histroy"); //将之前写好的匹配的代码拷贝过来(在cookie实现上次访问时间代码中)

if(cookie ==null)//第一次浏览
{
//1.创建cookie
Cookie c=new Cookie("history",id); //创建了一个名 history 值为id的cookie
//2.将新建的cookie要响应给浏览器(客户端)
response.addCookie(c);
//3.跳转到具体界面
response.sendRedirect("product_info.htm");
}
else //第二次浏览
{
//1.获取以前的cookie(在19行代码已经匹配判断过)
String ids = cookie.getValue();
//2.让现在浏览的商品和以前的商品形成cookie新的值 -----可以展示 1#2#4#3等等的样子表明我已经点击过哪些
cookie.setValue(id+"#"+ids);
//2.将新建的cookie要响应给浏览器(客户端)
response.addCookie(cookie);
//3.跳转到具体界面
response.sendRedirect("product_info.htm");
}

}

protected void doPost(HttpServletRequest request, HttpServletResponse response) throws ServletException, IOException {
doGet(request, response);
}

}

三、实现浏览记录

介绍jsp的用法(jsp里面只能写java代码)

1.定义全局变量
    <%! int a=990; %>
2.定义局部变量
    <%  int b=99; %>
3.在jsp页面上,显示a和b的值
    <%=a %>
    <%=b %>

更改的位置大概在(product_list.jsp的商品浏览记录左右):

1
2
3
4
5
6
7
8
9
10
11
12
13
14
15
16
17
18
19
20
21
22
23
24
25
<div style="overflow: hidden;">
<ul style="list-style: none;">
<%
Cookie[] cookie=request.getCookies();
Cookie cook=CookieUtil.findCookie(cookie,"history");
if(cookie==null)
{
%>
<h2>你还没有浏览商品!</h2>
<%
}
else
{
String[] id=cook.getValue().split("#"); //将1#2#3#4#5 拆分成 1 2 3 4 5
for(String i:id)
{
%>
//后面把图片改成<%=i %>形式可以弹出对应的的图片
<li style="width: 150px;height: 216;float: left;margin: 0 8px 0 0;padding: 0 18px 15px;text-align: center;"><img src="products/1/cs1000<%=i %>.jpg" width="130px" height="130px" /></li>
<%
}
}
%>
</ul>
</div>

四、清除浏览记录

  1. 在刚才改实现留记录的div下面写一个标签href=”清除的那个类”(提示一行可以清除记录)

  2. 新建一个清除的类(只能通过设置MaxAge=0)

1
2
3
4
Cookie cookie = new Cookie("history","");
cookie.setMaxAge(0); //设置立即删除
cookie.setPath("/CookieDemo02");
response.addCookie(cookie); //给客户端添加一个cookie

Cookie获取上次登录时间

一、Cookie获取上次登录时间#

  主要是由一个index.html的前端浏览器代码写出登录需要的用户密码提交按钮,然后通过servlet提交到另外一个Demo03程序(新建CookieUtil完成所有cookies和所要的cookie对比的功能)之中。

  由Demo03先去写由request得到用户名和密码然后if判断用户名是否正确:
  1.如果不正确弹出密码错误,由于输出中文需要提前写好response.setContenType那行文字编码。
  2.如果是正确进入之后获取所有的cookies值,调用方法判断是不是所要的cookie,
    2.1如果是null那么就是没有cookie需要完成的是设置一个名为last,值为当前时间的cookie,然后将它添加到客户端,输出语句。
    2.2如果cookie存在,那就只需要输出上一次最近的访问时间。

客户端用于写按钮的index.html代码如下:

1
2
3
4
5
6
7
8
9
10
11
12
13
14
<!DOCTYPE html>
<html>
<head>
<meta charset="UTF-8">
<title>Insert title here</title>
</head>
<body>
<form action="Demo03">
账号: <input type="text" name="username"/><br>
密码: <input type="text" name="password"/><br>
<input type="submit" value="登录"/><br>
</form>
</body>
</html>

用于匹配判断是不是存在有的CookieUtil的类代码如下:

1
2
3
4
5
6
7
8
9
10
11
12
13
14
public class CookieUtil {
public static Cookie findCookie(Cookie[] cookies,String name) {
if(cookies !=null)
{
for (Cookie cookie :cookies)
{
if(name.equals(cookie.getName())) { //从一个cookie数组中找到具体的对象
return cookie;
}
}
}
return null;
}
}

Demo03主要类代码如下:

1
2
3
4
5
6
7
8
9
10
11
12
13
14
15
16
17
18
19
20
21
22
23
24
25
26
27
28
29
30
31
32
33
34
35
36
37
38
39
40
41
42
43
44
public class Demo03 extends HttpServlet {
protected void doGet(HttpServletRequest request, HttpServletResponse response) throws ServletException, IOException {
response.setContentType("text/html;charset=utf-8"); //解决中文乱码问题
String username=request.getParameter("username");
String password=request.getParameter("password");

if("admin".equals(username)&&"123".equals(password))
{

//获取所有的cookie值
Cookie[] cookies = request.getCookies();

Cookie cookie = CookieUtil.findCookie(cookies, "last"); //在匹配的类里面去放数组找last配对的值

if(cookie==null) //第一次登录 --设置一个cookie--然后设置有效期--添加到客户端
{
Cookie c=new Cookie("last",System.currentTimeMillis()+""); //因为一会在数组找last那个 value写当前时间戳
c.setMaxAge(60*60); //设置cookie有效值(1小时)
response.addCookie(c);
response.getWriter().write("欢迎您"+username); //使用字符流 但是要改中文的问题
}
else //第二次登陆 已经有了cookie --输出cookie值
{
//1.取之前的cookie值
Long lastVisitTime = Long.parseLong(cookie.getValue()); //转成long型
//2.输出到界面
response.getWriter().write("欢迎您"+username+",上次来访时间是:"+new Date(lastVisitTime)); //使用字符流 但是要改中文的问题
//3.重置时间
cookie.setValue(System.currentTimeMillis()+""); //使用时间戳
response.addCookie(cookie);
}

}

else
{
response.getWriter().write("登陆失败!请退出重新输入!"); //使用字符流 但是要改中文的问题
}
}

protected void doPost(HttpServletRequest request, HttpServletResponse response) throws ServletException, IOException {
doGet(request, response);
}
}

用户admin和密码123第一次进入是欢迎界面,第二次界面为弹出上次登录时间:


Session

一、Session(会话)以及常用的API方法

Session是基于Cookie的一种会话机制。数据存放在服务器端。

1
2
3
4
5
6
7
8
9
10
11
12
13
HttpSession session = request.getSession(); //和Cookie一样由request调用得到

//得到会话的ID
String id = session.getId();

//存值
session.setAttribute(name, value); //设置值

//取值
session.getAttribute(name);

//移除值
session.removeAttribute(name);

二、Session简单使用

  • 创建

    如果有在servlet里面调用了 request.getSession()

  • 销毁

session是存放在服务器的内存中的一份数据,当然可以持久化,Redis。即使关闭浏览器也不会销毁

  1. 关闭服务器
  2. session会话时间过期(默认有效期:30分钟)

举例:

1
2
3
4
5
6
7
8
9
10
11
12
13
14
15
16
17
18
19
20
21
22
23
24
package Servlet;
import java.io.IOException;
import javax.servlet.ServletException;
import javax.servlet.http.HttpServlet;
import javax.servlet.http.HttpServletRequest;
import javax.servlet.http.HttpServletResponse;
public class LoginServlet extends HttpServlet {
protected void doGet(HttpServletRequest request, HttpServletResponse response) throws ServletException, IOException {

//使用字节流/字符流需要使用文字编码
response.setContentType("text/html;charset=utf-8");

//使用session的getId()获得id
String sessionid = request.getSession().getId();
System.out.println("sessionid="+sessionid);//JAVA的控制台输出

response.getWriter().write("收到请求了!"); //浏览器输出
}

protected void doPost(HttpServletRequest request, HttpServletResponse response) throws ServletException, IOException {
doGet(request, response);
}

}

Cookie

一、Cookie概述

服务器给客户端并且存在客户端(浏览器)上的一份小数据

  • 应用场景:

    自动登录、浏览记录、浏览器

  • 为什么有这个Cookie

    http的请求是无状态。 客户端与服务器在通讯的时候是无状态,其实就是客户端在第二次来访的时候,服务器根本就不知道这个客户端以前有没有来访问过。 为了更好的用户体验,更好的交互 [自动登录],其实从公司层面讲,就是为了更好的收集用户习惯[出现了大数据]。


二、Cookie应用

1. 服务器–生成一个cookie(response.addCookie())

主要是使用Cookie创建一个对象,然后对象调用addCookie()方法就可以添加。
第二次打开浏览器就会在http(客户端收到消息)中加一个 Set-Cookie:选项

1
2
3
4
5
6
7
8
9
10
11
12
13
14
15
public class Demo01 extends HttpServlet {
protected void doGet(HttpServletRequest request, HttpServletResponse response) throws ServletException, IOException {
response.setContentType("text/html;charset=utf");//response添加中文的方法

Cookie cookie=new Cookie("aa","bb");
//给响应添加一个cookie
response.addCookie(cookie);

response.getWriter().write("成功了!");

}
protected void doPost(HttpServletRequest request, HttpServletResponse response) throws ServletException, IOException {
doGet(request, response);
}
}

2. 客户端–遍历(for循环)所有的cookie(request.getCookies())

主要代码:

1
2
3
4
5
6
7
8
9
10
Cookie[] cookies = request.getCookies();  //客户端request.getCookies获取
if(cookies !=null)
{
for(Cookie c:cookies) //增强for循环输出
{
String value = c.getValue(); 使用get方法获取cookie的信息
String name = c.getName();
System.out.println(name+" "+value);
}
}

完整代码如下:

1
2
3
4
5
6
7
8
9
10
11
12
13
14
15
16
17
18
19
20
21
22
23
24
25
26
27
28
29
30
31
public class Demo01 extends HttpServlet {
protected void doGet(HttpServletRequest request, HttpServletResponse response) throws ServletException, IOException {
response.setContentType("text/html;charset=utf");//response添加中文的方法
//方法参数要什么就给什么
//创建对象几种方法: 1. 直接new 2. 单例模式/提供静态方法 3. 工厂模式构建 StuFactory StuBuilder

Cookie cookie=new Cookie("aa","bb");

//服务器端给客户端添加一个cookie
response.addCookie(cookie);

response.getWriter().write("成功了!");

//获取客户端带过来的cookie
Cookie[] cookies = request.getCookies();
if(cookies !=null)
{
for(Cookie c:cookies)
{
String value = c.getValue();
String name = c.getName();
System.out.println(name+" "+value);
}
}

}

protected void doPost(HttpServletRequest request, HttpServletResponse response) throws ServletException, IOException {
doGet(request, response);
}
}

3. 给cookie设置有效期(setMaxAge())以及指定域名打开(setDomain)和指定路径(setPath)

  • 3.1有效期–cookie.setMaxAge()

    1.一般不设置的话默认----关闭浏览器,cookie就消失
    2.设置的话:
            2.1:正值:过了这个值就失效
            2.2:负值:(默认-1) 关闭浏览器,cookie就消失
  • 3.2域名–cookie.setDomain(“.xxxx.com”)

  • 3.3域名下的路径–cookie.setPath(“/yyy”)

    两者合在一起就是给ww.xxxx.com/yyy/这个地址才可以增加cookie

主要代码如下:(已经有创建了一个cookie)

1
2
3
4
5
6
7
8
9
10
11
12
13
14
15
//先写cookie对象
Cookie cookie=new Cookie("name","zhangsan");

//创建cookie的有限期
//cookie的有效期没有设置的话默认是关闭浏览器就没有了
//正值:在这个时间后就失效
//负值:默认-1.关闭浏览器就会失效
cookie.setMaxAge(60*60*24*7); //以秒为单位

//设置指定域名才会带上cookie
cookie.setDomain(".larkkkkkkk.com");
//设置访问该域名下的lark路径才会带上cookie ----相当于 www.larkkkkkkk.com/lark/
cookie.setPath("/lark");

response.addCookie(cookie);//服务器response添加一个cookie

完整代码如下:

1
2
3
4
5
6
7
8
9
10
11
12
13
14
15
16
17
18
19
20
21
22
23
24
25
26
27
28
29
30
31
32
33
34
35
36
37
38
39
40
41
42
43
44
45
46
47
48
49
50
51
52
package Servlet;
import java.io.IOException;
import javax.servlet.ServletException;
import javax.servlet.http.Cookie;
import javax.servlet.http.HttpServlet;
import javax.servlet.http.HttpServletRequest;
import javax.servlet.http.HttpServletResponse;
public class Demo02 extends HttpServlet {

protected void doGet(HttpServletRequest request, HttpServletResponse response) throws ServletException, IOException {

//客户端request遍历所有cookie信息
Cookie[] cookies = request.getCookies(); //request获取所有的cookie
if(cookies !=null)
{
for (Cookie cookie :cookies)
{
System.out.println(cookie.getName()+" = "+cookie.getValue());
}
}

//先写cookie对象
Cookie cookie=new Cookie("name","zhangsan");

//创建cookie的有限期
//cookie的有效期没有设置的话默认是关闭浏览器就没有了
//正值:在这个时间后就失效
//负值:默认-1.关闭浏览器就会失效
cookie.setMaxAge(60*60*24*7); //以秒为单位

//设置指定域名才会带上cookie
cookie.setDomain(".larkkkkkkk.com");

//设置访问该域名下的lark路径才会带上cookie ----相当于 www.larkkkkkkk.com/lark/
cookie.setPath("/lark");

response.addCookie(cookie);//服务器response添加一个cookie


//cookie2对象
Cookie cookie2=new Cookie("age","18");
response.addCookie(cookie2);//服务器response添加一个cookie


response.getWriter().write("hello Cookie..."); //响应给浏览器展示
}

protected void doPost(HttpServletRequest request, HttpServletResponse response) throws ServletException, IOException {
doGet(request, response);
}

}

,