Spring整合Mybatis

Spring整合Mybatis

导入jar包

创建数据库

spring的bean标签代替mybatis全局配置文件

1
2
3
4
5
6
7
8
9
10
11
12
13
14
15
16
17
18
19
20
21
22
23
24
25
26
27
28
29
<?xml version="1.0" encoding="UTF-8"?>

<beans xmlns="http://www.springframework.org/schema/beans"
xmlns:xsi="http://www.w3.org/2001/XMLSchema-instance"
xsi:schemaLocation="http://www.springframework.org/schema/beans
http://www.springframework.org/schema/beans/spring-beans.xsd">

<!-- 数据封装类
替换mybatis里面连接数据库的文件 spring-jdbc.jar -->
<bean id="dataSouce" class="org.springframework.jdbc.datasource.DriverManagerDataSource">
<property name="driverClassName" value="com.mysql.jdbc.Driver"></property>
<property name="url" value="jdbc:mysql://localhost:3306/ssm"></property>
<property name="username" value="root"></property>
<property name="password" value="njdxrjgc7777777."></property>
</bean>


<!-- 创建SqlSessionFactory对象 -->
<bean id="factory" class="org.mybatis.spring.SqlSessionFactoryBean">
<property name="dataSource" ref="dataSouce"></property> <!-- 跳转到关于有数据库信息的bean -->
</bean>

<!-- 扫描器 相当于mybatis配置文件中mappers下的package标签 扫描mapper包下会给对应接口创建对象 -->
<bean class="org.mybatis.spring.mapper.MapperScannerConfigurer">
<property name="basePackage" value="com.bjsxt.mapper"></property>
<property name="sqlSessionFactory" ref="factory"></property> <!-- 跳转到factory的bean里面 -->
</bean>

</beans>

准备实体类

1
2
3
4
5
6
7
8
9
10
11
12
13
14
15
16
17
18
19
20
21
22
23
24
25
26
27
public class Airport {
private int id;
private String portName;
private String cityName;
public int getId() {
return id;
}
public void setId(int id) {
this.id = id;
}
public String getPortName() {
return portName;
}
public void setPortName(String portName) {
this.portName = portName;
}
public String getCityName() {
return cityName;
}
public void setCityName(String cityName) {
this.cityName = cityName;
}
@Override
public String toString() {
return "Airport [id=" + id + ", portName=" + portName + ", cityName=" + cityName + "]";
}
}

使用接口绑定写sql语句

1
2
3
4
5
6
public interface AirportMapper {

@Select("select * from airport") //注解的方式写sql语句
List<Airport> selAll(); //返回值是实体类的一个list形式

}
1
--------

使用接口写查询结果方法

1
2
3
public interface AirportService {
List<Airport> show(); //返回值是实体类的一个list形式
}

使用实现类实现接口方法

1
2
3
4
5
6
7
8
9
10
11
12
13
14
15
16
17
18
19
20
public class AirportServiceImpl implements AirportService {

//添加接口实现
private AirportMapper airportMapper;

//生成get和set方法
public AirportMapper getAirportMapper() {
return airportMapper;
}

public void setAirportMapper(AirportMapper airportMapper) {
this.airportMapper = airportMapper;
}

//实现service层接口方法
@Override
public List<Airport> show() {
return airportMapper.selAll();
}
}

在配置文件中加bean

1
2
3
4
5

<!-- 由spring管理service类 -->
<bean id="airportService" class="com.bjsxt.service.impl.AirportServiceImpl">
<property name="airportMapper" ref="airportMapper"></property> <!-- 实现类里面的那个对象在这里配置 -->
</bean>

test类

1
2
3
4
5
6
7
8
9
10
11
12
13

public class Test {
public static void main(String[] args) {

//找spring容器配置文件地址
ApplicationContext ac=new ClassPathXmlApplicationContext("applicationContext.xml"); //默认从classes文件夹根目录开始寻找
//执行方法
AirportServiceImpl bean = ac.getBean("airportService",AirportServiceImpl.class); //通过bean去实例化
List<Airport> list = bean.show(); //调用接口实现类方法
System.out.println(list);

}
}

总结

代码框架

执行过程分析

1. 准备jar包和数据库    
2. 准备好实体类(和数据库对的上)
3. 准备配置文件
    1. 准备替换mybatis和数据库连接信息的bean
    2. 准备刚才替换mybatis的文件的读入的bean
    3. 准备创建扫描器(相当于mappers下面的package标签)
    4. 准备要被spring管理的service类
4. 准备接口绑定的接口写sql语句
5. 准备service接口写返回的方法
6. 准备实体类实现接口返回结果
    1. 要准备接口绑定接口的对象
    2. 生成get和set方法
    3. 实现接口方法 返回结果!!
7. 准备service的bean
8. 准备实现test测试类
    1. 通过ApplicationContext找配置文件
    2. 通过对象调用bean方法查找到配置文件中的关于service类的bean去找实现类实现

执行结果:


Spring给Bean注入

给Bean属性赋值(注入)

1. 通过有参构造方法设置
2. 设置注入(set方法)

设置注入(set方法)

属性:基本数据类型/String

value标签

1
2
3
4
5
6
7
8
9
10
11
12
13
14
15
16
//第一种:
<bean id="peo" class="com.bjsxt.pojo.People">
<property name="id" value="222"></property>
<property name="name" value="zhangsan"></property>
</bean>

//第二种:
<bean id="peo" class="com.bjsxt.pojo.People">
<property name="id">
<value>222</value>
</property>

<property name="name">
<value>zhangsan</value>
</property>
</bean>

属性:Set<?>

set标签 – value标签

1
2
3
4
5
6
7
<property name="set">
<set>
<value>1</value>
<value>2</value>
<value>3</value>
</set>
</property>

属性:List<?>

list标签 – value标签

1
2
3
4
5
6
7
<property name="list">
<list>
<value>1</value>
<value>2</value>
<value>3</value>
</list>
</property>

属性:数组

array标签 – value标签

1
2
3
4
5
6
7
<property name="strs">
<array>
<value>1</value>
<value>2</value>
<value>3</value>
</array>
</property>

属性:map

map标签 – entry标签(key value属性)

1
2
3
4
5
6
<property name="map">
<map>
<entry key="a" value="b"></entry>
<entry key="c" value="d"></entry>
</map>
</property>

属性:properties

pros标签 – prop标签(key属性)

1
2
3
4
5
6
<property name="demo">
<props>
<prop key="key1">value1</prop>
<prop key="key2">value2</prop>
</props>
</property>

DI (依赖注入)

Dependency Injection:类A依赖类B对象,把B赋值给A的过程就叫做依赖注入

DI和Ioc其实是一样的!!!(Ioc是将创建对象的步骤交给spring去做)

1
2
3
4
5
6
7
8
<bean id="peo" class="com.bjsxt.pojo.People">
<property name="desk" ref="desk"></property> //ref是可以跳转到bean里面id叫做desk的bean
</bean>

<bean id="desk" class="com.bjsxt.pojo.Desktop">
<property name="id" value="1"></property>
<property name="price" value="77"></property>
</bean>

Spring

Spring概述

Rod Johnson提出轮子理论:不用重复发明轮子(直接使用写好的代码)

  • Spring核心功能

    1. IoC/DI    控制反转/依赖注入
    2. AOP       面向切面编程
    3. 声明式事务

框架分析

框架图(八个部分)

具体讲解

Test

test:spring提供测试功能

Core Container

1. Beans:创建类对象并管理对象
2. Core:核心类
3. Context:上下文参数 获取外部资源/管理注解
4. spEl:expression.jar

AOP

AOP:实现aop功能需要依赖

Aspects

Aspects:切面AOP依赖的包

Instrumentation

Messaging

Data Access / Integration

1. JDBC: spring对于JDBC封装后的代码
2. ORM:封装持久层框架的代码(ssh里面的Hibernate)
3. transactions:对应spring-tx.jar -- 声明式事务使用

Web

spring完成web相关功能
例:tomcat加载spring配置文件时需要sping-web包

spring容器

1. 容器(Container):Spring当作一个大容器
2. ApplicationContext接口(老版本的BeanFactory接口)的子接口
3. Spring3之后将sping框架的功能拆分为多个jar

Ioc 控制反转(Inversion of Control)

将原来要new实例化对象 –> 交给spring完成

  1. 控制: 控制类的对象

  2. 反转: 交给spring负责

  3. Ioc最大作用:解耦


Spring环境搭建

导入jar

新建applicationContext.xml配置文件

关于配置文件的知识点:

1
2
3
4
1. Spring配置文件信息内容 --> Spring容器ApplicationContext
2. Spring配置文件基于schema(文件扩展名.xsd)
3. schema是DTD升级版
4. Spring配置文件引入一个xsd就有一个namespace(xmlns就是去找相关文档位置)

具体写法:

1
2
3
4
5
6
7
8
9
10
11
12

<?xml version="1.0" encoding="UTF-8"?>

<beans xmlns="http://www.springframework.org/schema/beans"
xmlns:xsi="http://www.w3.org/2001/XMLSchema-instance"
xsi:schemaLocation="http://www.springframework.org/schema/beans
http://www.springframework.org/schema/beans/spring-beans.xsd">

<!-- id 表示获取到对象标识 class 创建哪个类的对象 -->
<bean id="peo" class="com.bjsxt.pojo.People"/> // bean标签去创建对象 id用来之后getBean中第一个参数调用 class是写具体类的全路径

</beans>

编写实体类

1
2
3
4
5
6
7
8
9
10
11
12
13
14
15
16
17
18
19
20
21
22

public class People {
private int id;
private String name;

public int getId() {
return id;
}
public void setId(int id) {
this.id = id;
}
public String getName() {
return name;
}
public void setName(String name) {
this.name = name;
}
@Override
public String toString() {
return "People [id=" + id + ", name=" + name + "]";
}
}

编写测试类

分析使用

1. 对比getBean()和getBeanDefinitionNames()方法
     getBean()方法两个参数:
        第一个:配置文件中bean标签id值
        第二个:返回值类型(默认Object)         
     getBeanDefinitionNames() Spring容器中目前所有管理的所有对象

2. 要使用ApplicationContext容器 -- 我们暂时用ClassPathXmlApplicationContext去获取资源

具体实现

1
2
3
4
5
6
7
8
9
10
11
12
13
14
15
public class Test {
public static void main(String[] args) {

ApplicationContext ac = new ClassPathXmlApplicationContext("applicationContext.xml");
People people = ac.getBean("peo",People.class);
System.out.println(people);

String[] names = ac.getBeanDefinitionNames();
for (String string : names)
{
System.out.println(string);
}

}
}

Spring创建对象的三种方式

1. 构造方法创建
     无参构造创建:默认
     有参构造创建:需要明确配置

2. 实例工厂

3. 静态工厂

构造方法创建(bean标签更改)

实体类创建好无参构造方法和有参构造方法

1
2
3
4
5
6
7
8
9
10
11
12
13
14
15
16
17
18
public People(){
super();
System.out.println("执行无参构造方法");
}

public People(int id,String name){
super();
this.id=id;
this.name=name;
System.out.println("执行有参构造方法1");
}

public People(String name,int id){
super();
this.id=id;
this.name=name;
System.out.println("执行有参构造方法2");
}

无参构造方法

1
<bean id="peo" class="com.bjsxt.pojo.People"/>   //直接简单的写id和class即可

有参构造方法(constructor-arg标签)

四个属性(可以区别用哪个有参构造方法 默认是用最下面的!!!!)

index:参数索引(0开始)
value:参数对应值
name:参数名
type:区别关键字和封装类(int和Integer)
1
2
3
4
<bean id="peo" class="com.bjsxt.pojo.People"> 
<constructor-arg index="0" name="id" type="int" value="123"></constructor-arg>
<constructor-arg index="1" name="name" type="java.lang.String" value="zhangsan"></constructor-arg>
</bean>

实例工厂(先工厂后对象)#

生成一个实例工厂

1
2
3
4
5
public class PeopleFactory{
public People newInstance(){ //一般都叫newInstance()
return new People(1,"测试");
}
}

配置文件配置工厂对象

1
2
3
4
5
6
7
// 原来代码格式:
PeopleFactory factory=new PeopleFactory()
People P1=factory.newInstance();

<bean id="factory" class="com.bjsxt.pojo.PeopleFactory"></bean> //用了后面类创建了一个工厂对象叫factory

<bean id="p1" factory-bean="factory" factory-method="newInstance"></bean> //用上面的factory工厂对象调用newInstance方法 返回为p1

静态工厂(快速创建对象)

不需要工厂(静态方法直接用)

1
2
3
4
5
public class PeopleFactory{
public static newInstance(){ //一般都叫newInstance() static静态!!!!
return new People(1,"测试");
}
}

配置文件调用方法

1
2
3
4
// 原来代码格式:
People P2=PeopleFactory.newInstance();

<bean id="p2" class="com.bjsxt.pojo.PeopleFactory" factory-method="newInstance"></bean> //直接调用静态newInstance方法

Mybatis运行原理总结

Mybatis运行原理

运行过程中涉及的类

1. Resources Mybatis中的IO流的工具类 : 加载配置文件
2. SqlSesssionFactoryBuilder()构建器 :创建SqlSessionFactory接口的实体类
3. XMLConfigBuilder() : Mybatis全局配置文件内容构造器类 --读取流内容并转为JAVA代码
4. Configuration: 封装全局配置文件所有内容 
5. DefaultSqlSessionFactory():是SqlSessionFactory()接口实现类
6. Transaction:事务类 -- 每一个sqlssion都有一个transaction对象
7. TransactionFactory:事务工厂
8. Executor: Mybatis执行器
9. SimpleExecutor: 默认执行器
10. BatchExcutor:批量操作
11. openSession:参数控制:
12. DefaultSqlSession:SqlSession接口实现类
13. ExcptionFactory:异常工厂

流程图

文字描述

1. Mybatis执行时先要通过Resources加载全局配置文件
2. 通过实例化SqlSessionFactoryBuilder构建器 -- 帮助SqlSessionFactory接口实现类DefaultSqlSessionFactory
3. 用XmlConfiguration解析全局配置文件 
4. 将解析结果给Configuration --> 最后又给了DefaultSqlSessionFactory

----

5. 由SqlSessionFactory工厂创建SqlSession
6. 每次创建SqlSession都必须要要用TransactionFactory创建Transaction对象
7. 有了事务对象之后就需要有Excutor执行器
8. 创建实例化DefaultSqlSession传给SqlSession接口
9. 进行不同的JDBC
10. 成功就提交 --关闭
11. 不成功就回滚事务

Mybatis注解

注解(简化配置文件)

Mybatis的注解简化mapper.xml文件(涉及动态SQL就不可用(×))

注解和全局配置文件mapper.xml共存!!!

注解的简单实用

使用注解:
        1. package标签(用接口里面写注解)
        2. mapper标签里面用class属性(原来是resource取对应配置文件)

例:
    1. 第一种用package的方式:    
     <mappers>
        <package name="com.bjsxt.com"/>  //因为后面的被对应的配置文件用别名起了
    </mappers>

    2. 第二种更改class属性

    <mappers>
        <mapper class="com.bjsxt.com.XXXMapper"/>
    </mappers>

package(接口内写注解)

1. 查询 @Select

1
2
@Select("select * from teacher")
List<Teacher> selAll();

2. 新增 @Insert

1
2
@Insert("insert into teacher values(default,#{name})" )
int insTeacher(Teacherteacher);

3. 修改 @Update

1
2
@Update("update teacher set name=#{name} where id=#{id}" )
int upd Teacher(Teacherteacher);

4. 刪除 @Delete

1
2
@Delete("delete from teacher whereid=#{0}" )
int delById(intid);

注解实现resultMap功能(老师和学生的例子)

其实就是一些注解名和resultMap标签对等

学生接口添加注解

1
2
@Select("select * from student wheret id=#{0}")  //相当于student配置文件里面写sql语句
List<Student> selByTid(int tid);

老师接口添加注解

1
2
3
4
5
6
7
8
9
@Results(       //相当于resultMap标签
value={
@Result(id=true,property="id",column="id"), //相当于id/result标签
@Result(property="name",column="name"),
@Result(property="list",column="id",many=@Many(select="com.bjsxt.mapper.StudentMapper.selByTid")) //Many相当于collection(集合对象)
})

@Select("select * from teacher")
List<Teacher> selTeacher();

总结

1.     @Results()   == resultMap标签
2.     @Result()    == id/result标签 (主键/其他键)
3. @Result(id=true) == id标签
4.      @Many()     == collection标签 (集合对象)
5.      @One()      == association标签 (单个对象)

使用Mybatis的动态Sql实现多表查询

具体实现(student项目)

创建数据库

1
2
3
4
5
6
7
8
9
10
11
create table teacher(
id int(10) primary key auto_increment,
name varchar(20)
);

create table student(
id int(10) primary key auto_increment,
name varchar(20),
age int(3),
tid int(10)
);

数据库情况:

学生表添加外键:

搭建环境

1. 导入相关jar包
2. 准备mybatis.xml全局配置文件(里面利用package标签找那个接口!!!!)
3. 准备student实体类
4. 准备teacher实体类
5. 准备pageInfo分页实体类
6. 准备实现类接口StudentMapper
...

Mybatis实现多表查询方式

多表查询三种方式

1. 业务装配:
    两表单表查询 -- 在业务(service)将查询结果关联
2. 通过Auto Mapping特性
    两表联合查询 -- 通过别名完成映射    
3. 使用Mybatis的resultMap标签进行实现

类中(其他类) 分类

1. 单个对象

2. 集合对象

单表resultMap

resultMap标签(mapper.xml中)

程序员控制sql查询结果与实体类的映射关系
默认:Mybatis使用Auto Mapping特性(resultType属性)
更改:Mybatis使用resultMap属性引用resultMap标签(不写resultType属性)

具体操作

1. 数据库(id和name两列):

2. 实体类(我们用id1和name1区别)

1
2
3
4
5
6
7
8
9
10
11
12
13
14
15
16
17
18
public class Teacher {
private int id1;
private String name1;

public int getId1() {
return id1;
}
public void setId1(int id1) {
this.id1 = id1;
}
public String getName1() {
return name1;
}
public void setName1(String name1) {
this.name1 = name1;
}

}

3. 在TeacherMapper.xml配置文件中使用resultMap标签:

1
2
3
4
5
6
7
8
9
10
11
12
13
14
<mapper namespace="com.bjsxt.mapper.TeacherMapper">

<resultMap type="teacher" id="mymap">
<!-- 主键用id -->
<id column="id" property="id1"/>
<!-- 其他列用result -->
<result column="name" property="name1"/>
</resultMap>

<select id="selAll" resultMap="mymap">
select * from teacher
</select>

</mapper>

单表总结使用

1. 实体类去写需要映射的名称(id和name 实体类就写id1和name1)
2. 配置文件中select里面把resultType改成使用resultMap属性 
    注: resultMap属性值 == resultMap标签的id值
3. 书写resultMap标签
    注: resultMap两个属性一个是类型 一个是和select里面属性匹配的id
         主键使用id标签 其他列用result标签
         里面column写的是数据库的名称 property写的是映射的实体类名称

resultMap实现关联单个对象(N+1方式) association标签

就是先查询出一个表的全部信息 然后根据这个表的信息再查另外一个表的信息(两个表合并)

具体操作

1. 学生数据库的tid是刚才老师id的外键

2. 学生实体类除了自己的属性还要有一个老师的对象

1
2
3
4
5
6
 //只列举了变量
private int id;
private String name;
private int age;
private int tid;
private Teacher teacher; //老师类的对象!!!!!!

3. 学生配置文件(通过association标签把tid给老师的sql语句中当做id)

1
2
3
4
5
6
7
8
9
10
11
12
13
14
15
16
17
<mapper namespace="com.bjsxt.mapper.StudentMapper">

<resultMap type="student" id="linahe">

<id column="id" property="id"/>
<result column="name" property="name"/>
<result column="age" property="age"/>
<result column="tid" property="tid"/>
<association property="teacher" select="com.bjsxt.com.TeacherMapper.selById" column="tid"></association>

</resultMap>

<select id="selAll" resultMap="lianhe">
select * from student
</select>

</mapper>

4. 老师配置文件(只写根据id查老师信息的sql语句)

1
2
3
4
5
6
7
<mapper namespace="com.bjsxt.mapper.TeacherMapper">

<select id="selById" resultType="teacher" parameterType="int"> //只需要写好根据id查老师的sql操作
select * from teacher where id=#{id}
</select>

</mapper>

结果分析

图例分析流程:

具体实现过程:

1. 准备老师和学生类(要有老师类对象)
2. 准备老师的配置文件(通过id查询结果)
3. 准备学生的配置文件
    3.1 先写自己的sql语句 -- resultMap属性连接到resultMap标签的id  -- id标签写学生的主键映射 result标签写学生的其他列映射
    3.2 一定要用association标签!!!(column属性把学生的tid拿过来 select去掉老师配置文件的sql语句的方法名一定是全路径!!)

resultMap实现关联集合对象(N+1方式) colloction标签

其实关联 集合对象(老师返回学生的list集合) / 单个对象(学生传老师一个对象) 只是从不同角度来看!!!!!!

具体操作

1. teacher实体类(放的就是list集合)

1
2
3
private int id;
private String name;
private List<Student> list; //list集合返回结果

2. student配置文件(只需要写简单的sql语句让老师传过来id当tid用)

1
2
3
4
5
6
7
<mapper namespace="com.bjsxt.mapper.StudentMapper">

<select id="selByTid" resultType="student" parameterType="int">
select * from student where tid=#{id}
</select>

</mapper>

3. teacher老师配置文件(通过collection标签将id传过去当tid查)

1
2
3
4
5
6
7
8
9
10
11
12
13
<mapper namespace="com.bjsxt.mapper.TeacherMapper">

<resultMap type="teacher" id="mymap">
<id column="id" property="id"/>
<result column="name" property="name"/>
<collection property="list" ofType="student" select="com.bjsxt.mapper.StudentMapper.selByTid" column="id"></collection>
</resultMap>

<select id="selAll" resultMap="mymap">
select * from teacher
</select>

</mapper>

结果分析

图例分析流程:

具体实现过程:

1. 准备老师类(要有list集合返回学生类信息)和学生类
2. 准备学生的配置文件(只需要sql语句通过id查所有信息)
3. 准备老师的配置文件
    3.1 通过查询的sql语句去找resultMap标签 然后标签去找学生配置文件的方法查处结果(将id传过去当tid用)

多表resultMap加载集合对象联合查询方式

假设老师1有多个学生(数据库会一下子很多行) – 我们现在让老师1 后面跟学生(减少重复每次都要出现老师1)

具体操作

1. teacher实体类(放的就是list集合)

1
2
3
private int id;
private String name;
private List<Student> list; //list集合返回结果

2. 只在teacher配置文件改

1
2
3
4
5
6
7
8
9
10
11
12
13
14
15
16
17
18
19
20
21
22
23
24
25
26
27
<mapper namespace="com.bjsxt.mapper.TeacherMapper">
<resultMap type="teacher" id="mymap">
<id column="id" property="id"/>
<result column="name" property="name"/>
<collection property="list" select="com.bjsxt.mapper.StudentMapper.selByTid" column="id"></collection>
</resultMap>

<select id="selAll" resultMap="mymap">
select * from teacher
</select>

<resultMap type="teacher" id="mymap1">
<id column="tid" property="id"/>
<result column="tname" property="name"/>
<collection property="list" ofType="student" >
<id column="sid" property="id"/>
<result column="sname" property="name"/>
<result column="age" property="age"/>
<result column="tid" property="tid"/>
</collection>
</resultMap>

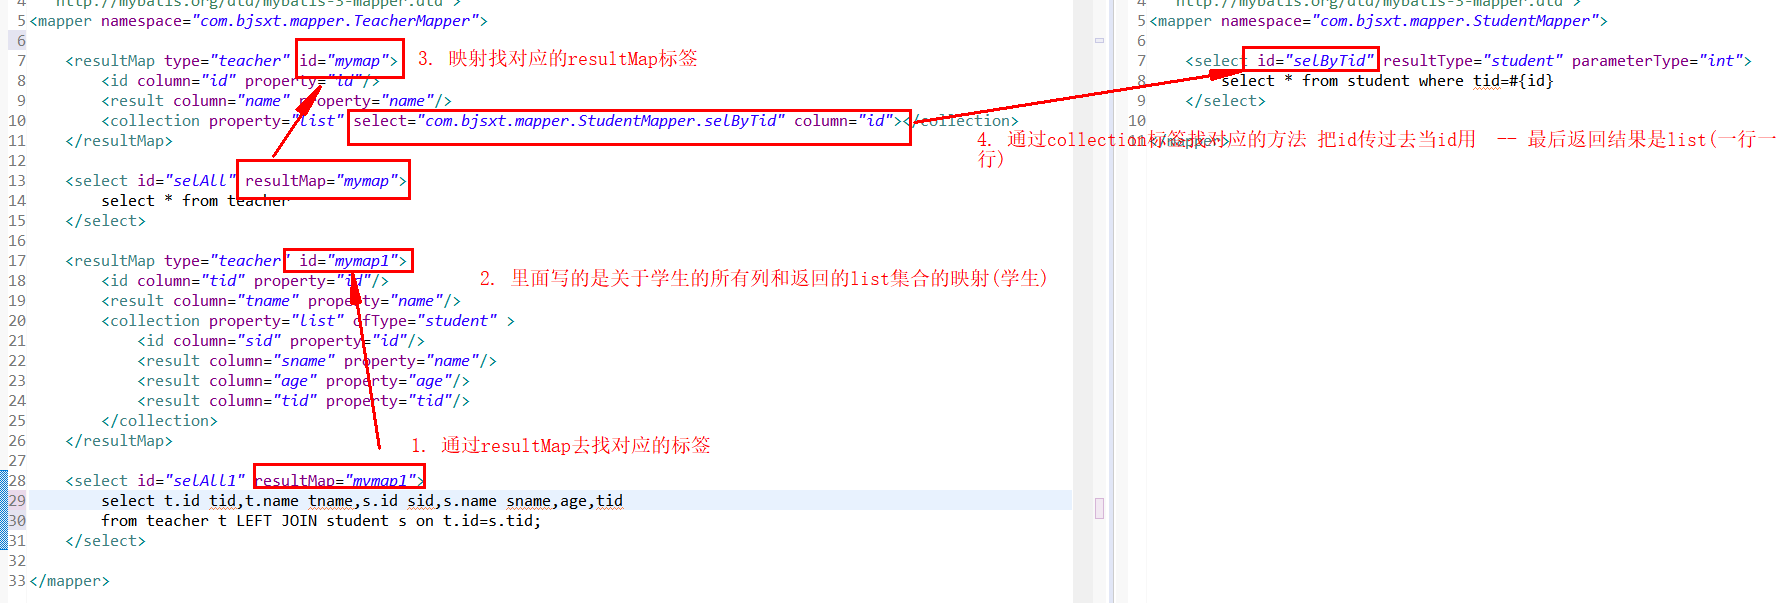
<select id="selAll1" resultMap="mymap1">
select t.id tid,t.name tname,s.id sid,s.name sname,age,tid from teacher t LEFT JOIN student s on t.id=s.tid;
</select>

</mapper>

结果分析

图例分析流程:

具体实现过程:

1. 准备老师类(要有list集合返回学生类信息)和学生类
2. 准备学生的配置文件(只需要sql语句通过id查所有信息)
3. 准备老师的配置文件
    3.1 通过查询的sql语句去找resultMap标签 然后标签去找学生配置文件的方法查处结果(将id传过去当tid用)
    3.2 因为他返回的结果我需要一个老师对应很多学生 -- 所以我们要再写一个resultMap标签去映射list(一行一行给) --最终通过这个标签返回答案

AutoMapping加载单个对象 ( 添加反单引号 )

使用多表联合查询(起别名!!)

具体操作

1. 学生实体类(老师类对象)

1
2
3
4
5
6
 //只列举了变量
private int id;
private String name;
private int age;
private int tid;
private Teacher teacher; //老师类的对象!!!!!!

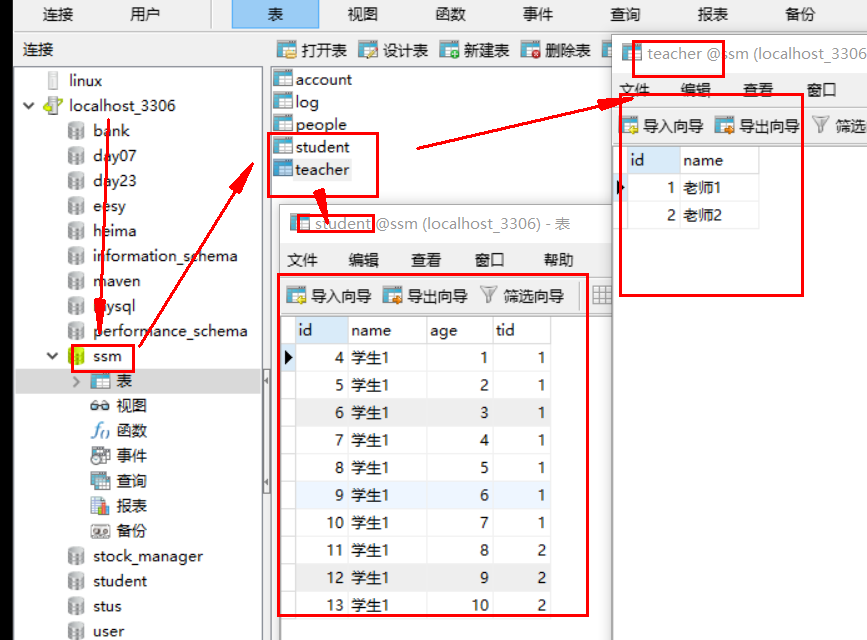
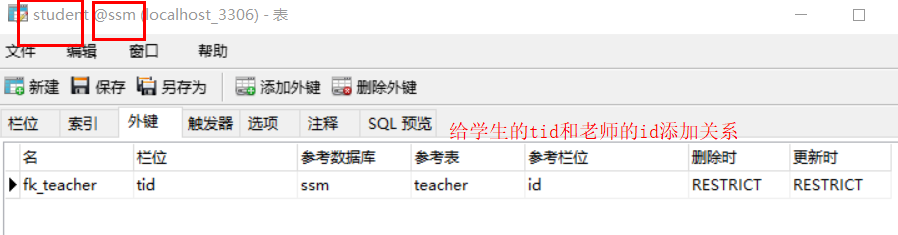
2. teacher配置文件(一个是student)

1
2
3
4
5
6
<mapper namespace="com.bjsxt.mapper.TeacherMapper">
<select id="selAll" resultType="teacher">
select t.id id,t.name name,s.id `list.id`,s.name `list.name`,age `list.age`,tid `list.tid`
from teacher t LEFT JOIN student s on t.id=s.tid //展示的是list集合输出
</select>
</mapper>

3. student配置文件(里面通过老师对象(反单引号) teacher.id等传过来用)

1
2
3
4
5
6
7

<mapper namespace="com.bjsxt.mapper.StudentMapper">
<select id="selAll" resultType="student">
select t.id `teacher.id`,t.name `teacher.name`,s.id id,s.name name,age,tid
from student s LEFT JOIN teacher t on t.id=s.tid //里面通过老师对象(反单引号) teacher.id等传过来用)
</select>
</mapper>

Mybatis缓存

缓存概述

提升运行效率(让应用程序减少对数据库的访问)


默认SqlSession缓存开启

1
2
3
4
5
1. 一旦你创建select标签 就会有一个对应statement对象

2. 同一个SqlSession对象调用同一个select --> 只有第一次访问数据库(后面都是将查询结果缓存到SqlSession缓存区)

3. 有效范围: 必须是同一个SqlSession对象(多个sqlsession对象就会执行多次!!)

SqlSessionFactory 二级缓存

引入原因

//问题概述:
    以前要是写两个sql语句两个sqlsession对象 --就会有两个缓存区域 --然后执行就会有两次执行(效率低)

//使用二次缓存:
    让两个sqlsession是获取同一个factory --就只有一个大的单独的缓存区域 -- 就只有一次执行

使用注意事项

1. 有效范围: 
     就是同一个factory的所有SqlSession都可以获取

2. 使用范围
     主要用于数据频繁使用但是很少修改

3. 使用步骤
     只需要在mapper.xml的select标签中添加
            <cache readOnly="true"></cache>

4. 当SqlSession对象进行close() / commit()  --> sqlsession缓存的数据刷  --> SqlSessionFactory缓存区

缓存流程


ThreadLocal

ThreadLocal

线程容器,给线程绑定一个Object内容,只要线程不变就可以随时取出

改变线程 –> 无法(×)取出内容

举例

1
2
3
4
5
6
7
8
9
10
11
12
13
14
15
16
17
18
19
20
public class Test {
public static void main(String[] args) {
//使用ThreadLocal类
final ThreadLocal<String> threadLocal=new ThreadLocal<>(); //final不让实例化
threadLocal.set("测试");

//创建子线程
new Thread() {
public void run() //匿名内部类
{
String result = threadLocal.get();
System.out.println("结果"+result);
};
}.start();

String result = threadLocal.get();
System.out.println(result);

}
}

优化线程


动态SQL

动态SQL

根据不同的条件执行不同的SQL语句

Mybatis中动态SQL在mapper.xml里面添加逻辑判断

前期准备:
        1. 准备好之前getMapper接口绑定和参数传递的环境

if

1
2
3
4
5
6
7
8
9
10
11
12
13
14
15
16
17

//接口需要写方法
List<Log> selByAccinAccout(@Param("accout") String accout,@Param("accin") String accin);

//配置xml文件
<select id="selByAccinAccout" resultType="log">
select * from log where 1=1 //if是需要写where1=1

<!-- OGNL表达式 直接写key / 对象的属性 不需要添加任何特定字符号 -->
<if test="accin!=null and accin!=''">
and accin=#{accin}
</if>

<if test="accout!=null and accout!=''">
and accout=#{accout}
</if>
</select>

where (比if在sql少写where 1=1)

先去掉前面的and 然后加where (先去后加)

1
2
3
4
5
6
7
8
9
10
11
12
13
14
15
16
17
18

//接口需要写方法
List<Log> selByAccinAccout(@Param("accout") String accout,@Param("accin") String accin);

<select id="selByAccinAccout" resultType="log">
select * from log //省去了if情况要写的where 1=1

<where>
<if test="accin!=null and accin!=''">
and accin=#{accin}
</if>

<if test="accout!=null and accout!=''">
and accout=#{accout}
</if>
</where>

</select>

choose when otherwise

1
2
3
4
5
6
7
8
9
10
11
12
13
14
15
16
17
18
19
20

//接口需要写方法
List<Log> selByAccinAccout(@Param("accout") String accout,@Param("accin") String accin);

<select id="selByAccinAccout" resultType="log">
select * from log
<!-- OGNL表达式 直接写key / 对象的属性 不需要添加任何特定字符号 -->

<where>
<choose>
<when test="accin!=null and accin!=''"> //其实相当于将if改成了when
and accin=#{accin}
</when>
<when test="accout!=null and accout!=''">
and accout=#{accout}
</when>
</choose>
</where>

</select>

set 修改sqlset从句

去掉最后一个逗号 如果set里面有内容就会生成set关键字 (先去后加)

1
2
3
4
凑出形式: 
update log
set id=?,accin=?,accout=?, (最后一个逗号会被set删除掉 )
where id=?
1
2
3
4
5
6
7
8
9
10
11
12
13
14
15
16
17
18
19
20
21
22
23
24
25
26
27
28
29
30
31
32
33
34
35

//接口写方法
int upd(Log log);

//配置xml里面

<update id="upd" parameterType="log">

update log
<set>
id=#{id},
<if test="accin!=null and accin!=''">
accin=#{accin},
</if>

<if test="accout!=null and accout!=''">
accout=#{accout},
</if>
</set>
where id=#{id}

</update>

//测试类使用接口产生getMapper对象 --然后创建log对象 set添加值
LogMapper logMapper = session.getMapper(LogMapper.class);
Log log=new Log();
log.setId(1);
log.setAccIn(accin); //上面输入
log.setAccOut(accout); //上面输入
int index=logMapper.upd(log); //获得结果

//提交
session.commit(); //一定要记得提交!!! 更新呀
session.close();
System.out.println("程序执行结束");

trim 可以去除和添加

trim属性介绍

1
2
3
4
prefix 在前面添加内容(+)
prefixOverrides 去掉前面内容(-)
suffix 在后面添加内容(+)
suffixOverrides 去掉后面内容(-)

模拟其他功能

先删除and 后添加where (模拟where功能)

1
2
3
4
凑出形式: 
select *
from log
where accin=? //先删除and 然后添加where
1
2
3
4
5
6
7

<select id="selByLog" parameterType="log" resultType="log">
select * from log
<trim prefix="where" prefixOverrides="and">
and accin={accin}
</trim>
</select>

先删除逗号 后添加set (模拟set功能)

1
2
3
4
凑出形式: 
update log
set id=?,accin=?,accout=?, (最后一个逗号会被set删除掉 )
where id=?
1
2
3
4
5
6
7
8
9
10
11
12
13
14
15

<update id="upd" parameterType="log">
update log
<trim prefix="sex" suffixOverrides=,"">
id=#{id},
<if test="accin!=null and accin!=''">
accin=#{accin},
</if>

<if test="accout!=null and accout!=''">
accout=#{accout},
</if>
</trim>
where id={id}
</update>

bind 重新赋值 / 模糊查询

模糊查询
原内容前/后添加内容

1
2
3
4
<select id="selByLog" parameterType="log">
<bind name="accin" value="'%'+accin+'%'">
#{money}
</select>

foreach

循环参数内容 **
**内容前后添加内容

添加分隔符

属性介绍

1. collection 要遍历的集合
2. item 迭代变量 
      #{迭代变量名}获取内容
3. open 循环后左边添加内容
4. close 循环后右边添加内容
5. separator 每层循环时 元素之间的分隔符

在in查询

1
2
3
4
凑出来:
select *
from log
where id in (1,2,3);
1
2
3
4
5
6
<select id="selIn" parameterType="list" resultType="list">
select * from log where id in

<foreach collection="list" item="abc" open="(" close=")" separator=",">
#{abc}
</select>

批量新增 (效率低)

1. 写sql语句批量新增:

1
2
3
4
凑出来:
insert
into log
values (default,1,2,3),(default,12,2,3),(default,1,22,3)

2. openSession()必须指定

1
factory.openSession(ExecutorType.BATCH);  //底层的PreparedStatement.addBatch();

sql + include 多表查询

多表查询 (sql片段复用)

*将mysql这个表然后内容是四个属性 上面select可以直接include调用 *

1
2
3
4
5
6
7
8
<select id="">
select <include refid="mysql"></include> //直接include的refid标签调用mysql表
from log
</select>

<sql id="mysql">
id,accin,accout,money //给mysql这个表添加一个id 内容是四个属性
</sql>

getMapper接口绑定和多参数传递

Mybatisi接口绑定 + 参数传递

mybatis和spring整合使用的方案

实现步骤:

1.创建接口
    要求:
         1.1 接口包名 == mapper.xml的namespace标签 (接口和配置xml文件在同一个包)
         1.2 接口方法名 == mapper.xml的id属性  (接口名和配置xml里面的id名一样)
2.mybatis.xml全局配置文件中:
    mappers标签里面 -- 使用package标签

举例实现

1. 准备数据库
2. 准备jar包
3. 准备全局mybatis.xml文件
4. 准备实体类 Log
5. 准备mapper包 
    5.1 准备接口 LogMapper
    5.2 准备配置xml文件 LogMapper.xml
6. 准备测试类 test

代码结构层次

实体类

1
2
3
4
5
6
7
8
9
10
11
12
13
14
15
16
17
18
19
20
21
22
23
24
25
26
27
28
29
30
31
32
33
34
35
36
public class Log {
private int id;
private String accIn;
private String accOut;
private double money;
public int getId() {
return id;
}
public void setId(int id) {
this.id = id;
}
public String getAccIn() {
return accIn;
}
public void setAccIn(String accIn) {
this.accIn = accIn;
}
public String getAccOut() {
return accOut;
}
public void setAccOut(String accOut) {
this.accOut = accOut;
}
public double getMoney() {
return money;
}
public void setMoney(double money) {
this.money = money;
}

@Override
public String toString() {
return "Log [id=" + id + ", accIn=" + accIn + ", accOut=" + accOut + ", money=" + money + "]";
}

}

全局配置文件

1
2
3
4
5
6
7
8
9
10
11
12
13
14
15
16
17
18
19
20
21
22
23
24
25
26
27
28
29
30
31
32
33
34
35
<?xml version="1.0" encoding="UTF-8"?>

<!DOCTYPE configuration
PUBLIC "-//mybatis.org//DTD Config 3.0//EN"
"http://mybatis.org/dtd/mybatis-3-config.dtd">
<configuration>

<settings>
<setting name="logImpl" value="LOG4J"/>
</settings>

<typeAliases>
<package name="com.bjsxt.pojo" />
</typeAliases>

<!-- default引用environment的id,当前所使用的环境 -->
<environments default="default">
<!-- 声明可以使用的环境 -->
<environment id="default">
<!-- 使用原生JDBC事务 -->
<transactionManager type="JDBC"></transactionManager>
<dataSource type="POOLED">
<property name="driver" value="com.mysql.jdbc.Driver"/>
<property name="url" value="jdbc:mysql://localhost:3306/ssm"/>
<property name="username" value="root"/>
<property name="password" value="njdxrjgc7777777."/>
</dataSource>
</environment>
</environments>

<mappers>
<package name="com.bjsxt.mapper"/>
</mappers>

</configuration>

LogMapper接口

1
2
3
4
5
public interface LogMapper {
List<Log> selAll(); //方法名是selAll

List<Log> selByAccInAccount(String accin,String accout); //多参数
}

LogMapper.xml配置文件(sql语句)

1
2
3
4
5
6
7
8
9
10
11
12
13
14
15
<?xml version="1.0" encoding="UTF-8"?>
<!DOCTYPE mapper
PUBLIC "-//mybatis.org//DTD Mapper 3.0//EN"
"http://mybatis.org/dtd/mybatis-3-mapper.dtd">
<mapper namespace="com.bjsxt.mapper.LogMapper">

<select id="selAll" resultType="log"> <!-- 方法名和接口方法一致 resultYType使用别名 -->
select * from log
</select>

<select id=" selByAccInAccount" resultType="log"> <!-- 多参数不写parameterType -->
select * from log where accin=#{0} and accout=#{1}
</select>

</mapper>

测试代码类

1
2
3
4
5
6
7
8
9
10
11
12
13
14
15
16
17
18
19
20
21
22
23
24
public class Test {
public static void main(String[] args) throws IOException {
//固定三行
InputStream is = Resources.getResourceAsStream("mybatis.xml");
SqlSessionFactory factory = new SqlSessionFactoryBuilder().build(is);
SqlSession session = factory.openSession();

// 使用JDK的动态代理设计模式 面向接口的代理设计模式(必须有接口)
LogMapper logMapper = session.getMapper(LogMapper.class); //给接口产生实例化 接口 -- 实例化proxy -- 反射到xml文件
List<Log> list = logMapper.selAll();
for(Log log1:list) {
System.out.println(log1);
}

List<Log> list2 = logMapper.selByAccInAccount("1","7");
for(Log log2:list2) {
System.out.println(log2);
}

session.close();
System.out.println("程序执行结束");

}
}

多参数传递

1
2
3
4
5
6
7
8
9
10
11
12
	1. 配置文件中写sql语句和id  -- (因为id要和接口方法一致) -- 创建接口方法
sql语句中accin 和 accout写法
第一种: #{0} #{1} 调用方法: "1" "7"
第二种: #{param1} #{param2} 调用方法: "1" "7"
第三种(通过map的实现思路) #{accin} #{accout} 调用方法: @param("accin") @param("accout")

2. 然后测试类调用


```

## 总结 ##
1. 其实就是我们把配置文件的id(sql语句实现的方法)和接口一样 然后通过接口去实例化proxy代理,然后代理反射到xml文件内实现。

2. 之所以可以实例化是因为我们使用其中一种动态代理设计模式  面向接口

    LogMapper logMapper = session.getMapper(LogMapper.class);   //方法要接口的类加载器 调用getMapper方法
        List<Log> list = logMapper.selAll();  //实例化对象获得结果

```


,