SpringMVC

SpringMVC简介

SpringMVC中重要组件

1. DispatcherServlet : 前端控制器 (接收所有请求)

2. HandlerMapping : 解析请求格式 (判断执行哪个方法)

3. HandlerAdapter : 调用具体方法

4. ViewResovler : 视图解析器 (准备跳转到具体的物理视图)

SpringMVC运行原理图


使用纯配置文件搭建SpringMVC环境

导入jar包

修改web.xml文件

1
2
3
4
5
6
7
8
9
10
11
12
13
14
15
16
17
18
19
20
21
22
23
24
25
<?xml version="1.0" encoding="UTF-8"?>
<web-app version="3.0" xmlns="http://java.sun.com/xml/ns/javaee"
xmlns:xsi="http://www.w3.org/2001/XMLSchema-instance"
xsi:schemaLocation="http://java.sun.com/xml/ns/javaee
http://java.sun.com/xml/ns/javaee/web-app_3_0.xsd">

<!-- 配置Servlet 找前端控制器 DispatcherServlet类 -->
<servlet>
<servlet-name>springmvc123</servlet-name>
<servlet-class>org.springframework.web.servlet.DispatcherServlet</servlet-class>
<!-- 修改配置文件路径和名称 -->
<init-param>
<param-name>contextConfigLocation</param-name>
<param-value>classpath:springmvc.xml</param-value> //所有的配置文件去找src下的springmvc.xml文件
</init-param>
<!-- 自启动 -->
<load-on-startup>1</load-on-startup>
</servlet>

<servlet-mapping>
<servlet-name>springmvc123</servlet-name>
<url-pattern>/</url-pattern>
</servlet-mapping>

</web-app>

配置springmvc.xml文件

配置思路:

1
2
3
4
5
6
1. 导入spring的xmlns:xxx信息
2. 配置四个组件信息
2.1 配置HandlerMapping的底层simpleUrlHandlerMapping接口
2.2 配置simpleUrlHandlerMapping接口的实现类(新建DemoController类)
2.3 配置HandlerAdapter底层的SimpleControllerHandlerAdapter接口
2.4 配置ViewResovler底层的InternalResourceViewResolver接口

完整代码:

1
2
3
4
5
6
7
8
9
10
11
12
13
14
15
16
17
18
19
20
21
22
23
24
25
26
27
28
29
30
<?xml version="1.0" encoding="UTF-8"?>
<beans xmlns="http://www.springframework.org/schema/beans"
xmlns:xsi="http://www.w3.org/2001/XMLSchema-instance"
xmlns:context="http://www.springframework.org/schema/context"
xsi:schemaLocation="http://www.springframework.org/schema/beans
http://www.springframework.org/schema/beans/spring-beans.xsd
http://www.springframework.org/schema/context
http://www.springframework.org/schema/context/spring-context.xsd">
<!-- 底层接口实现类 -->
<bean id="demo123" class="com.bjsxt.controller.DemoController"></bean>

<!-- 使用HandlerMapping底层的simpleUrlHandlerMapping接口 -->
<bean id="handlerMapping" class="org.springframework.web.servlet.handler.SimpleUrlHandlerMapping">
<property name="urlMap"> <!-- 底层用map集合 -->
<map>
<entry key="demo" value-ref="demo123"></entry> <!-- key表示解析出控制器逻辑名 value-ref表示跳转到接口实现类 -->
</map>
</property>
</bean>

<!-- 使用HandlerAdapter底层的SimpleControllerHandlerAdapter接口 -->
<bean class="org.springframework.web.servlet.mvc.SimpleControllerHandlerAdapter"></bean>

<!-- 使用ViewResovler底层的InternalResourceViewResolver接口 -->
<bean id="viewResovler" class="org.springframework.web.servlet.view.InternalResourceViewResolver">
<property name="prefix" value="/"></property> <!-- 视图解释器 可以方便的给要跳转的页面加好前置和后置信息 -->
<property name="suffix" value=".jsp"></property>
</bean>

</beans>

配置前端控制器接口实现类

1
2
3
4
5
6
7
8
9
10
public class DemoController implements Controller{

@Override
public ModelAndView handleRequest(HttpServletRequest request, HttpServletResponse response) throws Exception {
System.out.println("执行了springmvc控制器");
ModelAndView mav=new ModelAndView("main"); //传递和传值 (跳转到main.jsp)
return mav;
}

}

配置跳转到main.jsp页面

1
2
3
4
5
6
7
8
9
10
11
12
<%@ page language="java" contentType="text/html; charset=UTF-8"
pageEncoding="UTF-8"%>
<!DOCTYPE html PUBLIC "-//W3C//DTD HTML 4.01 Transitional//EN" "http://www.w3.org/TR/html4/loose.dtd">
<html>
<head>
<meta http-equiv="Content-Type" content="text/html; charset=UTF-8">
<title>Insert title here</title>
</head>
<body>
main.jsp
</body>
</html>

新建test测试类

1
2
3
4
5
6
7
8

public class Test {
public static void main(String[] args) {
ApplicationContext ac=null;
HandlerMapping hm=null; //设置默认的
HandlerAdapter ha=null; //设置默认的
}
}

SpringMVC运行过程源码跟踪

Spring和SpringMVC关系

Spring容器和SpringMVC容器是父子容器(SpringMVC容器可以调用Spring容器中所有内容)


SpringMVC环境搭建(注解方式)

导入JAR包

编写web.xml文件

1
2
3
4
5
6
7
8
9
10
11
12
13
14
15
<!-- 配置前端控制器 -->
<servlet>
<servlet-name>jqk</servlet-name>
<servlet-class>org.springframework.web.servlet.DispatcherServlet</servlet-class>
<init-param>
<param-name>contextConfigLocation</param-name> //配置要找的配置文件件地址
<param-value>Classpath:springmvc.xml</param-value> //配置要找的配置文件叫springmvc.xml
</init-param>
<load-on-startup>1</load-on-startup> //自启动 优先级为1
</servlet>

<servlet-mapping>
<servlet-name>jqk</servlet-name>
<url-pattern>/</url-pattern>
</servlet-mapping>

编写springmvc.xml文件

1
2
3
4
5
6
7
8
9
10
11
12
13
14
15
16
17
18
19
20
21
22
23
24
25
26
<?xml version="1.0" encoding="UTF-8"?>
<beans xmlns="http://www.springframework.org/schema/beans"
xmlns:xsi="http://www.w3.org/2001/XMLSchema-instance"
xmlns:mvc="http://www.springframework.org/schema/mvc" //现在的mvc框架必备(减少不必要的组件配置)
xmlns:context="http://www.springframework.org/schema/context" //注解必备
xsi:schemaLocation="http://www.springframework.org/schema/beans
http://www.springframework.org/schema/beans/spring-beans.xsd
http://www.springframework.org/schema/context
http://www.springframework.org/schema/context/spring-context.xsd
http://www.springframework.org/schema/mvc //后面两行是mvc的location地址
http://www.springframework.org/schema/mvc/spring-mvc.xsd">

<!-- 扫描注解(具体哪些包下的类有注解) -->
<context:component-scan base-package="com.bjsxt.controller"></context:component-scan>

<!-- 注解驱动 相当于配置了两个组件(下面两行注解的组件) -->
<!-- org.springframework.web.servlet.mvc.annotation.DefaultAnnotationHandlerMapping -->
<!-- org.springframework.web.servlet.mvc.annotation.AnnotationMethodHandlerAdapter -->
<mvc:annotation-driven></mvc:annotation-driven>

<!-- 静态资源 -->
<mvc:resources location="/js/" mapping="/js/**"></mvc:resources> //location表明 当前代码框架下文件名 mapping表明用浏览器 localhost:8080/项目名/js/jssa.js的形式
<mvc:resources location="/css/" mapping="/css/**"></mvc:resources>
<mvc:resources location="/images/" mapping="/images/**"></mvc:resources>

</beans>

编写注解类

1
2
3
4
5
6
7
8
9
10
@Controller
public class DemoController {

@RequestMapping("demo") //浏览器访问的形式:localhost:8080/项目名/demo
public String demo() {
System.out.println("执行demo"); //控制台输出
return "main.jsp"; // 返回到main.jsp页面
}

}

跳转到的main.jsp页面

1
2
3
4
5
6
7
8
9
10
11
12
<%@ page language="java" contentType="text/html; charset=UTF-8"
pageEncoding="UTF-8"%>
<!DOCTYPE html PUBLIC "-//W3C//DTD HTML 4.01 Transitional//EN" "http://www.w3.org/TR/html4/loose.dtd">
<html>
<head>
<meta http-equiv="Content-Type" content="text/html; charset=UTF-8">
<title>Insert title here</title>
</head>
<body>
要跳转到的main.jsp! //主页展示的内容
</body>
</html>

总结

1. 导入jar包
2. 配置web.xml文件
    2.1 配置servlet和servlet-mapping标签
    2.2 在servlet标签中配置init-param标签 去配置springmvc.xml文件的地址和访问
3. 配置springmvc.xml文件
    3.1 配置mvc框架的xmlns:mvc和location地址
    3.2 扫描注解(context:component-scan标签 配置哪些类有注解)
    3.3 注解驱动(mvc:annotation-driven标签 配置相当于配置了两个组件)
    3.4 静态资源(mvc:resources标签 配置要访问的js/css/images地址)
4. 配置注解类
    4.1 使用@Controller 注解整个类
    4.2 使用@RequestMapping("xxx") 注解访问访问的地址
    4.3 return 放入要返回的主页地址

代码结构框架:


基本数据类型(参数)

把内容写到方法(HandlerMethod)参数内,springmvc只要有这个内容就会注入内容

在刚才的基础上新建index.jsp页面

1
2
3
4
5
<form action="demo" method="post">
<input type="text" name="name"/>
<input type="text" name="age"/>
<input type="submit" value="提交"/>
</form>

web.xml中添加防止乱码(filter标签)

1
2
3
4
5
6
7
8
9
10
11
12
13
<filter>
<filter-name>encoding</filter-name>
<filter-class>org.springframework.web.filter.CharacterEncodingFilter</filter-class>
<init-param>
<param-name>encoding</param-name>
<param-value>utf-8</param-value>
</init-param>
</filter>

<filter-mapping>
<filter-name>encoding</filter-name>
<url-pattern>/*</url-pattern>
</filter-mapping>

更改注解类(方法添加参数)

1
2
3
4
5
6
7
8
9
10
@Controller
public class DemoController {

@RequestMapping("demo") //路径要用的demo
public String demo(String name,int age) { //添加了name和age两个参数
System.out.println("执行demo"+" "+name+" "+age);
return "main.jsp"; // 返回到main.jsp页面
}

}

运行项目

直接从项目运行(run)

填写信息(已经做了预防中文乱码的操作):


对象类型(参数)

把内容写到方法(HandlerMethod)参数内,springmvc只要有这个内容就会注入内容

新建实体类

1
2
3
4
5
6
7
8
9
10
11
12
13
14
15
16
17
18
public class People {
private String name;
private int age;

public String getName() {
return name;
}
public void setName(String name) {
this.name = name;
}
public int getAge() {
return age;
}
public void setAge(int age) {
this.age = age;
}

}

修改注解类(参数修改)

1
2
3
4
5
6
7
8
9
public class DemoController {

@RequestMapping("demo") //路径要用的demo
public String demo(People peo,String name,int age) { //可以将整个people对象放进来
System.out.println("执行demo"+peo+" "+name+" "+age);
return "main.jsp"; // 返回到main.jsp页面
}

}

基本数据类型 - 参数问题(@RequestParam注解)

(默认)参数和传递参数名相同

1
2
3
4
5
6
7
8
9
10
11
12
13
14

//主页面(请求传递参数名为name和age)
<form action="demo" method="post">
<input type="text" name="name"/>
<input type="text" name="age"/>
<input type="submit" value="提交"/>
</form>

//方法传递为name和age
@RequestMapping("demo") //路径要用的demo
public String demo(String name,int age) {
System.out.println("执行demo"+" "+name+" "+age);
return "main.jsp"; // 返回到main.jsp页面
}

参数和传递参数名不同(@RequestParam(value=”前端的参数名”))

例如:前端程序员和后端java对于同一个name和age不同!!(使用@RequestParam(value=”前端的参数名”))方式让匹配上)

1
2
3
4
5
6
7
8
9
10
11
12
13
14
15
16
17

//主页面(请求传递参数名为name1和age1)
<form action="demo" method="post">
<input type="text" name="name1"/>
<input type="text" name="age1"/>
<input type="submit" value="提交"/>
</form>

//方法传递为name和age
@RequestMapping("demo") //路径要用的demo

//使用 value="前端的参数名" [value=可以省略] 让两者匹配

public String demo(@RequestParam(value="name1") String name,@RequestParam(value="age1")int age) {
System.out.println("执行demo"+" "+name+" "+age);
return "main.jsp"; // 返回到main.jsp页面
}

方法参数没赋值(防止执行500)

设置默认值解决500问题(@RequestParam(defaultValue=”XXX”))

1
2
3
4
5
6
7
8
@RequestMapping("page")

//使用defaultValue="xxx" 设置一个基础值

public String page(@RequestParam(defaultValue="2") int pageSize,@RequestParam(defaultValue="1") int pageNumber) {
System.out.println(pageSize+" "+pageNumber);
return "main.jsp";
}

强制有参数

设置必要值为true(@RequestParam(required))

1
2
3
4
5
6
7
8
@RequestMapping("demo2")

//设置 required=true 达到强制有参数的条件

public String demo2(@RequestParam(required=true) String name) {
System.out.println("必须传name参数");
return "main.jsp";
}

对象类型 - 参数问题

请求参数中含多个同名参数(List集合)

复选框传递的参数是多个同名参数(@RequestParam(“复选框的name名”)List x)

1
2
3
4
5
6
7
8
9
10
11
12
13
14
15
16
17
18
19
20
21
22
23
24

//index.jsp页面

<form action="demo5" method="post"> //通过post方式提交到demo5的方法内
<input type="text" name="name"/>
<input type="text" name="age"/>
<input type="checkbox" name="hover" value="学习"/> //爱好是复选框
<input type="checkbox" name="hover" value="写代码"/>
<input type="checkbox" name="hover" value="看视频"/>
<input type="checkbox" name="hover" value="看笔记"/>
<input type="submit" value="提交"/>
</form>


//注解类

@RequestMapping("demo5")

//name和age还是普通的方式 爱好就需要List来传递 (@RequestParam("页面内复选框的name名"))

public String demo5(String name,int age,@RequestParam("hover")List<String> a) {
System.out.println(name+" "+age+" "+a);
return "main.jsp";
}

请求参数(对象.属性)

1
2
3
4
5
6
7
8
9
10
11
12
13
14
15
//页面中:
<input type="text" name="peo.name"/>
<input type="text" name="peo.age"/>

//新建一个类(对象名和参数中(.)之前的名称对应)
// peo和peo.name对应

private People peo; //传people实体类对象

//注解类
@RequestMapping("demo6")
public String demo6(Demo demo) { //直接传整个类对象
System.out.println(demo);
return "main.jsp";
}

请求参数传递集合对象(对象[X].属性)

1
2
3
4
5
6
7
8
9
10
11
12
13
14
15
16
17
//页面中:
<input type="text" name="peo[0].name"/>
<input type="text" name="peo[0].age"/>
<input type="text" name="peo[1].name"/>
<input type="text" name="peo[1].age"/>

//新建一个类(对象名和参数中(.)之前的名称对应)
// peo和peo.name对应

private List<People> peo; //传list集合

//注解类
@RequestMapping("demo6")
public String demo6(Demo demo) { //直接传整个类对象
System.out.println(demo);
return "main.jsp";
}

restful传值方式

简化jsp中参数编码格式

jsp中特定格式

1
2
<a href="demo07/123/abc">跳转</a>   
//就是去找注解是demo07而且第一个值123 第二个是abc的注解类

注解类

注意事项:

1
2
3
1. @RequestMapping里面一定要和请求格式对应
1.1 {}里面随便写名称
2. @PathVariable 获取@RequestMapping中的内容(默认按照方法参数名找)

具体代码:

1
2
3
4
5
@RequestMapping("demo7/{id}/{name}")
public String demo7(@PathVariable String name,@PathVariable("id") int age) {
System.out.println(name+" "+age);
return "main.jsp";
}

跳转方式

1. 默认跳转方式    请求转发
2. 设置返回字符串内容
    2.1 添加 redirect:资源路径 (重定向)
    2.2 添加 forward:资源路径/省略forward (转发) 

视图解析器(Spring默认提供)

可以自定义使用ViewResovler底层的InternalResourceViewResolver接口

1
2
3
4
5
<!-- 使用ViewResovler底层的InternalResourceViewResolver接口 -->	
<bean id="viewResovler" class="org.springframework.web.servlet.view.InternalResourceViewResolver">
<property name="prefix" value="/"></property> <!-- 视图解释器 可以方便的给要跳转的页面加好前置和后置信息 -->
<property name="suffix" value=".jsp"></property>
</bean>

** 如果希望不执行自定义视图解析器,可以在注解类方法返回值前添加forward: / redirect: **

1
2
3
4
5
6
7
8
9
10
11
12
//注解类
@RequestMapping("demo10")
public String demo10() { //直接传整个类对象
return "forward:demo11"; //使用forward: demo11 的形式(不适用自定义视图解析器)
}

@RequestMapping("demo11")
public String demo11() { //直接传整个类对象
System.out.println("demo11");
//加了视图解析器会简化不写前缀和后缀 所以写main就行(原来是main.jsp)
return "main";
}

@ResponseBody(恒不跳转)

一般使用@RequestMapping (恒跳转)

返回值满足key-value形式(对象/map)

1. 响应头设置为 application/json;charset=utf-8
2. 方法返回值 : 输出流

返回值不满足key-value形式(String等)

1. 响应头设置为 text/htmln;charset=utf-8
2. 方法返回值 : 流

底层使用Jackson进行json转换

一定要导入jackson的jar包

spring4.1.6对jackson不支持较高版本(jackson2.7无效)


Ajax整理

Ajax(异步请求 局部刷新)

局部刷新:通过异步请求,请求到服务器资源数据后,过脚本修改页面中部分内容

JQuery中ajax分类

第一层:$.ajax({属性名1:值,属性名2:值})

本层是jquery中功能最全(代码写起来相对麻烦)

1
2
3
4
5
6
7
8
9
10
11
12
13
14
15
16
17
18
19
<script type="text/javascript">
$(function(){
$("a").click(function(){
$.ajax({
url:'demo',
data:{"name":"zhangsan"},
dataType:'html',
error:function(){
alert("请求出错.")
},
success:function(data){
alert("请求成功"+data)
},
type:'POST'
});
return false;
})
});
</script>

其中属性:

1. url:请求服务器地址
2. data:请求参数
3. dataType:服务器返回数据类型
4. error:请求出错执行的功能
5. success:请求成功执行的功能(function(data):data是服务器返回的数据)

第二层(简化$.ajax)

1. $.get(url,data,success,dataType)
2. $.post(url,data,success,dataType)   --常用 但是没有出错提示!!

第三层(简化$.get())

1. $.getJSON(url,data,success)  相当于设置dataType="json"
2. $.getScript(url,data,success)  相当于设置dataType="script"

json概述

服务器返回数据是从表取出,为了方便服务器操作返回的数据,服务器返回的数据设置为json

json数据类型:

1. JsonObject -- json对象
    {"key":value,"key":value}

2. JsonArray -- json数组
    [{"key":value,"key":value},{}] 

json案例

导入jar包

生成Users实体类

1
2
3
4
5
6
7
8
9
10
11
12
13
14
15
16
17
18
19
20
21
22
23
24
public class Users {
private int id;
private String username;
private String password;
public int getId() {
return id;
}
public void setId(int id) {
this.id = id;
}
public String getUsername() {
return username;
}
public void setUsername(String username) {
this.username = username;
}
public String getPassword() {
return password;
}
public void setPassword(String password) {
this.password = password;
}

}

生成DemoServlet类

1
2
3
4
5
6
7
8
9
10
11
12
13
14
15
16
17
18
19
20
21
22
23
24
25
26
27
28
29
30
31
32
33
34
@WebServlet("/demo")
public class DemoServlet extends HttpServlet{

@Override
protected void service(HttpServletRequest req, HttpServletResponse resp) throws ServletException, IOException {
System.out.println("执行控制器");
String name=req.getParameter("name"); // 从index页面获取name

Users users=new Users();
users.setId(1);
users.setPassword("123");
users.setUsername("张三"); // 添加users的信息( 1 123 张三 )

Users users1=new Users();
users1.setId(2);
users1.setPassword("22");
users1.setUsername("李四"); // 添加users1的信息( 2 22 李四 )

List<Users> list=new ArrayList<Users>(); //list集合将users和users1加进去
list.add(users1);
list.add(users);

ObjectMapper mapper = new ObjectMapper();
String result = mapper.writeValueAsString(list); //通过ObjectMapper对象方法把list添加进去

resp.setContentType("application/json;charset=utf-8"); //设置返回文件类型 json
PrintWriter out=resp.getWriter();
out.print(result); // 打印result
out.flush();
out.close();

}

}

生成 index.jsp页面

1
2
3
4
5
6
7
8
9
10
11
12
13
14
15
16
17
18
19
20
21
22
23
24
25
26
27
28
29
30
31
32
33
34
35
36
37
38
39
40
41
42
43
44
45
46
47
48
49
50
51
52
53
54
55
<%@ page language="java" contentType="text/html; charset=UTF-8"
pageEncoding="UTF-8"%>
<!DOCTYPE html PUBLIC "-//W3C//DTD HTML 4.01 Transitional//EN" "http://www.w3.org/TR/html4/loose.dtd">
<html>
<head>
<meta http-equiv="Content-Type" content="text/html; charset=UTF-8">
<title>Insert title here</title>

<script type="text/javascript" src="js/jquery-1.7.2.js"></script> //jQuery必备的

<script type="text/javascript">
$(function(){
$("a").click(function(){

//第二种方式:
$.post("demo",{"name":"zhangsan"},function(data){
//定义空字符串 存结果
var result="";
for(var i=0;i<data.length;i++) //因为是两个对象 list集合要循环输出
{
result+="<tr>";
result+="<td>"+data[i].id+"</td>"
result+="<td>"+data[i].username+"</td>"
result+="<td>"+data[i].password+"</td>"
result+="</tr>";
// alert(data.id+" "+data.username+" "+data.password); 弹出结果
}

//第一种:
// $("table").append(result); 一次次加
//第二种:
$("#mytbody").html(result); //使用分组标签 放入东西

})

return false;
})
});
</script>

</head>

<body>
<a href="demo">跳转</a>
<table border="1">
<tr>
<td>编号</td>
<td>姓名</td>
<td>密码</td>
</tr>
<tbody id="mytbody"></tbody> //使用分组标签 存放结果!!!
</table>
</body>

</html>

Spring常用注解整理

Spring常用注解

创建类对象

1. @Component 创建类对象 (相当于配置文件中的<bean>标签)

2. @Service(Component功能相同)
    2.1 写在ServiceImpl类

3. @Repository(Component功能相同) 
    3.1 写在数据访问层 

4. @Controller(Component功能相同) 
    4.1 写在控制器类

不需要写对象的get/set

1. @Resource(java的注解)
    1.1 按照byName注入(默认) 按照byType注入(没有名称对象) 
    1.2 一般将对象名称和spring容器中对象名相同

2. @Autowired(spring的注解)
    1.1 按照byType注入(默认)

AOP(面向切面编程)

1. @Pointcut() 定义切点
2. @Aspect() 定义切面类
3. @Before() 前置通知
4. @After() 后置通知 (切点正不正确都可以)
5. @AfterReturing() 后置通知 (必须切点正确才执行)
6. @AfterThrowing 异常通知
7. @Arround() 环绕通知

关于读取配置文件内容

1. @Value() 获取xxx.properties文件内容

Spring事务

编程式事务(程序员编写)

程序员编程 事务控制代码

  • OpenSessionInView 编程式事务

声明式事务(Spring编写好 程序员声明)

Spring写好 事务控制代码
程序员只需要声明哪些方法需要进行事务控制和如何进行事务控制

针对ServiceImpl类下的方法

事务管理器基于通知(advice) – 切点(AOP)

在spring配置文件中配置声明式事务

1
2
3
4
5
1. 导入xmlns:tx 和location地址
2. 书写tx:advice --> 基于通知所以导入spring-jdbc.jar中的类
3. 然后需要配置数据源 --> 导入整合mybatis的三步骤
4. 三步骤中数据源要导入db.properties文件 --> 添加context:property-placeholder --> 利用${key}方式导入
5. 因为基于通知 所以还需要切点和通知的aop:config标签 -->

分析(代码流向)

最终代码

1
2
3
4
5
6
7
8
9
10
11
12
13
14
15
16
17
18
19
20
21
22
23
24
25
26
27
28
29
30
31
32
33
34
35
36
37
38
39
40
41
42
43
44
45
46
47
48
49
50
51
52
<?xml version="1.0" encoding="UTF-8"?>
<beans xmlns="http://www.springframework.org/schema/beans"
xmlns:xsi="http://www.w3.org/2001/XMLSchema-instance"
xmlns:aop="http://www.springframework.org/schema/aop"
xmlns:context="http://www.springframework.org/schema/context"
xmlns:tx="http://www.springframework.org/schema/tx"
xsi:schemaLocation="http://www.springframework.org/schema/beans
http://www.springframework.org/schema/beans/spring-beans.xsd
http://www.springframework.org/schema/aop
http://www.springframework.org/schema/aop/spring-aop.xsd
http://www.springframework.org/schema/context
http://www.springframework.org/schema/context/spring-context.xsd
http://www.springframework.org/schema/tx
http://www.springframework.org/schema/tx/spring-tx.xsd">

<!-- spring-jdbc.jar中 -->
<bean id="txManager" class="org.springframework.jdbc.datasource.DataSourceTransactionManager">
<property name="dataSource" ref="dataSource"></property>
</bean>

<context:property-placeholder location="classpath:db.properties,classpath:second.properties"/>

<!-- 数据源 -->
<bean id="dataSource" class="org.springframework.jdbc.datasource.DriverManagerDataSource">
<property name="driverClassName" value="${jdbc.driver}"></property>
<property name="url" value="${jdbc.url}"></property>
<property name="username" value="${jdbc.username}"></property>
<property name="password" value="${jdbc.password}"></property>
</bean>
<!-- SqlSessinFactory对象 -->
<bean id="factory" class="org.mybatis.spring.SqlSessionFactoryBean">
<property name="typeAliasesPackage" value="com.bjsxt.pojo"></property>
</bean>
<!-- 扫描器 -->
<bean class="org.mybatis.spring.mapper.MapperScannerConfigurer">
<property name="basePackage" value="com.bjsxt.mapper"></property>
<property name="sqlSessionFactoryBeanName" value="factory"></property>
</bean>

<!-- 配置声明式事务 -->
<tx:advice id="txAdvice" transaction-manager="txManager">
<tx:attributes>
<tx:method name="insert"/> <!-- 可以用通配符 -->
</tx:attributes>
</tx:advice>

<aop:config>
<aop:pointcut expression="execution(* com.bjsxt.service.impl.*.*(..))" id="mypoint"/>
<aop:advisor advice-ref="txAdvice" pointcut-ref="mypoint"/>
</aop:config>

</beans>

声明式事务(tx:method)属性解释

声明式事务例子:

1
2
3
4
5
6
7
8
9
<!-- 配置声明式事务 -->
<tx:advice id="txAdvice" transaction-manager="txManager">
<tx:attributes>
<tx:method name="insert"/> <!-- 可以用通配符 -->
<tx:method name="ins*"/>
<tx:method name="saf"/>
<tx:method name="adad*"/>
</tx:attributes>
</tx:advice>

name 和 read-only

1. name=""   哪些方法需要被事务控制 (支持 * 通配符)

2. read-only="true/false"  是否是只读事务
    2.1 true : 告诉数据库此事务是只读事务 数据化优化,会对性能有一定提升(查询)
    2.2 false(默认) : 告诉数据库此事务是需要提交的事务 (新增/删除/修改)

propagation 控制事务传播行为

当一个具有事务控制的方法被另外一个有事务控制的方法调用后,需要如何管理事务?

1. REQUIRED(默认) : 
    1.1 有事务 --> 在此事务中执行
    1.2 无事务 --> 新建事务

2. SUPPORTS(随遇而安 有就有 没有就没有) : 
    2.1 有事务 --> 在此事务中执行
    2.2 无事务 --> 非事务状态下执行

3. MANDATORY(必须在事务内执行) :
    3.1 有事务 --> 在此事务中执行
    3.2 无事务 --> 报错

4. REQUIRES_NEW(必须在事务内执行) :
    4.1 有事务 --> 挂起
    4.2 无事务 --> 新建事务

5. NOT_SUPPORTED(必须在非事务执行) :
    5.1 有事务 --> 挂起
    5.2 无事务 --> 正常执行

6. NEVER(必须在非事务执行) :
    6.1 有事务 --> 报错
    6.2 无事务 --> 正常执行

7. NESTED(必须在事务内执行) :
    7.1 有事务 --> 创建一个嵌套事务
    7.2 无事务 --> 新建事务

isolation 事务隔离级别

多线程/并发访问保证数据具有完整性

  • 脏读(两个事务)

    事务A读取到事务B中未提交的数据 --> B可能数据改变 --> A读的数据可能和数据库中的不一致 
  • 不可重复读(同一事务)

    1. 主要针对某行数据数据 (行中某列)
    2. 主要针对 修改 操作
    3. 事务A读取事务 --> 事务B对事务A读取的数据修改 --> A再次读取和之前的不一致 
  • 幻读(两个事务)

    1. 主要针对 新增/删除 操作
    2. 事务A按照特定条件查询结果 --> 事务B新增了数据(符合A查询条件) --> A查询的数据和数据库的数据不一致
1. DEFAULT(默认) : 底层数据库自动判断用什么隔离界别

2. READ_UNCOMMITTED(效率最高) : 可以读取未提交的数据 ( 可能出现 脏读 / 不可重复读 / 幻读 ) 

3. READ_COMMITTED(避免脏读) : 只能读取其他事务已经提交的数据 (可能出现 不可重复读 / 幻读)    

4. REPEATABLE_READ(避免脏读和不可重复读) : 读的数据被添加锁(一行) (可能出现 幻读)

5. SERIALIZABLE(最安全和效率最低) : 整个表添加锁(排队操作) 

rollback-for 事务回滚

1. rollback-for="异常类型全限定路径"  出现什么异常时候需要进行回滚

    给定该属性值 (手动抛异常一定要给该属性值!!!)

2. no-rollback-for=" "  当出现什么异常时不滚回事务

Spring单例设计模式

单例设计模式

在应用程序中有保证最多只有一个实例

单例设计模式好处:
1. 提升运行效率
2. 实现数据共享 ( application对象 )

单例设计模式分类
1. 懒汉式
2. 饿汉式


懒汉式

创建SingleTon类

1
2
3
4
5
6
7
8
9
10
11
12
13
14
15
16
17
18
19
20
21
22
23
public class SingleTon {

private static SingleTon singleton; // 由于对象需要被静态方法调用 所以方法也要是static 也要讲改为private (public 就直接调用对象)

// 构造方法 (其他类不能实例化这个类对象 对外提供访问入口)
private SingleTon() {}

// 实例方法 (必须通过对象调用 )
public static SingleTon getInstance() {
if(singleton==null)
{
// 多线程访问下 可能if同时成立 -- 添加锁
synchronized(SingleTon.class) {
if(singleton==null) // 双重检验
{
singleton=new SingleTon(); //创建实例化
}
}
}
return new SingleTon(); // 实例化
}

}

创建test类

1
2
3
4
5
6
7
8
9
public class Test {
public static void main(String[] args) {
//类加载时就进行实例化!!!
SingleTon singleton=SingleTon.getInstance(); //不能直接new SingTon() -- 调用静态方法
SingleTon singleton1=SingleTon.getInstance();
System.out.println(singleton==singleton1);

}
}

饿汉式

懒汉式加了锁(效率降低) – 解决懒汉式中可能同时访问一个对象的问题

只需要更改SingleTon类

1
2
3
4
5
6
7
8
9
10
11
12
13
14
public class SingleTon {

//在类加载时就实例化
private static SingleTon singleton=new SingleTon(); //对比懒汉式 将实例方法内容删除 直接new一个对象

//构造方法
private SingleTon() {}

//实例方法
public static SingleTon getInstance() {
return new SingleTon();
}

}

总结

1. private static SingleTon singleton=new SingleTon();  直接new一个对象
2. 实例方法内容全部删除(不用管锁的事情)

Spring加载属性文件和scope属性

加载properties文件

src下新建xxx.properties文件

1
2
3
4
jdbc.driver=com.mysql.jdbc.Driver
jdbc.url=jdbc:mysql://localhost:3306/ssm
jdbc.password=njdxrjgc7777777.
jdbc.username=root

在spring配置文件中引入xmlns:context

1
2
3
4
xmlns:context="http://www.springframework.org/schema/context"  //上面加的是xmlns

http://www.springframework.org/schema/context
http://www.springframework.org/schema/context/spring-context.xsd //加到location里面

使用context:property-placeholder标签

1
<context:property-placeholder location="classpath:db.properties,classpath:xx.properties"/>   // 多个就用逗号隔开

之前配置jdbc用${}更改

1
2
3
4
5
6
7
 <!-- 数据源 -->
<bean id="dataSource" class="org.springframework.jdbc.datasource.DriverManagerDataSource">
<property name="driverClassName" value="${jdbc.driver}"></property> //将原来的直接改成 ${} 形式
<property name="url" value="${jdbc.url}"></property>
<property name="username" value="${jdbc.username}"></property>
<property name="password" value="${jdbc.password}"></property>
</bean>

配置文件完整代码

1
2
3
4
5
6
7
8
9
10
11
12
13
14
15
16
17
18
19
20
21
22
23
<?xml version="1.0" encoding="UTF-8"?>
<beans xmlns="http://www.springframework.org/schema/beans"
xmlns:xsi="http://www.w3.org/2001/XMLSchema-instance"
xmlns:aop="http://www.springframework.org/schema/aop"
xmlns:context="http://www.springframework.org/schema/context"
xsi:schemaLocation="http://www.springframework.org/schema/beans
http://www.springframework.org/schema/beans/spring-beans.xsd
http://www.springframework.org/schema/aop
http://www.springframework.org/schema/aop/spring-aop.xsd
http://www.springframework.org/schema/context
http://www.springframework.org/schema/context/spring-context.xsd">

<context:property-placeholder location="classpath:db.properties,classpath:xx.properties"/>

<!-- 数据源 -->
<bean id="dataSource" class="org.springframework.jdbc.datasource.DriverManagerDataSource">
<property name="driverClassName" value="${jdbc.driver}"></property>
<property name="url" value="${jdbc.url}"></property>
<property name="username" value="${jdbc.username}"></property>
<property name="password" value="${jdbc.password}"></property>
</bean>

</beans>

从spring容器中取出属性文件值

修改注解扫描(注解要扫描)

1
2
3
 //具体写哪些类用了注解 (多个就用逗号隔开)
<context:component-scan base-package="com.bjsxt.advice,com.bjsxt.test">
</context:component-scan>

类中加载注解 @value(“${key}”)

key和变量名可以不相同
变量类型任意 (key对应的value可以转换成这个类型就行)

1
2
@value("${jdbc.uri}")  //取出jdbc.uri的值
private String test;

scope属性(bean标签属性)

控制对象有效范围(单例 多例等)

bean标签

对应的对象默认是单例(无论获取多少次都是同一对象)

scope属性取值

1. singleton(默认) : 单例
2. prototype :多例
3. request : 每次请求都重新实例化
4. session : 每个会话对象内,对象都是单例
5. application : 在application对象内是单例
6. global session spring : 退出的一个对象 依赖于spring-webmvc-protlet 类似于session

Spring自动注入

自动注入

(spring配置文件中对象名) == (ref=”id”中id名字) 就可以使用自动注解(不需要配置property)

1
2
3
4
5
//有两个类People和Teacher (People里面有Teacher的对象)
<bean id="teacher" class="com.bjsxt.test.Teacher"></bean>
<bean id="people" class="com.bjsxt.test.People" autowire="byName">
<!-- <property name="teacher" ref="teacher"></property> --> //以前都需要配置property
</bean>

解决方案

1. 在<bean>标签中通过 autowire=""配置 (只在本bean有效)
2. 在最大的<beans>标签中通过 default-autowire=""配置 (所有bean有效)

五大取值

1. default(默认): 根据全局default-autowire=""值 (默认全局和局部的在没有配置的时候都相当于no)
2. no: 不自动注入
3. byName: 通过名称自动注入 在Spring容器中找类的id
4. byType : 通过类型注入 
    4.1 不能有两个相同类型的bean!!!!!!
5. constructor : 根据构造方法注入
    5.1 提供对应参数的构造方法
    5.2 底层还是byName  构造方法参数名和其他bean的id相同

Spring代理设计模式

代理设计模式

代理设计模式优点
1. 保护真实对象(不见到源码)
2. 职责加强 (增强功能)
3. 扩展 (接口扩展)

代理设计模式
1. 真实对象 (老总)
2. 代理对象 (秘书)
3. 抽象对象(抽象功能)


静态代理设计模式

由代理对象代理所有真实对象的功能

1. 自己编写代理类(特点)
2. 每个代理的功能需要单独编写

动态代理设计模式

为了解决静态代理模式的缺点

分类

1. JDK 动态代理    不需额外jar(JDK自带)
2. cglib 动态代理  需额外jar

JDK和cglib对比

JDK动态代理(false)

优点:
       jdk自带 不需要导入额外jar

缺点:
       1. 真实对象必须实现接口
       2. 利用反射机制(效率不高)

异常:
       希望把接口对象 --> 具体真实对象

cglib动态代理(true)

优点:
       1. 基于字节码 生成真实对象的子类
       2. 运行效率高
       3. 不需要实现接口    

缺点:
       1. 需要导入额外jar

异常:
       使用spring aop时,只要出现Proxy和真实对象转换异常

异常解决:
        proxy-target-class更改 true(cglib动态代理) / false(JDK动态代理)

配置文件aop标签(配合注解)

1
2
3
<aop:aspectj-autoproxy proxy-target-class="true">  //注解一定要打开true  用更高效的cglib

</aop:aspectj-autoproxy>

AOP

AOP 面向切面编程

在原有纵向执行流程中添加横切面(不需要修改原有代码)

面向切面编程 特性:
1. 高扩展性
2. 原有代码释放了部分逻辑(横切面会分担一些功能)

面向切面编程:

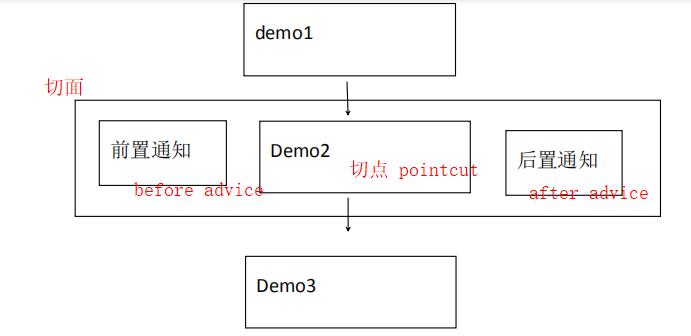
在程序原有纵向执行流程中,针对某一个/某一些方法添加通知,形成横切面过程 -- 面向切面编程

面向切面编程概念图:

1. 原有功能: 切点(pointcut)
2. 前置通知: 切点之前执行的功能 (before advice)
3. 后置通知: 切点之后执行的功能 (after advice)
4. 异常通知: 切点执行过程中出现异常 (throws advice)
5. 切面: 所有功能总称
6. 织入: 将切面嵌入到原有功能的过程

两种AOP实现方式

1. Schema-based  
    1. 每个通知都需要实现接口/类
    2. 配置spring配置文件在<aop:config>配置

2. AspectJ  
    1. 每个通知不需要实现接口/类
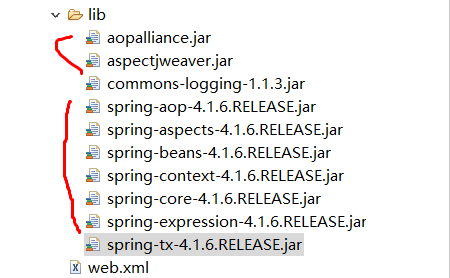
    2. 配置spring配置文件在<aop:config>的子标签<aop:aspect>中配置

使用Schema-based方式

总体实现步骤

1.导入jar包
2.编写demo类(具有几个方法)
3.编写配置文件
    3.1 导入aop的xmls和location
    3.2 编写aop的相关信息(切点 前置和后置通知类的连接)
    3.3 前置通知类/后置通知类/demo类的bean方法
4.编写前置通知类(实现MethodBeforeAdvice接口)
5.编写后置通知类(实现AfterReturningAdvic接口)
6.编写测试类(IOC 控制反转)

具体实现代码

1.导入jar包

2.Demo类

1
2
3
4
5
6
7
8
9
10
11
12
13
14
15
public class Demo {

public void demo1(){
System.out.println("demo1");
}

public void demo2(){
System.out.println("demo2"); //切点是demo02方法
}

public void demo3(){
System.out.println("demo3");
}

}

3.配置文件

1
2
3
4
5
6
7
8
9
10
11
12
13
14
15
16
17
18
19
20
21
22
<?xml version="1.0" encoding="UTF-8"?>

<beans xmlns="http://www.springframework.org/schema/beans"
xmlns:xsi="http://www.w3.org/2001/XMLSchema-instance"
xmlns:aop="http://www.springframework.org/schema/aop" <!-- 导入aop的xmlns -->
xsi:schemaLocation="http://www.springframework.org/schema/beans
http://www.springframework.org/schema/beans/spring-beans.xsd
http://www.springframework.org/schema/aop <!-- 导入aop的地址 -->
http://www.springframework.org/schema/aop/spring-aop.xsd">

<bean id="mybefore" class="com.bjsxt.advice.MyBeforeAdvice"></bean> <!-- 前置通知类 -->
<bean id="myafter" class="com.bjsxt.advice.MyAfterAdvice"></bean> <!-- 后置通知类 -->

<aop:config>
<aop:pointcut expression="execution(* com.bjsxt.test.Demo.demo02())" id="mypoint"/> <!-- 要给aop的pointcut切点编程 execution(* )的格式 -->
<aop:advisor advice-ref="mybefore" pointcut-ref="mypoint"/> <!-- 将前置通知类加到上面的切点 -->
<aop:advisor advice-ref="myafter" pointcut-ref="mypoint"/> <!-- 将后置通知类加到上面的切点 -->
</aop:config>

<bean id="demo" class="com.bjsxt.test.Demo"></bean> <!-- 找方法的bean 用于test类找 -->

</beans>

4.前置通知类

1
2
3
4
5
6
public class MyBeforeAdvice implements MethodBeforeAdvice{
@Override
public void before(Method arg0, Object[] arg1, Object arg2) throws Throwable {
System.out.println("执行前置通知!");
}
}

5.后置通知类

1
2
3
4
5
6
public class MyAfterAdvice implements AfterReturningAdvice {
@Override
public void afterReturning(Object arg0, Method arg1, Object[] arg2, Object arg3) throws Throwable {
System.out.println("执行后置通知!");
}
}

6.测试类

1
2
3
4
5
6
7
8
9
10
11
12
13
14
15
16
17
18
public class Test {
public static void main(String[] args) {

//原来的写法:
//Demo demo=new Demo();
//demo.demo1();
//demo.demo2();
//demo.demo3();

//因为我们是IOC 控制反转 将new和管理对象给了spring
ApplicationContext ac=new ClassPathXmlApplicationContext("applicationContext.xml");
Demo demo = ac.getBean("demo",Demo.class); //通过找配置文件中的bean
demo.demo1();
demo.demo2();
demo.demo3();
}

}
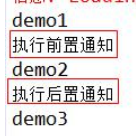
总结

执行结果

前置通知实现的接口方法参数

1
2
3
4
5
6
7
8
9
10
public class MyBeforeAdvice implements MethodBeforeAdvice{
@Override
public void before(Method arg0, Object[] arg1, Object arg2) throws Throwable {

//agr0 切点方法对象 Method对象
//agr1 切点方法参数
//agr2 切点在那个对象中

}
}

后置通知实现的接口方法参数

1
2
3
4
5
6
7
8
9
10
11
public class MyAfterAdvice implements AfterReturningAdvice {
@Override
public void afterReturning(Object arg0, Method arg1, Object[] arg2, Object arg3) throws Throwable {

//agr0 切点方法返回值
//agr1 切点方法对象
//agr2 切点方法参数
//agr3 切点方法所在类的对象

}
}

配置异常通知(AspectJ方式)

只要切点报异常才能触发 异常通知(throws advice)
不实现接口(方法随便写) 然后配置在aop:aspect标签下面

准备类和异常通知方法

1
2
3
4
5
public class MtThrowAdvice {
public void myexception(Exception e) {
System.out.println("异常了!!!"+e.getMessage()); //自己写的报错的方法 输出错误原因
}
}

创建Demo类(切点方法)

1
2
3
4
5
6
7
8
public class Demo {

public void demo1(){
int i=5/0; //这里出异常
System.out.println("demo1");
}

}

更改配置文件

1
2
3
4
5
6
7
8
9
10
11
12
13
14
15
16
17
18
19
20
21
22
<?xml version="1.0" encoding="UTF-8"?>
<beans xmlns="http://www.springframework.org/schema/beans"
xmlns:xsi="http://www.w3.org/2001/XMLSchema-instance"
xmlns:aop="http://www.springframework.org/schema/aop"
xsi:schemaLocation="http://www.springframework.org/schema/beans
http://www.springframework.org/schema/beans/spring-beans.xsd
http://www.springframework.org/schema/aop
http://www.springframework.org/schema/aop/spring-aop.xsd">


<bean id="mythrow" class="com.bjsxt.advice.MtThrowAdvice"></bean> //给写的异常类写bean

<aop:config>
<aop:aspect ref="mythrow"> //相比于schema-based方式它可以自动找是前置还是后置通知 我们的aspectJ需要明确ref跳到哪个异常类
<aop:pointcut expression="execution(* com.bjsxt.test.Demo.demo01())" id="mypoint"/> //这行主要写切点: 是哪个包哪个类的哪个方法 然后给切点一个id
<aop:after-throwing method="myexception" pointcut-ref="mypoint" throwing="e"/> //异常通知: 方法是刚才那个类的哪个 然后切点是哪个 扔出来的信息是方法的哪个对象
</aop:aspect>
</aop:config>

<bean id="demo" class="com.bjsxt.test.Demo"></bean> //给切点的类写bean

</beans>

添加测试类

1
2
3
4
5
6
7
8
9
10
11
12
13
14
15
16
public class Test {
public static void main(String[] args) {

//原来的写法:
//Demo demo=new Demo();
//demo.demo1();
//demo.demo2();
//demo.demo3();

//因为我们是IOC 控制反转 将new和管理对象给了spring
ApplicationContext ac=new ClassPathXmlApplicationContext("applicationContext.xml");
Demo demo = ac.getBean("demo",Demo.class);
demo.demo1(); //测试方法
}

}

异常通知(Schema-based)

实现接口(方法必须叫afterThrowing) 然后配置在aop:config下面

准备异常类

1. 必须实现throwsAdvice接口
2. 实现的方法有两种 (1个参数 / 4个参数)
3. 异常类型必须要和切点报错的异常一致(一般就写最大的Exception!!!!)
1
2
3
4
5
6
7
8
  public class MyThrow implements ThrowsAdvice {

//第一种
public void afterThrowing(Exception ex) throws Throwable{ //里面用最大的Exception
System.out.println("aaaa");
}

}

准备配置文件(展示细节)

只在aop:config标签里面去写

1
2
3
4
<aop:config>
<aop:pointcut expression="execution(* com.bjsxt.test.Demo.demo01())" id="mypoint"/>
<aop:advisor advice-ref="mythrow" pointcut-ref="mypoint"/>
</aop:config>

对比两种方法的区别

1
2
3
4
5
6
7
1.AspectJ:
1.1 不实现接口(显示异常的方法随便取名字)
1.2 配置文件结构 aop:config -- aop:aspect(ref写跳转的异常类位置) -- aop:pointcut(切点) /aop:after-throwing(异常通知)

2.schema-based:
2.1 实现throwsAdvice接口(显示异常的方法必须叫afterThrowing)
2.2 配置文件结构 aop:config -- aop:pointcut(切点) / aop :advisor (前置/后置/异常通知都在这)

环绕通知(Schema-based)

前置和后置通知 –> 一个通知(环绕)

创建类实现MethodInterceptor接口

1
2
3
4
5
6
7
8
9
10
11
public class MyArround implements MethodInterceptor{

@Override
public Object invoke(MethodInvocation arg0) throws Throwable {
System.out.println("环绕-前置");
Object result = arg0.proceed(); //放行 调用切点方式
System.out.println("环绕-后置");
return result;
}

}

配置文件(展示细节)

1
2
3
4
5
6
7
8
<bean id="myarround" class="com.bjsxt.advice.MyArround"></bean>

<aop:config>
<aop:pointcut expression="execution(* com.bjsxt.test.Demo.demo01())" id="mypoint"/> //配置切点
<aop:advisor advice-ref="myarround" pointcut-ref="mypoint" /> //配置环绕的信息
</aop:config>

<bean id="demo" class="com.bjsxt.test.Demo"></bean>

环绕通知(AspectJ)

创建MyAdvice类(不实现接口)

1
2
3
4
5
6
7
8
9
10
11
12
13
14
15
16
17
18
19
20
21
22
23
24
25
26
27

public class MyAdvice {
public void mybefore(String name1,int age1) {
System.out.println("前置"+name1+" "+age1);
}

public void myafter1() {
System.out.println("后置1");
}

public void myafter2() {
System.out.println("后置2");
}

public void mythrow() {
System.out.println("异常");
}

public Object myarround(ProceedingJoinPoint p) throws Throwable { //环绕的类 ProceedingJoinPoint就是需要的类
System.out.println("执行环绕");
System.out.println("环绕-前置");
Object result = p.proceed(); //和另外一种方法一样的执行
System.out.println("环绕-后置");
return result;
}

}

创建Demo类(切点方法)

1
2
3
4
5
6
7
8
public class Demo {

public void demo1(String name,int age){ //现在切点传入的是name 和 age (后面会在配置和自己写的方法内的属性不同!!!)
//int i=5/0;
System.out.println("demo1"+name+" "+age);
}

}

配置文件

1
2
3
4
5
6
7
8
9
10
11
12
13
14
15
16
17
18
19
20
21
<bean id="myarround" class="com.bjsxt.advice.MyArround"></bean>
<bean id="myadvice" class="com.bjsxt.advice.MyAdvice"></bean> //自己写的环绕的类

<aop:config>
<aop:aspect ref="myadvice"> //弹到我们写的类(环绕 前置 后置等方法)
<aop:pointcut expression="execution(* com.bjsxt.test.Demo.demo01(String,int)) and args(name1,age1)" id="mypoint"/> //切点信息
<aop:before method="mybefore" pointcut-ref="mypoint" arg-names="name1,age1" /> //前置通知信息

//有两种:
1.after 异常也可以执行
2.after-returning 异常就不会执行

<aop:after method="myafter1" pointcut-ref="mypoint"/>
<aop:after-returning method="myafter2" pointcut-ref="mypoint"/>

<aop:after-throwing method="mythrow" pointcut-ref="mypoint"/> //异常通知信息
<aop:around method="myarround" pointcut-ref="mypoint"/> //环绕的具体标签 aop:around
</aop:aspect>
</aop:config>

<bean id="demo" class="com.bjsxt.test.Demo"></bean> //Demo类信息

测试Test类

1
2
3
4
5
6
7
8
public class Test {
public static void main(String[] args) {
//因为我们是IOC 控制反转 将new和管理对象给了spring
ApplicationContext ac=new ClassPathXmlApplicationContext("applicationContext.xml");
Demo demo = ac.getBean("demo",Demo.class); //通过bean去找
demo.demo1("zhangsan",123); //传入参数执行方法
}
}

关于配置文件中的细节

1. 关于后置的标签(执行顺序和配置顺序有关):
    1.1 after 异常也可以执行   
    1.2 after-returning 异常就不会执行

2. 关于前置标签的属性和使用问题
        <aop:pointcut expression="execution(* com.bjsxt.test.Demo.demo01(String,int)) and args(name1,age1)" id="mypoint"/>
        <aop:before method="mybefore" pointcut-ref="mypoint" arg-names="name1,age1" />
    注:     2.1 execution(* com.bjsxt.test.Demo.demo01()) 在后面加 and args()
         2.2 args()有几个参数 下面的arg-names就要有几个参数
         2.3 arg-names="" 里面的参数名称必须和通知方法参数名对应(和你写的前置方法的参数一样!!)

使用注解(基于Aspect)

告诉spring哪些类下的包有注解(默认不会自动找)

配置文件(引入xmlns:context)

1
2
3
4
5
6
7
8
9
10
<beans xmlns="http://www.springframework.org/schema/beans"
xmlns:xsi="http://www.w3.org/2001/XMLSchema-instance"
xmlns:aop="http://www.springframework.org/schema/aop"
xmlns:context="http://www.springframework.org/schema/context" // 1. 引入这一行 xmlns:context
xsi:schemaLocation="http://www.springframework.org/schema/beans
http://www.springframework.org/schema/beans/spring-beans.xsd
http://www.springframework.org/schema/aop
http://www.springframework.org/schema/aop/spring-aop.xsd
http://www.springframework.org/schema/context // 2. 引入相关的location地址
http://www.springframework.org/schema/context/spring-context.xsd">

@Component

1. 相当于bean标签(引入相关类)
2. 相当于bean id=""  @Component(没有参数) -- 将类名首字母变小写(Demo -- demo)  
3. @Component(可以随意自定义名称)

实现步骤

配置文件注解在哪些包

1
2
//多个包就用逗号隔开
<context:component-scan base-package="com.bjsxt.advice,com.bjsxt.test"></context:component-scan>

配置Demo切片类

1
2
3
4
5
6
7
@Component   //加这个注解 表明现在是给切片类写了id="demo"
public class Demo {
@Pointcut("execution(* com.bjsxt.test.Demo.demo01())") //demo01是切片
public void demo1(){
System.out.println("demo01");
}
}

配置前置/后置类

1
2
3
4
5
6
7
8
9
10
11
12
13
14
15
@Component  //要引入Demo切片类
@Aspect //告诉我是一个切片类
public class MyAdvice {

@Before("com.bjsxt.test.Demo.demo01()") //方法前面要用是哪个切片
public void mybefore() {
System.out.println("前置");
}

@After("com.bjsxt.test.Demo.demo01()")
public void myafter() {
System.out.println("后置");
}

}

配置文件更改代理

1
2
3
4
5
6
7

<!--
true 使用cglib动态代理(注解)
false 使用jdk动态代理
-->

<aop:aspectj-autoproxy proxy-target-class="true"></aop:aspectj-autoproxy>

Spring整合Mybatis

Spring整合Mybatis

导入jar包

创建数据库

spring的bean标签代替mybatis全局配置文件

1
2
3
4
5
6
7
8
9
10
11
12
13
14
15
16
17
18
19
20
21
22
23
24
25
26
27
28
29
<?xml version="1.0" encoding="UTF-8"?>

<beans xmlns="http://www.springframework.org/schema/beans"
xmlns:xsi="http://www.w3.org/2001/XMLSchema-instance"
xsi:schemaLocation="http://www.springframework.org/schema/beans
http://www.springframework.org/schema/beans/spring-beans.xsd">

<!-- 数据封装类
替换mybatis里面连接数据库的文件 spring-jdbc.jar -->
<bean id="dataSouce" class="org.springframework.jdbc.datasource.DriverManagerDataSource">
<property name="driverClassName" value="com.mysql.jdbc.Driver"></property>
<property name="url" value="jdbc:mysql://localhost:3306/ssm"></property>
<property name="username" value="root"></property>
<property name="password" value="njdxrjgc7777777."></property>
</bean>


<!-- 创建SqlSessionFactory对象 -->
<bean id="factory" class="org.mybatis.spring.SqlSessionFactoryBean">
<property name="dataSource" ref="dataSouce"></property> <!-- 跳转到关于有数据库信息的bean -->
</bean>

<!-- 扫描器 相当于mybatis配置文件中mappers下的package标签 扫描mapper包下会给对应接口创建对象 -->
<bean class="org.mybatis.spring.mapper.MapperScannerConfigurer">
<property name="basePackage" value="com.bjsxt.mapper"></property>
<property name="sqlSessionFactory" ref="factory"></property> <!-- 跳转到factory的bean里面 -->
</bean>

</beans>

准备实体类

1
2
3
4
5
6
7
8
9
10
11
12
13
14
15
16
17
18
19
20
21
22
23
24
25
26
27
public class Airport {
private int id;
private String portName;
private String cityName;
public int getId() {
return id;
}
public void setId(int id) {
this.id = id;
}
public String getPortName() {
return portName;
}
public void setPortName(String portName) {
this.portName = portName;
}
public String getCityName() {
return cityName;
}
public void setCityName(String cityName) {
this.cityName = cityName;
}
@Override
public String toString() {
return "Airport [id=" + id + ", portName=" + portName + ", cityName=" + cityName + "]";
}
}

使用接口绑定写sql语句

1
2
3
4
5
6
public interface AirportMapper {

@Select("select * from airport") //注解的方式写sql语句
List<Airport> selAll(); //返回值是实体类的一个list形式

}
1
--------

使用接口写查询结果方法

1
2
3
public interface AirportService {
List<Airport> show(); //返回值是实体类的一个list形式
}

使用实现类实现接口方法

1
2
3
4
5
6
7
8
9
10
11
12
13
14
15
16
17
18
19
20
public class AirportServiceImpl implements AirportService {

//添加接口实现
private AirportMapper airportMapper;

//生成get和set方法
public AirportMapper getAirportMapper() {
return airportMapper;
}

public void setAirportMapper(AirportMapper airportMapper) {
this.airportMapper = airportMapper;
}

//实现service层接口方法
@Override
public List<Airport> show() {
return airportMapper.selAll();
}
}

在配置文件中加bean

1
2
3
4
5

<!-- 由spring管理service类 -->
<bean id="airportService" class="com.bjsxt.service.impl.AirportServiceImpl">
<property name="airportMapper" ref="airportMapper"></property> <!-- 实现类里面的那个对象在这里配置 -->
</bean>

test类

1
2
3
4
5
6
7
8
9
10
11
12
13

public class Test {
public static void main(String[] args) {

//找spring容器配置文件地址
ApplicationContext ac=new ClassPathXmlApplicationContext("applicationContext.xml"); //默认从classes文件夹根目录开始寻找
//执行方法
AirportServiceImpl bean = ac.getBean("airportService",AirportServiceImpl.class); //通过bean去实例化
List<Airport> list = bean.show(); //调用接口实现类方法
System.out.println(list);

}
}

总结

代码框架

执行过程分析

1. 准备jar包和数据库    
2. 准备好实体类(和数据库对的上)
3. 准备配置文件
    1. 准备替换mybatis和数据库连接信息的bean
    2. 准备刚才替换mybatis的文件的读入的bean
    3. 准备创建扫描器(相当于mappers下面的package标签)
    4. 准备要被spring管理的service类
4. 准备接口绑定的接口写sql语句
5. 准备service接口写返回的方法
6. 准备实体类实现接口返回结果
    1. 要准备接口绑定接口的对象
    2. 生成get和set方法
    3. 实现接口方法 返回结果!!
7. 准备service的bean
8. 准备实现test测试类
    1. 通过ApplicationContext找配置文件
    2. 通过对象调用bean方法查找到配置文件中的关于service类的bean去找实现类实现

执行结果:


,