SpringMVC原理分析

运行原理

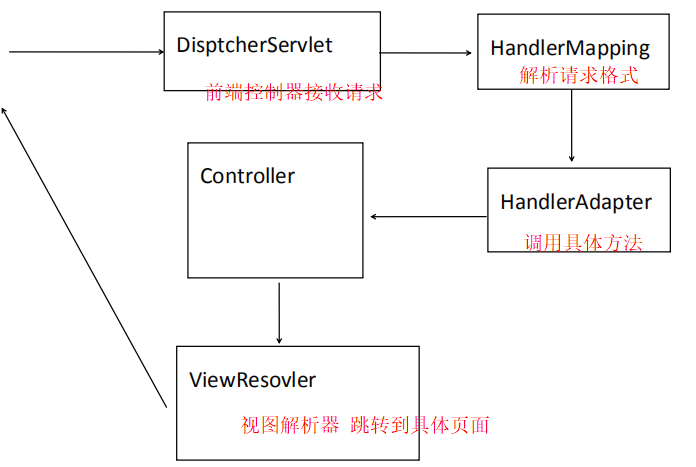
SpringMVC图示:

文字描述:

前提:
    web.xml文件中设置了DispatcherServlet的<url-pattern>为“/”
执行:
    1. 用于发起请求 --> 请求一个控制器
    2. 执行DispatcherServlet
    3. DispatcherServlet调用 HandlerMapping的DefaultAnnotatiionHandlerMapping解析URL
    4. 调用HandlerAdatper的AnnotationMethodHandlerAdapter
    5. 调用Controller中的HandlerMethod
    6. 当HandlerMehod执行完毕会返回view
    7. view会被viewResovler进行视图解析 --> 调用jsp对应的.class文件 --> 运行
    8. 将运行结果响应给客户端

SpringMVC实现自定义拦截器

拦截器

发送请求时被拦截器拦截,在控制器(注解类的@RequestMapping)前后添加额外功能

拦截器和AOP区别

1. AOP在特定方法前后进行扩充(对ServiceImpl实现类)
2. 拦截器对控制器方法(对Controller注解类)

SpringMVC拦截器和Filter过滤器区别

1. SpringMVC拦截器  拦截控制器Controller
2. Filter过滤器     拦截任何请求

拦截器实现(三个方法)

新建类实现HandlerInterceptor接口

1
2
3
4
5
6
7
8
9
10
11
12
13
14
15
16
17
18
19
20
21
22
23
24
25
26
27
28
29
30
31
32
public class DemoInterceptor implements HandlerInterceptor {

//1. 在进入控制器之前执行(false表示阻止进入控制器) --拦截器拦截哪个控制器
@Override
public boolean preHandle(HttpServletRequest arg0, HttpServletResponse arg1, Object arg2) throws Exception {
System.out.println("1.preHandle (控制器执行前)");
System.out.println("拦截器拦截的是:"+arg2); //arg2传的是哪个控制器
System.out.println("------------------------------------------------------");
return true; // false 表示 阻止进入控制器
}

//2. 控制器执行完成,进去jsp之前执行 -- 日志记录/敏感词语过滤
@Override
public void postHandle(HttpServletRequest arg0, HttpServletResponse arg1, Object arg2, ModelAndView arg3)throws Exception {
System.out.println("3.postHandle (jsp之前)");
System.out.println("往"+ arg3.getViewName()+"跳转"); //arg3是跳转到哪个jsp页面
System.out.println("model的值 :"+arg3.getModel().get("model")); //获取model的值
String word = arg3.getModel().get("model").toString(); //将model的值tostring转为字符串
String neword = word.replace("祖国", "***"); //通过字符串替换 将祖国这个敏感词 换成 ***
System.out.println("拦截器执行之后model过滤后: "+neword); //输出之后的model结果
System.out.println("------------------------------------------------------");
}

//3. jsp执行完成后执行 -- 记录异常到日志里面
@Override
public void afterCompletion(HttpServletRequest arg0, HttpServletResponse arg1, Object arg2, Exception arg3)throws Exception {
System.out.println("5.afterCompletion jsp之后");
System.out.println("现在的异常是: "+arg3); //arg3获取异常是什么
System.out.println("------------------------------------------------------");
}

}

spingmvc配置拦截器(两种方法)

拦截所有的控制器

1
2
3
<mvc:interceptors>
<bean class="com.bjsxt.interceptor.DemoInterceptor"></bean>
</mvc:interceptors>

拦截特定的控制器

1
2
3
4
5
6
7
<mvc:interceptors>
<mvc:interceptor>
<mvc:mapping path="/demo"/>
<mvc:mapping path="/demo01"/>
<bean class="com.bjsxt.interceptor.DemoInterceptor"></bean>
</mvc:interceptor>
</mvc:interceptors>

控制器

1
2
3
4
5
6
7
8
9
10
11
@Controller
public class DemoController {

@RequestMapping("demo")
public String demo(Model model) {
System.out.println("2.控制器demo执行");
System.out.println("------------------------------------------------------");
model.addAttribute("model","我们都爱祖国"); // 设置model值为我们都爱祖国
return "index.jsp"; // 跳转到index.jsp页面
}
}

主页index.jsp页面##

1
2
3
4
5
6
7
8
<body>

<% System.out.println("4.index.jsp (jsp执行)");
System.out.println("---------------------------------------");
%>
jsp执行正常!

</body>

总结:

方法分析(3个):

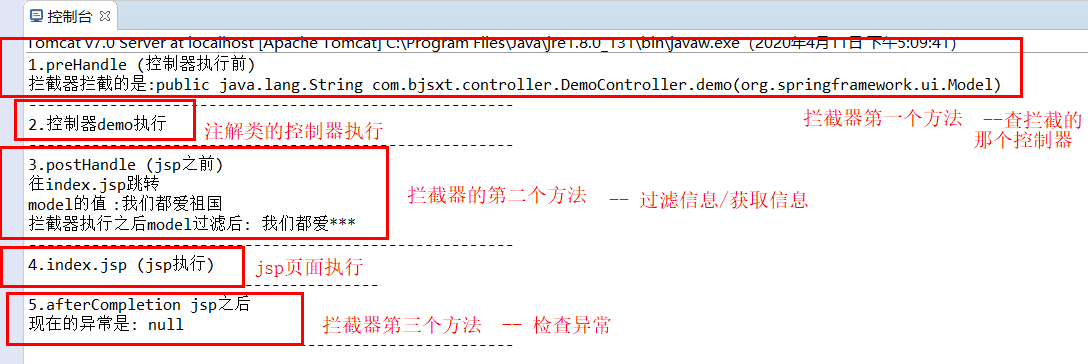
1. preHandle :                  控制器前(可以获得拦截的是哪个控制器)
2. @RequestMapping的注解方法 :   控制器 (写跳转哪个jsp页面)
3. postHandle :                 控制器后 jsp前(日志记录/敏感词语过滤)
4. xxx.jsp                      jsp页面
5. afterCompletion :            jsp之后(记录异常/异常写入日志)

最终执行结果:


拦截器栈

多个拦截器同时生效 –> 拦截器栈

执行顺序(先进后出)

执行顺序和springmvc.xml里面配置的顺序有关

执行案例(两个拦截器)

配置顺序 : 拦截器A --> 拦截器B

执行顺序(圆环!!!) :  
            preHandle(A)  最外层
            preHandle(B)  次外层
            控制器方法     中心(上面都是A在前 下面都是B在前)
            postHandle(B) 
            postHandle(A)
            JSP页面
            afterCompletion(B)
            afterCompletion(A)

SpringMVC实现文件上传和下载

文件下载

1. 响应头没有设置:Content-Disposition(浏览器默认按照inline值处理)  
    1.1 inline 就是能显示就显示,不能显示就下载
2. 响应头设置:Content-Disposition="attachment;filename=文件名"
    2.1 attachment 以附加形式下载
    2.2 filename  就是下载时显示的下载文件名
导入jar包

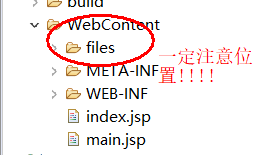
准备下载的文件

更改springmvc的静态资源

1
2
3
//添加files文件的静态资源配置
<mvc:resources location="/files/" mapping="/files/**">
</mvc:resources>

index.jsp页面添加标签

1
<a href="download?fileName=a.txt">下载</a>

注解类

1
2
3
4
5
6
7
8
9
10
11
12
13
14
15
16
17
18
19
20
21
22
23
24
25
@Controller
public class DemoController {

@RequestMapping("download")
public void download(String fileName,HttpServletResponse res,HttpServletRequest req) throws IOException
{
//设置响应流中文件进行下载
res.setHeader("Content-Disposition","attachment;filename="+fileName);

//把二进制流放入响应体中
ServletOutputStream os=res.getOutputStream();

//获取完整路径
String path=req.getServletContext().getRealPath("files"); //完整路径

//设置文件(路径,文件名)
File file=new File(path,fileName);
byte[] bytes=FileUtils.readFileToByteArray(file); //把一个文件导入转为二进制流
os.write(bytes); //流读入
os.flush();
os.close();

}

}

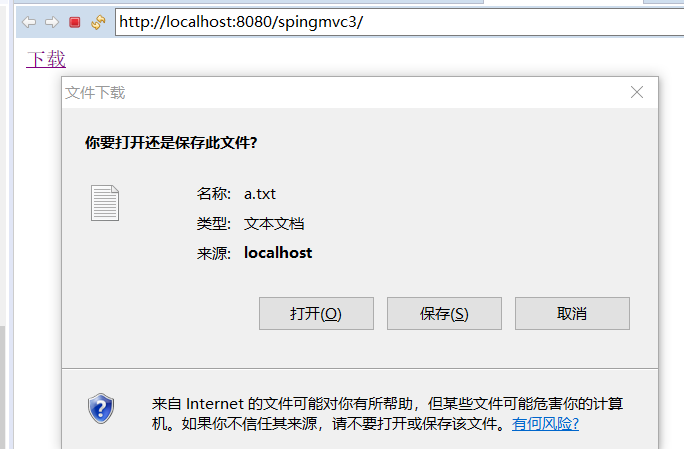
执行项目点击下载


文件上传(MultipartResovler)

文件上传具体分析

1. 基于apache的commons-fileupload.jar完成文件上传
2. MultipartResovler作用
    2.1 客户端上传的文件 -->MutipartFile封装类
    2.2 通过MutipartFile封装类获取到文件流

表单数据类型(enctype属性)

//enctype属性取值:
1. application/x-www-form-urlencoded(默认值) :普通表单数据(少量文字信息)
2. text/plain :大量文字信息(邮件/论文)
3. multipart/form-data : 表单中包含二进制文件内容

导入jar包

编写jsp页面

注解类传过去的类的对象和文件标签的name必须一致!!!

1
2
3
4
5
<form action="upload" enctype="multipart/form-data" method="post">  //enctype属性取值是表单中包含二进制文件的值
姓名:<input type="text" name="name"/><br/>
文件:<input type="file" name="file"/><br/> //一定要和注解类对象名一致!!!
<input type="submit" value="提交"/>
</form>

编写springmvc.xml文件

编写MultipartResovler解析器和异常解析器

1
2
3
4
5
6
7
8
9
10
11
12
13
<!-- MultipartResovler解析器 -->	
<bean id="multipartResovler" class="org.springframework.web.portlet.multipart.CommonsPortletMultipartResolver">
<property name="maxUploadSize" value="50"></property> //设置最大上传大小为50kb(超过我们就让弹出异常!!!)
</bean>

<!-- 异常解析器 -->
<bean id="exceptionResolver" class="org.springframework.web.servlet.handler.SimpleMappingExceptionResolver">
<property name="exceptionMappings"> //使用exceptionMappings属性
<props>
<prop key="org.springframework.web.multipart.MaxUploadSizeExceededException">/error.jsp</prop> //设置最大上传异常的提示给error.jsp文件
</props>
</property>
</bean>

注解类

注解类MultipartFile类的对象和文件标签的name必须一致!!!

1
2
3
4
5
6
7
8
9
10
11
12
13
14
15
16
17
18
19
20
@Controller
public class DemoController {

@RequestMapping()
public String upload(MultipartFile file,String name) throws IOException { // MultipartFile类的文件file名必须和input里面的name="file"一致

String fileName = file.getOriginalFilename(); //获取文件名
String suffix = fileName.substring(fileName.lastIndexOf(".")); //使用substring获取到.后面文件
if(suffix.equalsIgnoreCase(".png")) { //不区分大小判断
String uuid = UUID.randomUUID().toString(); //获取随机后数字
FileUtils.copyInputStreamToFile(file.getInputStream(),new File("E:/"+uuid+suffix)); //上传到E盘
return "index.jsp";
}
else{
return "error.jsp";
}

}

}

JSP九大内置对象和四大作用域

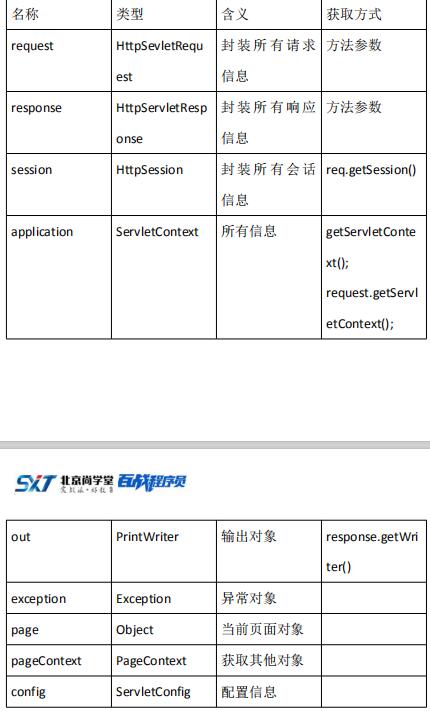
九大内置对象


四个作用域

1. page(当前页面)

2. request(一次请求中同一个对象)

3. session(一次会话)

3.1 只要客户端Cookie中传递的Jsessionid不变 --> session就不会重新实例化(不超过默认时间)
3.2 实际有效时间:
    3.2.1 浏览器关闭 : cookie失效
    3.2.2 默认时间 :tomcat的web.xml中配置

4 .application(关闭tomcat)


SpringMVC作用域传值方式(四种)

1. 使用原生Servlet(HandlerMethod参数中添加作用域对象)
2. 使用Map集合
3. 使用SpringMVC中Model接口
4. 使用SpringMVC中ModelAndView类

使用原生Servlet

在HandlerMethod参数中 + 作用域对象

注解类:

1
2
3
4
5
6
7
8
9
10
11
12
13
14
15
16
17
18
19
20
21
@Controller
public class DemoController {

@RequestMapping("demo01")
public String demo1(HttpServletRequest abc,HttpSession sessionParam) {

//request作用域
abc.setAttribute("req","req的值");

//session作用域
HttpSession session = abc.getSession();
session.setAttribute("session", "session的值");
sessionParam.setAttribute("sessionParam", "sessionParam的值");

//设置application作用域
ServletContext application=abc.getServletContext();
application.setAttribute("application","application的值");

return "index.jsp"; //返回给一个jsp页面
}
}

index.jsp页面(取出来):

1
2
3
4
request:${requestScope.req }</br>
session:${sessionScope.session }</br>
sessionParam:${sessionScope.sessionParam }</br>
application:${applicationScope.application }</br>

Map集合

map中的内容放入request作用域
spring会对map集合通过BindingAwareModelMap进行实例化

1
2
3
4
5
6
7
8
@RequestMapping("demo02")
public String demo2(Map<String,Object> map) {

System.out.println(map.getClass()); //输出map的结果
map.put("map","map的值"); //获取map值
return "index.jsp";

}

使用SpringMVC中Model接口

内容最终放入到request作用域

1
2
3
4
5
6
7
@RequestMapping("demo03")
public String demo3(Model model) {

model.addAttribute("model","model的值");
return "index.jsp";

}

使用SpringMVC中ModelAndView类

1
2
3
4
5
6
7
@RequestMapping("demo04")
public String demo4() {

ModelAndView m=new ModelAndView("index.jsp");
return "m";

}

SpringMVC实现菜单功能

前期准备

创建数据库

导入jar包

配置web.xml(四步)

1. spring的上下文参数(地址)
2. 监听器
3. springmvc的前端控制器(地址)
4. 字符编码过滤器(防止中文乱码)

具体代码

1
2
3
4
5
6
7
8
9
10
11
12
13
14
15
16
17
18
19
20
21
22
23
24
25
26
27
28
29
30
31
32
33
34
35
36
37
38
39
40
41
42
43
44
45
46
<?xml version="1.0" encoding="UTF-8"?>
<web-app version="3.0" xmlns="http://java.sun.com/xml/ns/javaee"
xmlns:xsi="http://www.w3.org/2001/XMLSchema-instance"
xsi:schemaLocation="http://java.sun.com/xml/ns/javaee
http://java.sun.com/xml/ns/javaee/web-app_3_0.xsd">

<!-- spring的上下文参数 -->
<context-param>
<param-name>contextConfigLocation</param-name>
<param-value>classpath:applicationContext.xml</param-value>
</context-param>

<!-- spring的监听器 -->
<listener>
<listener-class>org.springframework.web.context.ContextLoaderListener</listener-class>
</listener>

<!-- SpringMVC的前端控制器 -->
<servlet>
<servlet-name>springmvc</servlet-name>
<servlet-class>org.springframework.web.servlet.DispatcherServlet</servlet-class>
<init-param>
<param-name>contextConfigLocation</param-name>
<param-value>classpath:springmvc.xml</param-value>
</init-param>
<load-on-startup>1</load-on-startup>
</servlet>
<servlet-mapping>
<servlet-name>springmvc</servlet-name>
<url-pattern>/</url-pattern>
</servlet-mapping>
<!-- 字符编码过滤器(防止中文乱码) -->
<filter>
<filter-name>encoding</filter-name>
<filter-class>org.springframework.web.filter.CharacterEncodingFilter</filter-class>
<init-param>
<param-name>encoding</param-name>
<param-value>utf-8</param-value>
</init-param>
</filter>
<filter-mapping>
<filter-name>encoding</filter-name>
<url-pattern>/*</url-pattern>
</filter-mapping>

</web-app>

配置application.xml(七步)

1. 注解扫描
2. 加载属性文件(要写好db.properties文件)
3. 数据源
4. 扫描器
5. 事务管理器
6. 声明式事务
7. aop

具体代码

1
2
3
4
5
6
7
8
9
10
11
12
13
14
15
16
17
18
19
20
21
22
23
24
25
26
27
28
29
30
31
32
33
34
35
36
37
38
39
40
41
42
43
44
45
46
47
48
49
50
51
52
53
54
55
56
57
58
59
60
61
62
<?xml version="1.0" encoding="UTF-8"?>
<beans xmlns="http://www.springframework.org/schema/beans"
xmlns:xsi="http://www.w3.org/2001/XMLSchema-instance"
xmlns:aop="http://www.springframework.org/schema/aop"
xmlns:tx="http://www.springframework.org/schema/tx"
xmlns:context="http://www.springframework.org/schema/context"
xsi:schemaLocation="http://www.springframework.org/schema/beans
http://www.springframework.org/schema/beans/spring-beans.xsd
http://www.springframework.org/schema/aop
http://www.springframework.org/schema/aop/spring-aop.xsd
http://www.springframework.org/schema/context
http://www.springframework.org/schema/context/spring-context.xsd
http://www.springframework.org/schema/tx
http://www.springframework.org/schema/tx/spring-tx.xsd" default-autowire="byName">

<!-- 注解扫描 -->
<context:component-scan base-package="com.bjsxt.service.impl"></context:component-scan>

<!-- 加载属性文件 -->
<context:property-placeholder location="classpath:db.properties"/>

<!-- 数据源 -->
<bean id="dataSource" class="org.springframework.jdbc.datasource.DriverManagerDataSource">
<property name="driverClassName" value="${jdbc.driver}"></property>
<property name="url" value="${jdbc.url}"></property>
<property name="username" value="${jdbc.username}"></property>
<property name="password" value="${jdbc.password}"></property>
</bean>

<!-- SqlSessionFactory -->
<bean id="factory" class="org.mybatis.spring.SqlSessionFactoryBean">
<property name="dataSource" ref="dataSource"></property>
</bean>

<!-- 扫描器 -->
<bean class="org.mybatis.spring.mapper.MapperScannerConfigurer">
<property name="basePackage" value="com.bjsxt.mapper"></property>
<property name="sqlSessionFactoryBeanName" value="factory"></property>
</bean>

<!-- 事务管理器 -->
<bean id="txManage" class="org.springframework.jdbc.datasource.DataSourceTransactionManager">
<property name="dataSource" ref="dataSource"></property>
</bean>

<!-- 声明式事务 -->
<tx:advice id="txAdvice" transaction-manager="txManage">
<tx:attributes>
<tx:method name="ins*"/>
<tx:method name="del*"/>
<tx:method name="upd*"/>
<tx:method name="*" read-only="true"/>
</tx:attributes>
</tx:advice>

<!-- 配置aop -->
<aop:config>
<aop:pointcut expression="execution(* com.bjsxt.service.impl.*.*(..))" id="mypoint"/>
<aop:advisor advice-ref="txAdvice" pointcut-ref="mypoint"/>
</aop:config>

</beans>

db.properties文件:

1
2
3
4
jdbc.driver=com.mysql.jdbc.Driver
jdbc.url = jdbc:mysql://localhost:3306/ssm
jdbc.username = root
jdbc.password = njdxrjgc7777777.

配置springmvc.xml(三步)

1. 扫描注解
2. 注解驱动
3. 静态资源
4. 视图解析器    
1
2
3
4
5
6
7
8
9
10
11
12
13
14
15
16
17
18
19
20
21
22
23
24
25
26
27
28
29
30
31
32
<?xml version="1.0" encoding="UTF-8"?>
<beans xmlns="http://www.springframework.org/schema/beans"
xmlns:xsi="http://www.w3.org/2001/XMLSchema-instance"
xmlns:mvc="http://www.springframework.org/schema/mvc"
xmlns:context="http://www.springframework.org/schema/context"
xsi:schemaLocation="http://www.springframework.org/schema/beans
http://www.springframework.org/schema/beans/spring-beans.xsd
http://www.springframework.org/schema/context
http://www.springframework.org/schema/context/spring-context.xsd
http://www.springframework.org/schema/mvc
http://www.springframework.org/schema/mvc/spring-mvc.xsd">

<!-- 扫描注解 -->
<context:component-scan base-package="com.bjsxt.controller"></context:component-scan>

<!-- 注解驱动 相当于配置了两个组件 -->
<!-- org.springframework.web.servlet.mvc.annotation.DefaultAnnotationHandlerMapping -->
<!-- org.springframework.web.servlet.mvc.annotation.AnnotationMethodHandlerAdapter -->
<mvc:annotation-driven></mvc:annotation-driven>

<!-- 静态资源 -->
<mvc:resources location="/js/" mapping="/js/**"></mvc:resources>
<mvc:resources location="/css/" mapping="/css/**"></mvc:resources>
<mvc:resources location="/images/" mapping="/images/**"></mvc:resources>

<!-- 视图解析器 -->
<bean id="viewResolver" class="org.springframework.web.servlet.view.InternalResourceViewResolver">
<property name="prefix" value="/"></property>
<property name="suffix" value=".jsp"></property>
</bean>

</beans>

书写代码

创建实体类

1
2
3
4
5
6
7
8
9
10
11
12
13
14
15
16
17
18
19
20
21
22
23
24
25
26
27
28
29
30
31
public class Menu {
private int id;
private String name;
private int pid;
private List<Menu> children;
public int getId() {
return id;
}
public void setId(int id) {
this.id = id;
}
public String getName() {
return name;
}
public void setName(String name) {
this.name = name;
}
public int getPid() {
return pid;
}
public void setPid(int pid) {
this.pid = pid;
}
public List<Menu> getChildren() {
return children;
}
public void setChildren(List<Menu> children) {
this.children = children;
}

}

准备mapper下的接口和xml配置文件

1
2
3
4
5
6
7
8
9
10
11
12
13
14
15
16
17
18
19
20
21
22
23
24
25
26
27
28
29
//准备接口写方法
public interface MenuMapper {
List<Menu> selByPid(int pid); //selByPid通过pid查询
}

//写配置文件
<?xml version="1.0" encoding="UTF-8"?>
<!DOCTYPE mapper
PUBLIC "-//mybatis.org//DTD Mapper 3.0//EN"
"http://mybatis.org/dtd/mybatis-3-mapper.dtd">
<mapper namespace="com.bjsxt.mapper.MenuMapper">

<resultMap type="menu" id="mymap"> //被调用之后
<id property="id" column="id"/> 通过id去查询
<collection property="children" select="com.bjsxt.mapper.MenuMapper.selByPid" column="id">
</collection>
</resultMap>

<select id="selByPid" parameterType="int" resultMap="mymap"> //因为list集合要通过resultMap查询
select * from menu where pid=#{0}
</select>
</mapper>

//application.xml文件 加别名
<!-- SqlSessionFactory -->
<bean id="factory" class="org.mybatis.spring.SqlSessionFactoryBean">
<property name="dataSource" ref="dataSource"></property>
<property name="typeAliasesPackage" value="com.bjsxt.pojo"></property> //给pojo的实体类取别名
</bean>

准备service和impl实现层

准备接口展示结果:

1
2
3
4
//
public interface MenuService {
List<Menu> show(); // 展示方法
}

准备实现类

1
2
3
4
5
6
7
8
9
10
11
@Service
public class MenuServiceImpl implements MenuService {
@Resource
private MenuMapper menuMapper;

@Override
public List<Menu> show() {
return menuMapper.selByPid(0); //使用对象调方法
}

}

准备controller层(springmvc容器)

1
2
3
4
5
6
7
8
9
10
11
12
13
14
15
@Controller
public class MenuController {

//springmvc容器(当前类)调用spring容器中内容(impl实现类)

@Resource //通过byname查询
private MenuService menuServiceImpl;

@RequestMapping("show")
@ResponseBody
public List<Menu> show(){
return menuServiceImpl.show();
}

}

书写前端页面代码

导入js库

书写jsp页面

1
2
3
4
5
6
7
8
9
10
11
12
13
14
15
16
17
18
19
20
21
22
23
24
25
26
27
28
29
30
31
32
33
34
35
36
<%@ page language="java" contentType="text/html; charset=UTF-8"
pageEncoding="UTF-8"%>
<!DOCTYPE html PUBLIC "-//W3C//DTD HTML 4.01 Transitional//EN" "http://www.w3.org/TR/html4/loose.dtd">
<html>
<head>
<meta http-equiv="Content-Type" content="text/html; charset=UTF-8">
<title>Insert title here</title>
<script type="text/javascript" src="js/jquery-1.7.2.js"></script>
<script type="text/javascript">
$(function(){
$.post("show",function(data){
var result ="";
for(var i=0;i<data.length;i++){
result+="<dl>";
result+="<dt style='cursor:pointer'>"+data[i].name+"</dt>";
for(var j=0;j<data[i].children.length;j++){
result+="<dd>"+data[i].children[j].name+"</dd>";
}
result+="</dl>";
}
$("body").html(result);
});

//对所有父菜单添加点击事件
//live("事件名,多个事件使用空格分割",function(){})
$("dt").live("click",function(){
//slow normal fast 数值
$(this).siblings().slideToggle(1000); ; // slideToggle慢慢隐藏 dd和dt同级 (用siblings)
});

})
</script>
</head>
<body>
</body>
</html>

最终结果

直接运行界面

运行结果就会下载文件show.json

查看json文件内容


SpringMVC

SpringMVC简介

SpringMVC中重要组件

1. DispatcherServlet : 前端控制器 (接收所有请求)

2. HandlerMapping : 解析请求格式 (判断执行哪个方法)

3. HandlerAdapter : 调用具体方法

4. ViewResovler : 视图解析器 (准备跳转到具体的物理视图)

SpringMVC运行原理图


使用纯配置文件搭建SpringMVC环境

导入jar包

修改web.xml文件

1
2
3
4
5
6
7
8
9
10
11
12
13
14
15
16
17
18
19
20
21
22
23
24
25
<?xml version="1.0" encoding="UTF-8"?>
<web-app version="3.0" xmlns="http://java.sun.com/xml/ns/javaee"
xmlns:xsi="http://www.w3.org/2001/XMLSchema-instance"
xsi:schemaLocation="http://java.sun.com/xml/ns/javaee
http://java.sun.com/xml/ns/javaee/web-app_3_0.xsd">

<!-- 配置Servlet 找前端控制器 DispatcherServlet类 -->
<servlet>
<servlet-name>springmvc123</servlet-name>
<servlet-class>org.springframework.web.servlet.DispatcherServlet</servlet-class>
<!-- 修改配置文件路径和名称 -->
<init-param>
<param-name>contextConfigLocation</param-name>
<param-value>classpath:springmvc.xml</param-value> //所有的配置文件去找src下的springmvc.xml文件
</init-param>
<!-- 自启动 -->
<load-on-startup>1</load-on-startup>
</servlet>

<servlet-mapping>
<servlet-name>springmvc123</servlet-name>
<url-pattern>/</url-pattern>
</servlet-mapping>

</web-app>

配置springmvc.xml文件

配置思路:

1
2
3
4
5
6
1. 导入spring的xmlns:xxx信息
2. 配置四个组件信息
2.1 配置HandlerMapping的底层simpleUrlHandlerMapping接口
2.2 配置simpleUrlHandlerMapping接口的实现类(新建DemoController类)
2.3 配置HandlerAdapter底层的SimpleControllerHandlerAdapter接口
2.4 配置ViewResovler底层的InternalResourceViewResolver接口

完整代码:

1
2
3
4
5
6
7
8
9
10
11
12
13
14
15
16
17
18
19
20
21
22
23
24
25
26
27
28
29
30
<?xml version="1.0" encoding="UTF-8"?>
<beans xmlns="http://www.springframework.org/schema/beans"
xmlns:xsi="http://www.w3.org/2001/XMLSchema-instance"
xmlns:context="http://www.springframework.org/schema/context"
xsi:schemaLocation="http://www.springframework.org/schema/beans
http://www.springframework.org/schema/beans/spring-beans.xsd
http://www.springframework.org/schema/context
http://www.springframework.org/schema/context/spring-context.xsd">
<!-- 底层接口实现类 -->
<bean id="demo123" class="com.bjsxt.controller.DemoController"></bean>

<!-- 使用HandlerMapping底层的simpleUrlHandlerMapping接口 -->
<bean id="handlerMapping" class="org.springframework.web.servlet.handler.SimpleUrlHandlerMapping">
<property name="urlMap"> <!-- 底层用map集合 -->
<map>
<entry key="demo" value-ref="demo123"></entry> <!-- key表示解析出控制器逻辑名 value-ref表示跳转到接口实现类 -->
</map>
</property>
</bean>

<!-- 使用HandlerAdapter底层的SimpleControllerHandlerAdapter接口 -->
<bean class="org.springframework.web.servlet.mvc.SimpleControllerHandlerAdapter"></bean>

<!-- 使用ViewResovler底层的InternalResourceViewResolver接口 -->
<bean id="viewResovler" class="org.springframework.web.servlet.view.InternalResourceViewResolver">
<property name="prefix" value="/"></property> <!-- 视图解释器 可以方便的给要跳转的页面加好前置和后置信息 -->
<property name="suffix" value=".jsp"></property>
</bean>

</beans>

配置前端控制器接口实现类

1
2
3
4
5
6
7
8
9
10
public class DemoController implements Controller{

@Override
public ModelAndView handleRequest(HttpServletRequest request, HttpServletResponse response) throws Exception {
System.out.println("执行了springmvc控制器");
ModelAndView mav=new ModelAndView("main"); //传递和传值 (跳转到main.jsp)
return mav;
}

}

配置跳转到main.jsp页面

1
2
3
4
5
6
7
8
9
10
11
12
<%@ page language="java" contentType="text/html; charset=UTF-8"
pageEncoding="UTF-8"%>
<!DOCTYPE html PUBLIC "-//W3C//DTD HTML 4.01 Transitional//EN" "http://www.w3.org/TR/html4/loose.dtd">
<html>
<head>
<meta http-equiv="Content-Type" content="text/html; charset=UTF-8">
<title>Insert title here</title>
</head>
<body>
main.jsp
</body>
</html>

新建test测试类

1
2
3
4
5
6
7
8

public class Test {
public static void main(String[] args) {
ApplicationContext ac=null;
HandlerMapping hm=null; //设置默认的
HandlerAdapter ha=null; //设置默认的
}
}

SpringMVC运行过程源码跟踪

Spring和SpringMVC关系

Spring容器和SpringMVC容器是父子容器(SpringMVC容器可以调用Spring容器中所有内容)


SpringMVC环境搭建(注解方式)

导入JAR包

编写web.xml文件

1
2
3
4
5
6
7
8
9
10
11
12
13
14
15
<!-- 配置前端控制器 -->
<servlet>
<servlet-name>jqk</servlet-name>
<servlet-class>org.springframework.web.servlet.DispatcherServlet</servlet-class>
<init-param>
<param-name>contextConfigLocation</param-name> //配置要找的配置文件件地址
<param-value>Classpath:springmvc.xml</param-value> //配置要找的配置文件叫springmvc.xml
</init-param>
<load-on-startup>1</load-on-startup> //自启动 优先级为1
</servlet>

<servlet-mapping>
<servlet-name>jqk</servlet-name>
<url-pattern>/</url-pattern>
</servlet-mapping>

编写springmvc.xml文件

1
2
3
4
5
6
7
8
9
10
11
12
13
14
15
16
17
18
19
20
21
22
23
24
25
26
<?xml version="1.0" encoding="UTF-8"?>
<beans xmlns="http://www.springframework.org/schema/beans"
xmlns:xsi="http://www.w3.org/2001/XMLSchema-instance"
xmlns:mvc="http://www.springframework.org/schema/mvc" //现在的mvc框架必备(减少不必要的组件配置)
xmlns:context="http://www.springframework.org/schema/context" //注解必备
xsi:schemaLocation="http://www.springframework.org/schema/beans
http://www.springframework.org/schema/beans/spring-beans.xsd
http://www.springframework.org/schema/context
http://www.springframework.org/schema/context/spring-context.xsd
http://www.springframework.org/schema/mvc //后面两行是mvc的location地址
http://www.springframework.org/schema/mvc/spring-mvc.xsd">

<!-- 扫描注解(具体哪些包下的类有注解) -->
<context:component-scan base-package="com.bjsxt.controller"></context:component-scan>

<!-- 注解驱动 相当于配置了两个组件(下面两行注解的组件) -->
<!-- org.springframework.web.servlet.mvc.annotation.DefaultAnnotationHandlerMapping -->
<!-- org.springframework.web.servlet.mvc.annotation.AnnotationMethodHandlerAdapter -->
<mvc:annotation-driven></mvc:annotation-driven>

<!-- 静态资源 -->
<mvc:resources location="/js/" mapping="/js/**"></mvc:resources> //location表明 当前代码框架下文件名 mapping表明用浏览器 localhost:8080/项目名/js/jssa.js的形式
<mvc:resources location="/css/" mapping="/css/**"></mvc:resources>
<mvc:resources location="/images/" mapping="/images/**"></mvc:resources>

</beans>

编写注解类

1
2
3
4
5
6
7
8
9
10
@Controller
public class DemoController {

@RequestMapping("demo") //浏览器访问的形式:localhost:8080/项目名/demo
public String demo() {
System.out.println("执行demo"); //控制台输出
return "main.jsp"; // 返回到main.jsp页面
}

}

跳转到的main.jsp页面

1
2
3
4
5
6
7
8
9
10
11
12
<%@ page language="java" contentType="text/html; charset=UTF-8"
pageEncoding="UTF-8"%>
<!DOCTYPE html PUBLIC "-//W3C//DTD HTML 4.01 Transitional//EN" "http://www.w3.org/TR/html4/loose.dtd">
<html>
<head>
<meta http-equiv="Content-Type" content="text/html; charset=UTF-8">
<title>Insert title here</title>
</head>
<body>
要跳转到的main.jsp! //主页展示的内容
</body>
</html>

总结

1. 导入jar包
2. 配置web.xml文件
    2.1 配置servlet和servlet-mapping标签
    2.2 在servlet标签中配置init-param标签 去配置springmvc.xml文件的地址和访问
3. 配置springmvc.xml文件
    3.1 配置mvc框架的xmlns:mvc和location地址
    3.2 扫描注解(context:component-scan标签 配置哪些类有注解)
    3.3 注解驱动(mvc:annotation-driven标签 配置相当于配置了两个组件)
    3.4 静态资源(mvc:resources标签 配置要访问的js/css/images地址)
4. 配置注解类
    4.1 使用@Controller 注解整个类
    4.2 使用@RequestMapping("xxx") 注解访问访问的地址
    4.3 return 放入要返回的主页地址

代码结构框架:


基本数据类型(参数)

把内容写到方法(HandlerMethod)参数内,springmvc只要有这个内容就会注入内容

在刚才的基础上新建index.jsp页面

1
2
3
4
5
<form action="demo" method="post">
<input type="text" name="name"/>
<input type="text" name="age"/>
<input type="submit" value="提交"/>
</form>

web.xml中添加防止乱码(filter标签)

1
2
3
4
5
6
7
8
9
10
11
12
13
<filter>
<filter-name>encoding</filter-name>
<filter-class>org.springframework.web.filter.CharacterEncodingFilter</filter-class>
<init-param>
<param-name>encoding</param-name>
<param-value>utf-8</param-value>
</init-param>
</filter>

<filter-mapping>
<filter-name>encoding</filter-name>
<url-pattern>/*</url-pattern>
</filter-mapping>

更改注解类(方法添加参数)

1
2
3
4
5
6
7
8
9
10
@Controller
public class DemoController {

@RequestMapping("demo") //路径要用的demo
public String demo(String name,int age) { //添加了name和age两个参数
System.out.println("执行demo"+" "+name+" "+age);
return "main.jsp"; // 返回到main.jsp页面
}

}

运行项目

直接从项目运行(run)

填写信息(已经做了预防中文乱码的操作):


对象类型(参数)

把内容写到方法(HandlerMethod)参数内,springmvc只要有这个内容就会注入内容

新建实体类

1
2
3
4
5
6
7
8
9
10
11
12
13
14
15
16
17
18
public class People {
private String name;
private int age;

public String getName() {
return name;
}
public void setName(String name) {
this.name = name;
}
public int getAge() {
return age;
}
public void setAge(int age) {
this.age = age;
}

}

修改注解类(参数修改)

1
2
3
4
5
6
7
8
9
public class DemoController {

@RequestMapping("demo") //路径要用的demo
public String demo(People peo,String name,int age) { //可以将整个people对象放进来
System.out.println("执行demo"+peo+" "+name+" "+age);
return "main.jsp"; // 返回到main.jsp页面
}

}

基本数据类型 - 参数问题(@RequestParam注解)

(默认)参数和传递参数名相同

1
2
3
4
5
6
7
8
9
10
11
12
13
14

//主页面(请求传递参数名为name和age)
<form action="demo" method="post">
<input type="text" name="name"/>
<input type="text" name="age"/>
<input type="submit" value="提交"/>
</form>

//方法传递为name和age
@RequestMapping("demo") //路径要用的demo
public String demo(String name,int age) {
System.out.println("执行demo"+" "+name+" "+age);
return "main.jsp"; // 返回到main.jsp页面
}

参数和传递参数名不同(@RequestParam(value=”前端的参数名”))

例如:前端程序员和后端java对于同一个name和age不同!!(使用@RequestParam(value=”前端的参数名”))方式让匹配上)

1
2
3
4
5
6
7
8
9
10
11
12
13
14
15
16
17

//主页面(请求传递参数名为name1和age1)
<form action="demo" method="post">
<input type="text" name="name1"/>
<input type="text" name="age1"/>
<input type="submit" value="提交"/>
</form>

//方法传递为name和age
@RequestMapping("demo") //路径要用的demo

//使用 value="前端的参数名" [value=可以省略] 让两者匹配

public String demo(@RequestParam(value="name1") String name,@RequestParam(value="age1")int age) {
System.out.println("执行demo"+" "+name+" "+age);
return "main.jsp"; // 返回到main.jsp页面
}

方法参数没赋值(防止执行500)

设置默认值解决500问题(@RequestParam(defaultValue=”XXX”))

1
2
3
4
5
6
7
8
@RequestMapping("page")

//使用defaultValue="xxx" 设置一个基础值

public String page(@RequestParam(defaultValue="2") int pageSize,@RequestParam(defaultValue="1") int pageNumber) {
System.out.println(pageSize+" "+pageNumber);
return "main.jsp";
}

强制有参数

设置必要值为true(@RequestParam(required))

1
2
3
4
5
6
7
8
@RequestMapping("demo2")

//设置 required=true 达到强制有参数的条件

public String demo2(@RequestParam(required=true) String name) {
System.out.println("必须传name参数");
return "main.jsp";
}

对象类型 - 参数问题

请求参数中含多个同名参数(List集合)

复选框传递的参数是多个同名参数(@RequestParam(“复选框的name名”)List x)

1
2
3
4
5
6
7
8
9
10
11
12
13
14
15
16
17
18
19
20
21
22
23
24

//index.jsp页面

<form action="demo5" method="post"> //通过post方式提交到demo5的方法内
<input type="text" name="name"/>
<input type="text" name="age"/>
<input type="checkbox" name="hover" value="学习"/> //爱好是复选框
<input type="checkbox" name="hover" value="写代码"/>
<input type="checkbox" name="hover" value="看视频"/>
<input type="checkbox" name="hover" value="看笔记"/>
<input type="submit" value="提交"/>
</form>


//注解类

@RequestMapping("demo5")

//name和age还是普通的方式 爱好就需要List来传递 (@RequestParam("页面内复选框的name名"))

public String demo5(String name,int age,@RequestParam("hover")List<String> a) {
System.out.println(name+" "+age+" "+a);
return "main.jsp";
}

请求参数(对象.属性)

1
2
3
4
5
6
7
8
9
10
11
12
13
14
15
//页面中:
<input type="text" name="peo.name"/>
<input type="text" name="peo.age"/>

//新建一个类(对象名和参数中(.)之前的名称对应)
// peo和peo.name对应

private People peo; //传people实体类对象

//注解类
@RequestMapping("demo6")
public String demo6(Demo demo) { //直接传整个类对象
System.out.println(demo);
return "main.jsp";
}

请求参数传递集合对象(对象[X].属性)

1
2
3
4
5
6
7
8
9
10
11
12
13
14
15
16
17
//页面中:
<input type="text" name="peo[0].name"/>
<input type="text" name="peo[0].age"/>
<input type="text" name="peo[1].name"/>
<input type="text" name="peo[1].age"/>

//新建一个类(对象名和参数中(.)之前的名称对应)
// peo和peo.name对应

private List<People> peo; //传list集合

//注解类
@RequestMapping("demo6")
public String demo6(Demo demo) { //直接传整个类对象
System.out.println(demo);
return "main.jsp";
}

restful传值方式

简化jsp中参数编码格式

jsp中特定格式

1
2
<a href="demo07/123/abc">跳转</a>   
//就是去找注解是demo07而且第一个值123 第二个是abc的注解类

注解类

注意事项:

1
2
3
1. @RequestMapping里面一定要和请求格式对应
1.1 {}里面随便写名称
2. @PathVariable 获取@RequestMapping中的内容(默认按照方法参数名找)

具体代码:

1
2
3
4
5
@RequestMapping("demo7/{id}/{name}")
public String demo7(@PathVariable String name,@PathVariable("id") int age) {
System.out.println(name+" "+age);
return "main.jsp";
}

跳转方式

1. 默认跳转方式    请求转发
2. 设置返回字符串内容
    2.1 添加 redirect:资源路径 (重定向)
    2.2 添加 forward:资源路径/省略forward (转发) 

视图解析器(Spring默认提供)

可以自定义使用ViewResovler底层的InternalResourceViewResolver接口

1
2
3
4
5
<!-- 使用ViewResovler底层的InternalResourceViewResolver接口 -->	
<bean id="viewResovler" class="org.springframework.web.servlet.view.InternalResourceViewResolver">
<property name="prefix" value="/"></property> <!-- 视图解释器 可以方便的给要跳转的页面加好前置和后置信息 -->
<property name="suffix" value=".jsp"></property>
</bean>

** 如果希望不执行自定义视图解析器,可以在注解类方法返回值前添加forward: / redirect: **

1
2
3
4
5
6
7
8
9
10
11
12
//注解类
@RequestMapping("demo10")
public String demo10() { //直接传整个类对象
return "forward:demo11"; //使用forward: demo11 的形式(不适用自定义视图解析器)
}

@RequestMapping("demo11")
public String demo11() { //直接传整个类对象
System.out.println("demo11");
//加了视图解析器会简化不写前缀和后缀 所以写main就行(原来是main.jsp)
return "main";
}

@ResponseBody(恒不跳转)

一般使用@RequestMapping (恒跳转)

返回值满足key-value形式(对象/map)

1. 响应头设置为 application/json;charset=utf-8
2. 方法返回值 : 输出流

返回值不满足key-value形式(String等)

1. 响应头设置为 text/htmln;charset=utf-8
2. 方法返回值 : 流

底层使用Jackson进行json转换

一定要导入jackson的jar包

spring4.1.6对jackson不支持较高版本(jackson2.7无效)


Ajax整理

Ajax(异步请求 局部刷新)

局部刷新:通过异步请求,请求到服务器资源数据后,过脚本修改页面中部分内容

JQuery中ajax分类

第一层:$.ajax({属性名1:值,属性名2:值})

本层是jquery中功能最全(代码写起来相对麻烦)

1
2
3
4
5
6
7
8
9
10
11
12
13
14
15
16
17
18
19
<script type="text/javascript">
$(function(){
$("a").click(function(){
$.ajax({
url:'demo',
data:{"name":"zhangsan"},
dataType:'html',
error:function(){
alert("请求出错.")
},
success:function(data){
alert("请求成功"+data)
},
type:'POST'
});
return false;
})
});
</script>

其中属性:

1. url:请求服务器地址
2. data:请求参数
3. dataType:服务器返回数据类型
4. error:请求出错执行的功能
5. success:请求成功执行的功能(function(data):data是服务器返回的数据)

第二层(简化$.ajax)

1. $.get(url,data,success,dataType)
2. $.post(url,data,success,dataType)   --常用 但是没有出错提示!!

第三层(简化$.get())

1. $.getJSON(url,data,success)  相当于设置dataType="json"
2. $.getScript(url,data,success)  相当于设置dataType="script"

json概述

服务器返回数据是从表取出,为了方便服务器操作返回的数据,服务器返回的数据设置为json

json数据类型:

1. JsonObject -- json对象
    {"key":value,"key":value}

2. JsonArray -- json数组
    [{"key":value,"key":value},{}] 

json案例

导入jar包

生成Users实体类

1
2
3
4
5
6
7
8
9
10
11
12
13
14
15
16
17
18
19
20
21
22
23
24
public class Users {
private int id;
private String username;
private String password;
public int getId() {
return id;
}
public void setId(int id) {
this.id = id;
}
public String getUsername() {
return username;
}
public void setUsername(String username) {
this.username = username;
}
public String getPassword() {
return password;
}
public void setPassword(String password) {
this.password = password;
}

}

生成DemoServlet类

1
2
3
4
5
6
7
8
9
10
11
12
13
14
15
16
17
18
19
20
21
22
23
24
25
26
27
28
29
30
31
32
33
34
@WebServlet("/demo")
public class DemoServlet extends HttpServlet{

@Override
protected void service(HttpServletRequest req, HttpServletResponse resp) throws ServletException, IOException {
System.out.println("执行控制器");
String name=req.getParameter("name"); // 从index页面获取name

Users users=new Users();
users.setId(1);
users.setPassword("123");
users.setUsername("张三"); // 添加users的信息( 1 123 张三 )

Users users1=new Users();
users1.setId(2);
users1.setPassword("22");
users1.setUsername("李四"); // 添加users1的信息( 2 22 李四 )

List<Users> list=new ArrayList<Users>(); //list集合将users和users1加进去
list.add(users1);
list.add(users);

ObjectMapper mapper = new ObjectMapper();
String result = mapper.writeValueAsString(list); //通过ObjectMapper对象方法把list添加进去

resp.setContentType("application/json;charset=utf-8"); //设置返回文件类型 json
PrintWriter out=resp.getWriter();
out.print(result); // 打印result
out.flush();
out.close();

}

}

生成 index.jsp页面

1
2
3
4
5
6
7
8
9
10
11
12
13
14
15
16
17
18
19
20
21
22
23
24
25
26
27
28
29
30
31
32
33
34
35
36
37
38
39
40
41
42
43
44
45
46
47
48
49
50
51
52
53
54
55
<%@ page language="java" contentType="text/html; charset=UTF-8"
pageEncoding="UTF-8"%>
<!DOCTYPE html PUBLIC "-//W3C//DTD HTML 4.01 Transitional//EN" "http://www.w3.org/TR/html4/loose.dtd">
<html>
<head>
<meta http-equiv="Content-Type" content="text/html; charset=UTF-8">
<title>Insert title here</title>

<script type="text/javascript" src="js/jquery-1.7.2.js"></script> //jQuery必备的

<script type="text/javascript">
$(function(){
$("a").click(function(){

//第二种方式:
$.post("demo",{"name":"zhangsan"},function(data){
//定义空字符串 存结果
var result="";
for(var i=0;i<data.length;i++) //因为是两个对象 list集合要循环输出
{
result+="<tr>";
result+="<td>"+data[i].id+"</td>"
result+="<td>"+data[i].username+"</td>"
result+="<td>"+data[i].password+"</td>"
result+="</tr>";
// alert(data.id+" "+data.username+" "+data.password); 弹出结果
}

//第一种:
// $("table").append(result); 一次次加
//第二种:
$("#mytbody").html(result); //使用分组标签 放入东西

})

return false;
})
});
</script>

</head>

<body>
<a href="demo">跳转</a>
<table border="1">
<tr>
<td>编号</td>
<td>姓名</td>
<td>密码</td>
</tr>
<tbody id="mytbody"></tbody> //使用分组标签 存放结果!!!
</table>
</body>

</html>

Spring常用注解整理

Spring常用注解

创建类对象

1. @Component 创建类对象 (相当于配置文件中的<bean>标签)

2. @Service(Component功能相同)
    2.1 写在ServiceImpl类

3. @Repository(Component功能相同) 
    3.1 写在数据访问层 

4. @Controller(Component功能相同) 
    4.1 写在控制器类

不需要写对象的get/set

1. @Resource(java的注解)
    1.1 按照byName注入(默认) 按照byType注入(没有名称对象) 
    1.2 一般将对象名称和spring容器中对象名相同

2. @Autowired(spring的注解)
    1.1 按照byType注入(默认)

AOP(面向切面编程)

1. @Pointcut() 定义切点
2. @Aspect() 定义切面类
3. @Before() 前置通知
4. @After() 后置通知 (切点正不正确都可以)
5. @AfterReturing() 后置通知 (必须切点正确才执行)
6. @AfterThrowing 异常通知
7. @Arround() 环绕通知

关于读取配置文件内容

1. @Value() 获取xxx.properties文件内容

Spring事务

编程式事务(程序员编写)

程序员编程 事务控制代码

  • OpenSessionInView 编程式事务

声明式事务(Spring编写好 程序员声明)

Spring写好 事务控制代码
程序员只需要声明哪些方法需要进行事务控制和如何进行事务控制

针对ServiceImpl类下的方法

事务管理器基于通知(advice) – 切点(AOP)

在spring配置文件中配置声明式事务

1
2
3
4
5
1. 导入xmlns:tx 和location地址
2. 书写tx:advice --> 基于通知所以导入spring-jdbc.jar中的类
3. 然后需要配置数据源 --> 导入整合mybatis的三步骤
4. 三步骤中数据源要导入db.properties文件 --> 添加context:property-placeholder --> 利用${key}方式导入
5. 因为基于通知 所以还需要切点和通知的aop:config标签 -->

分析(代码流向)

最终代码

1
2
3
4
5
6
7
8
9
10
11
12
13
14
15
16
17
18
19
20
21
22
23
24
25
26
27
28
29
30
31
32
33
34
35
36
37
38
39
40
41
42
43
44
45
46
47
48
49
50
51
52
<?xml version="1.0" encoding="UTF-8"?>
<beans xmlns="http://www.springframework.org/schema/beans"
xmlns:xsi="http://www.w3.org/2001/XMLSchema-instance"
xmlns:aop="http://www.springframework.org/schema/aop"
xmlns:context="http://www.springframework.org/schema/context"
xmlns:tx="http://www.springframework.org/schema/tx"
xsi:schemaLocation="http://www.springframework.org/schema/beans
http://www.springframework.org/schema/beans/spring-beans.xsd
http://www.springframework.org/schema/aop
http://www.springframework.org/schema/aop/spring-aop.xsd
http://www.springframework.org/schema/context
http://www.springframework.org/schema/context/spring-context.xsd
http://www.springframework.org/schema/tx
http://www.springframework.org/schema/tx/spring-tx.xsd">

<!-- spring-jdbc.jar中 -->
<bean id="txManager" class="org.springframework.jdbc.datasource.DataSourceTransactionManager">
<property name="dataSource" ref="dataSource"></property>
</bean>

<context:property-placeholder location="classpath:db.properties,classpath:second.properties"/>

<!-- 数据源 -->
<bean id="dataSource" class="org.springframework.jdbc.datasource.DriverManagerDataSource">
<property name="driverClassName" value="${jdbc.driver}"></property>
<property name="url" value="${jdbc.url}"></property>
<property name="username" value="${jdbc.username}"></property>
<property name="password" value="${jdbc.password}"></property>
</bean>
<!-- SqlSessinFactory对象 -->
<bean id="factory" class="org.mybatis.spring.SqlSessionFactoryBean">
<property name="typeAliasesPackage" value="com.bjsxt.pojo"></property>
</bean>
<!-- 扫描器 -->
<bean class="org.mybatis.spring.mapper.MapperScannerConfigurer">
<property name="basePackage" value="com.bjsxt.mapper"></property>
<property name="sqlSessionFactoryBeanName" value="factory"></property>
</bean>

<!-- 配置声明式事务 -->
<tx:advice id="txAdvice" transaction-manager="txManager">
<tx:attributes>
<tx:method name="insert"/> <!-- 可以用通配符 -->
</tx:attributes>
</tx:advice>

<aop:config>
<aop:pointcut expression="execution(* com.bjsxt.service.impl.*.*(..))" id="mypoint"/>
<aop:advisor advice-ref="txAdvice" pointcut-ref="mypoint"/>
</aop:config>

</beans>

声明式事务(tx:method)属性解释

声明式事务例子:

1
2
3
4
5
6
7
8
9
<!-- 配置声明式事务 -->
<tx:advice id="txAdvice" transaction-manager="txManager">
<tx:attributes>
<tx:method name="insert"/> <!-- 可以用通配符 -->
<tx:method name="ins*"/>
<tx:method name="saf"/>
<tx:method name="adad*"/>
</tx:attributes>
</tx:advice>

name 和 read-only

1. name=""   哪些方法需要被事务控制 (支持 * 通配符)

2. read-only="true/false"  是否是只读事务
    2.1 true : 告诉数据库此事务是只读事务 数据化优化,会对性能有一定提升(查询)
    2.2 false(默认) : 告诉数据库此事务是需要提交的事务 (新增/删除/修改)

propagation 控制事务传播行为

当一个具有事务控制的方法被另外一个有事务控制的方法调用后,需要如何管理事务?

1. REQUIRED(默认) : 
    1.1 有事务 --> 在此事务中执行
    1.2 无事务 --> 新建事务

2. SUPPORTS(随遇而安 有就有 没有就没有) : 
    2.1 有事务 --> 在此事务中执行
    2.2 无事务 --> 非事务状态下执行

3. MANDATORY(必须在事务内执行) :
    3.1 有事务 --> 在此事务中执行
    3.2 无事务 --> 报错

4. REQUIRES_NEW(必须在事务内执行) :
    4.1 有事务 --> 挂起
    4.2 无事务 --> 新建事务

5. NOT_SUPPORTED(必须在非事务执行) :
    5.1 有事务 --> 挂起
    5.2 无事务 --> 正常执行

6. NEVER(必须在非事务执行) :
    6.1 有事务 --> 报错
    6.2 无事务 --> 正常执行

7. NESTED(必须在事务内执行) :
    7.1 有事务 --> 创建一个嵌套事务
    7.2 无事务 --> 新建事务

isolation 事务隔离级别

多线程/并发访问保证数据具有完整性

  • 脏读(两个事务)

    事务A读取到事务B中未提交的数据 --> B可能数据改变 --> A读的数据可能和数据库中的不一致 
  • 不可重复读(同一事务)

    1. 主要针对某行数据数据 (行中某列)
    2. 主要针对 修改 操作
    3. 事务A读取事务 --> 事务B对事务A读取的数据修改 --> A再次读取和之前的不一致 
  • 幻读(两个事务)

    1. 主要针对 新增/删除 操作
    2. 事务A按照特定条件查询结果 --> 事务B新增了数据(符合A查询条件) --> A查询的数据和数据库的数据不一致
1. DEFAULT(默认) : 底层数据库自动判断用什么隔离界别

2. READ_UNCOMMITTED(效率最高) : 可以读取未提交的数据 ( 可能出现 脏读 / 不可重复读 / 幻读 ) 

3. READ_COMMITTED(避免脏读) : 只能读取其他事务已经提交的数据 (可能出现 不可重复读 / 幻读)    

4. REPEATABLE_READ(避免脏读和不可重复读) : 读的数据被添加锁(一行) (可能出现 幻读)

5. SERIALIZABLE(最安全和效率最低) : 整个表添加锁(排队操作) 

rollback-for 事务回滚

1. rollback-for="异常类型全限定路径"  出现什么异常时候需要进行回滚

    给定该属性值 (手动抛异常一定要给该属性值!!!)

2. no-rollback-for=" "  当出现什么异常时不滚回事务

,