机器学习计划
学习思路
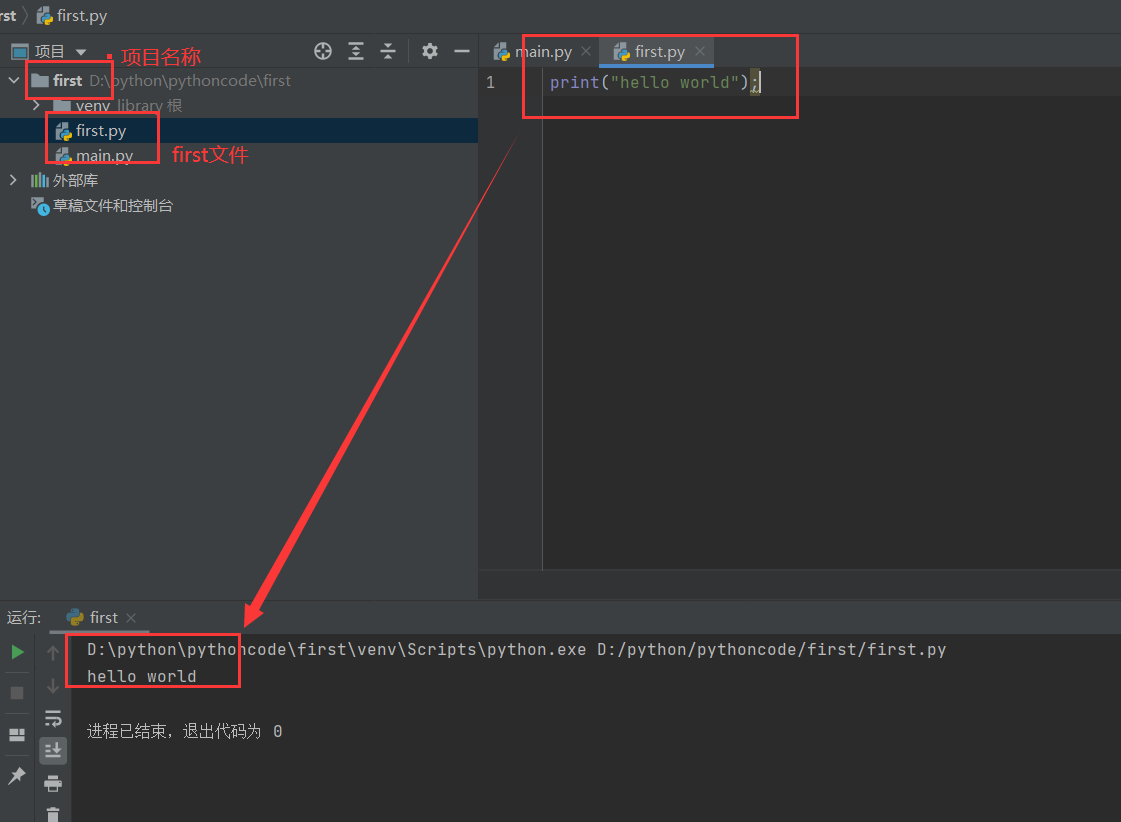
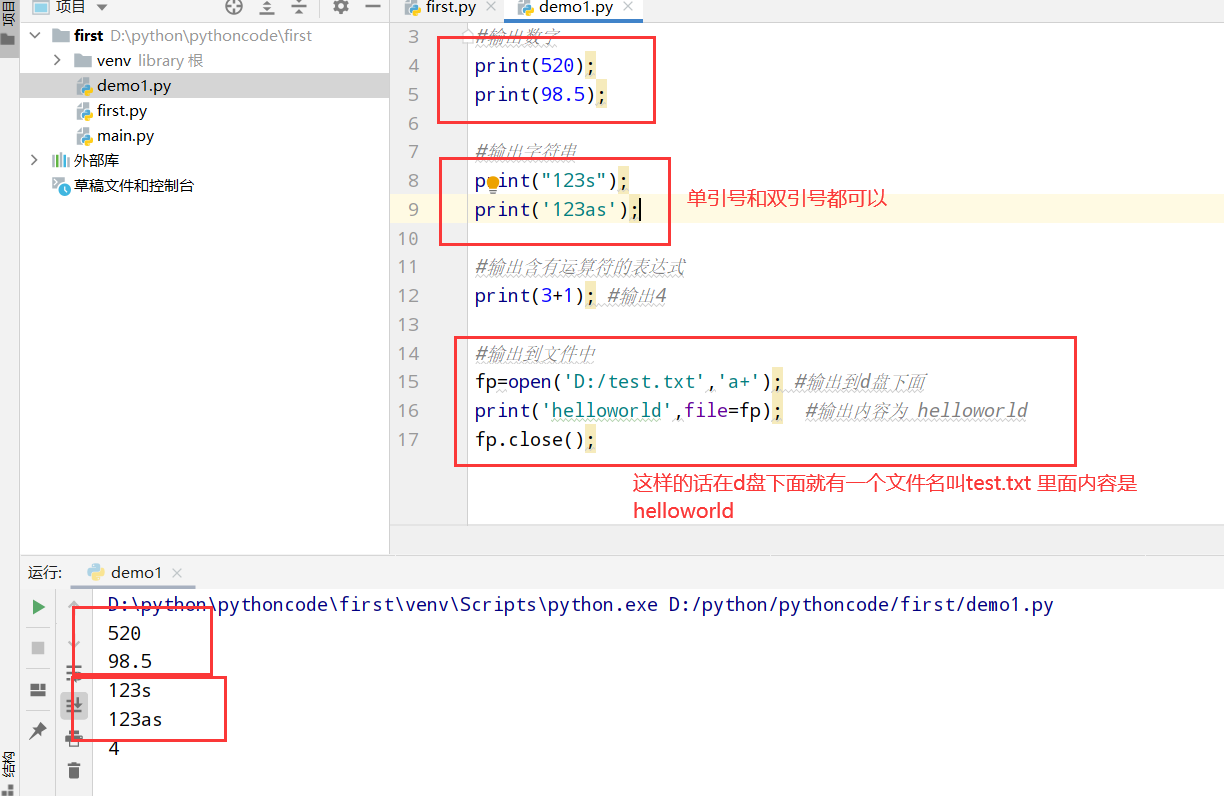
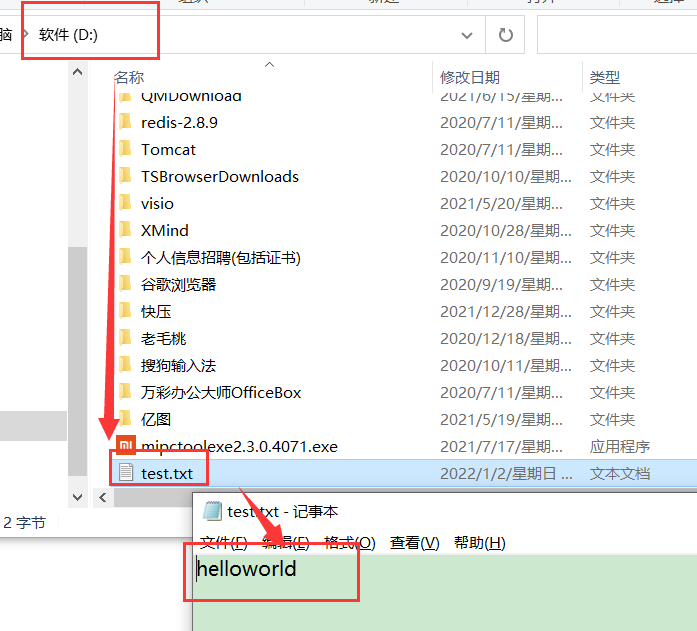
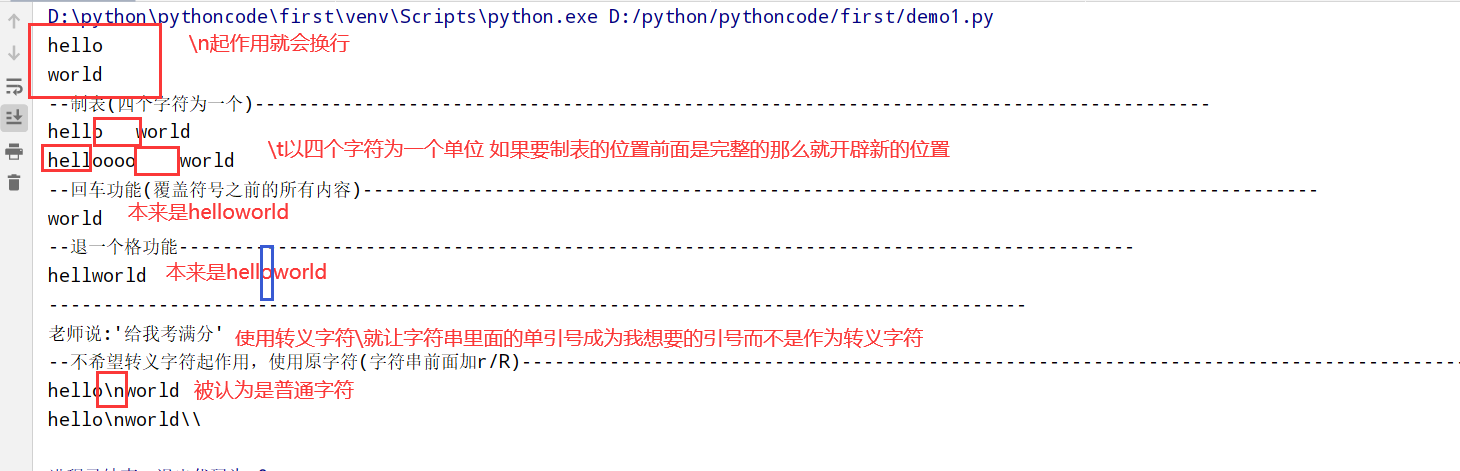
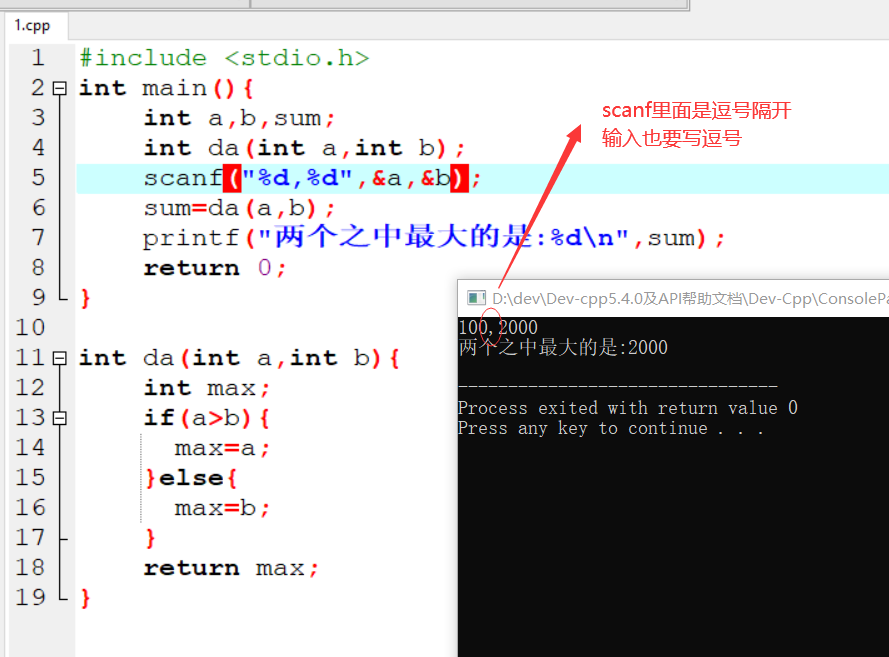
1 | 1.用书 |
参考视频pdf文件
机器学习简介
相关关系
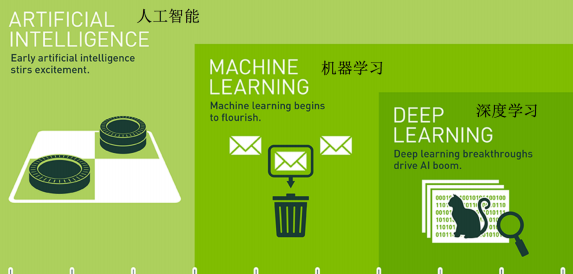
应用领域
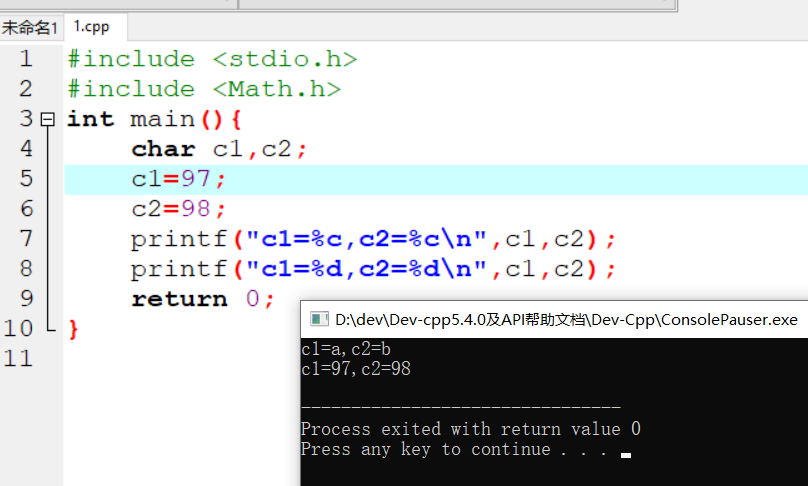
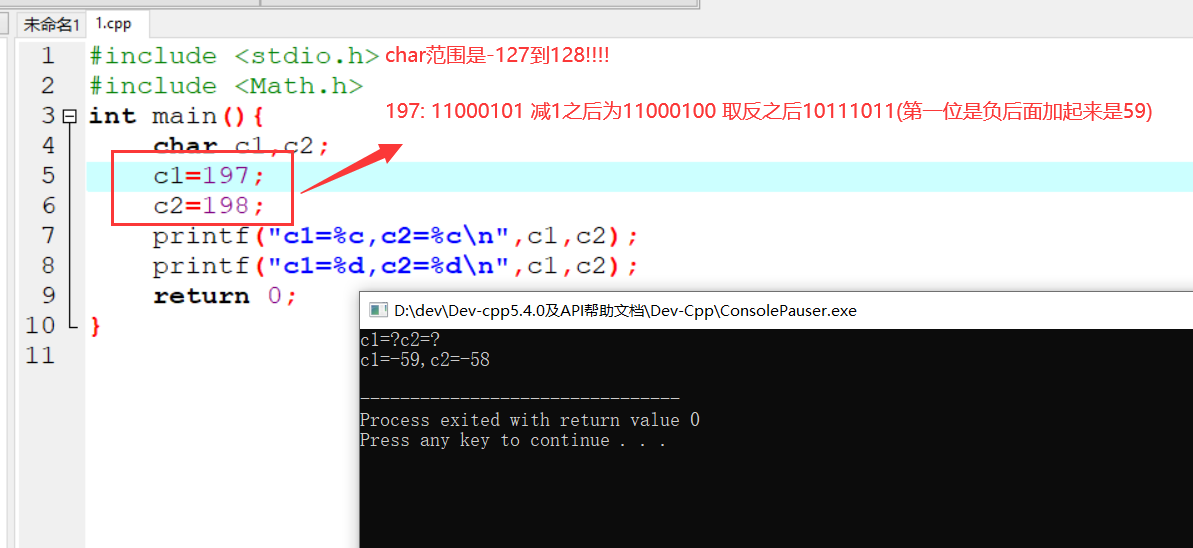
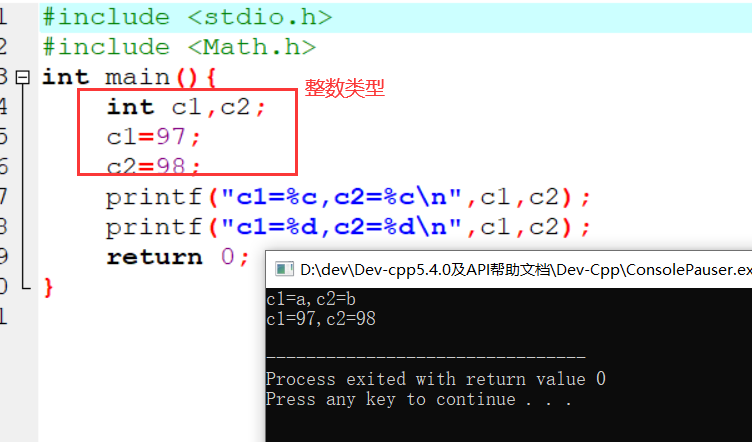
1 |
|
相关概念
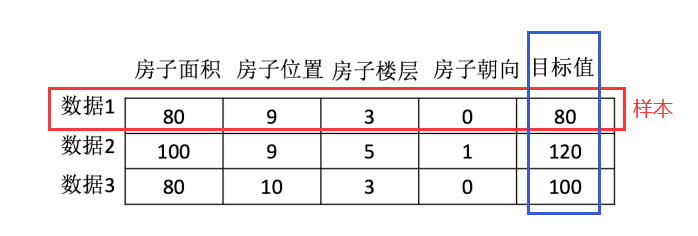
数据集(特征值+目标值)
常见三类问题
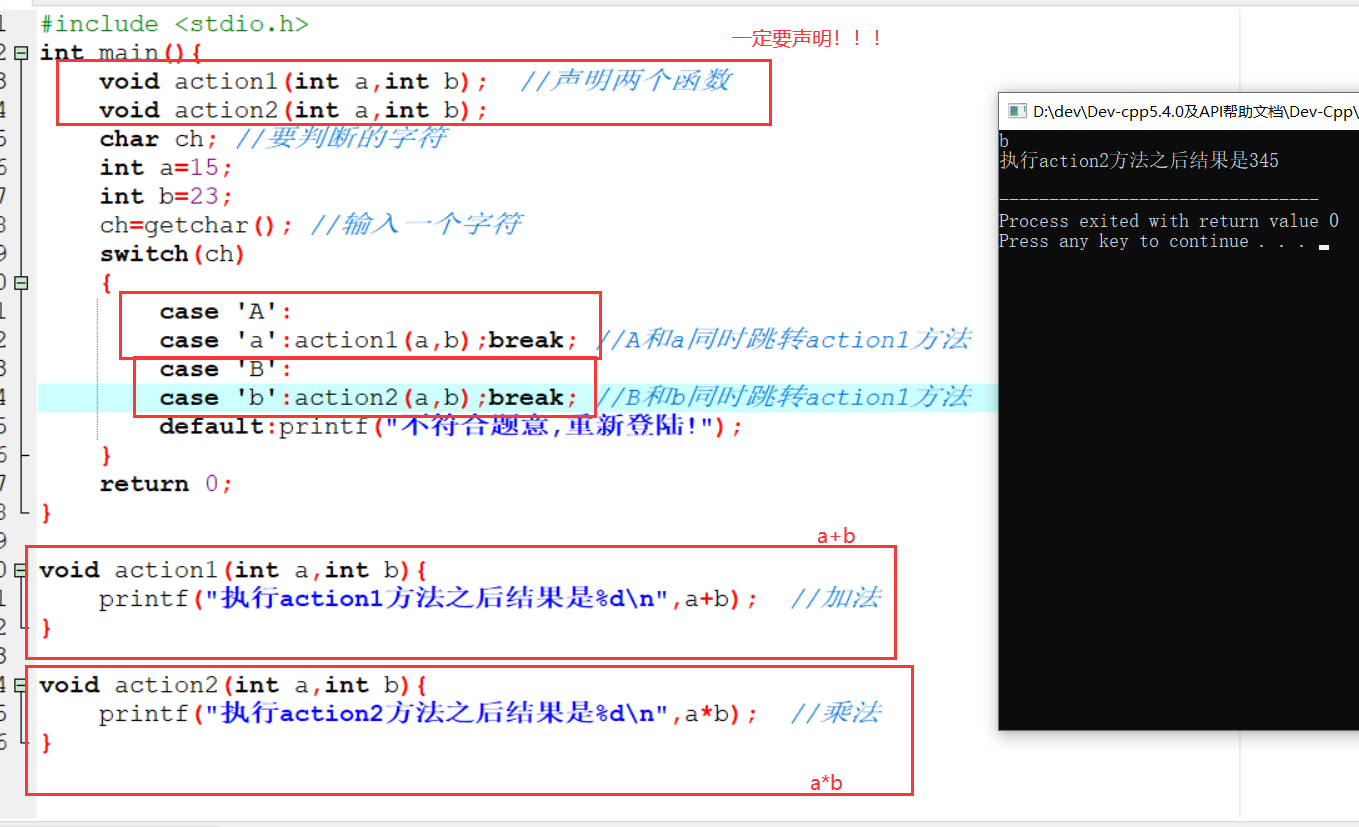
1 | 1.**分类问题**:给一堆小猫小狗 --> 分类是小狗还是小猫 |
算法分类
1 | 1.监督学习(**预测**):输入数据有特征有标签(有标准答案)---分类和回归 |
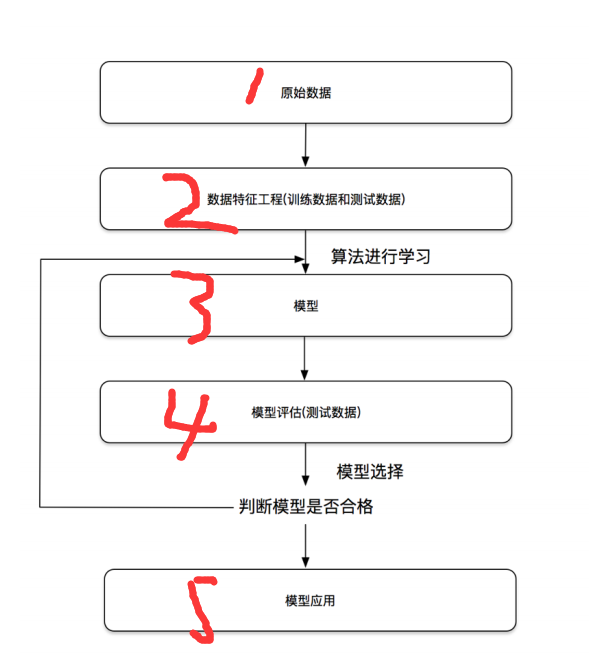
开发流程
特征工程
数据集
可用数据集
1 | 1. Kaggle:https://www.kaggle.com/datasets |
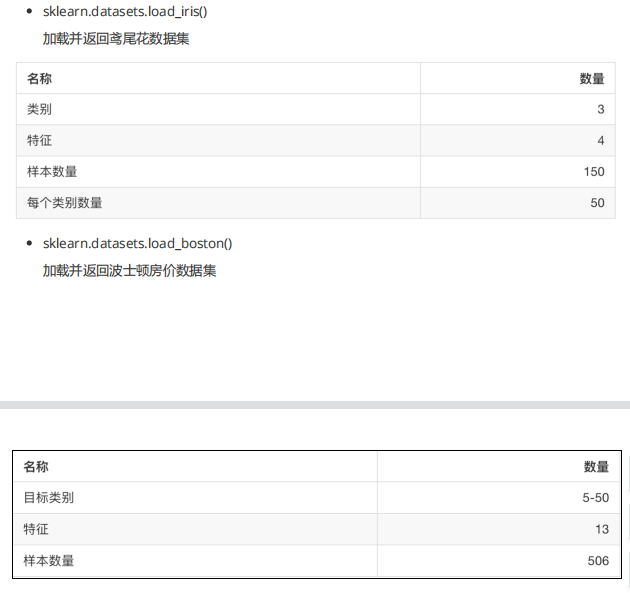
sklearn数据集
sklearn数据集内容
1 | 1.分类/聚类/回归 |
sklearn获取流行数据集(datasets)
1 | 1.sklearn.datasets --- 加载获取流行数据集 |
sklearn小数据集(load)
1 | from sklearn import datasets |
sklearn大数据集(fetch)
1 | from sklearn import datasets |

sklearn返回值(字典格式)
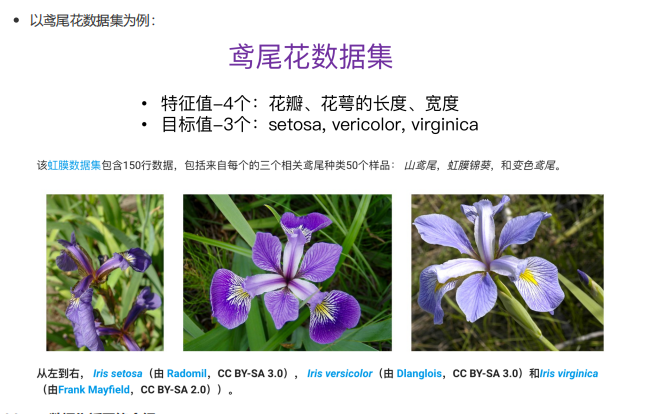
以鸢尾花为例(iris)
1 | #load和fetch均返回数据类型是datasets.base.Bunch(字典格式) |
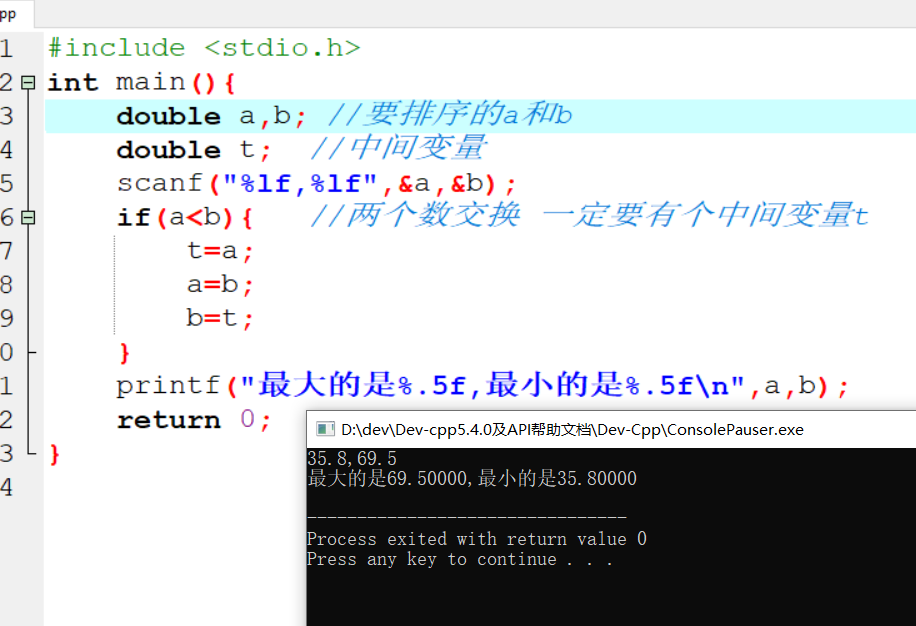
数据集划分
1 | 数据集划分: |
数据集划分API(model_selection)
1 | sklearn.model_selection.train_test_split(arrays,*option) |
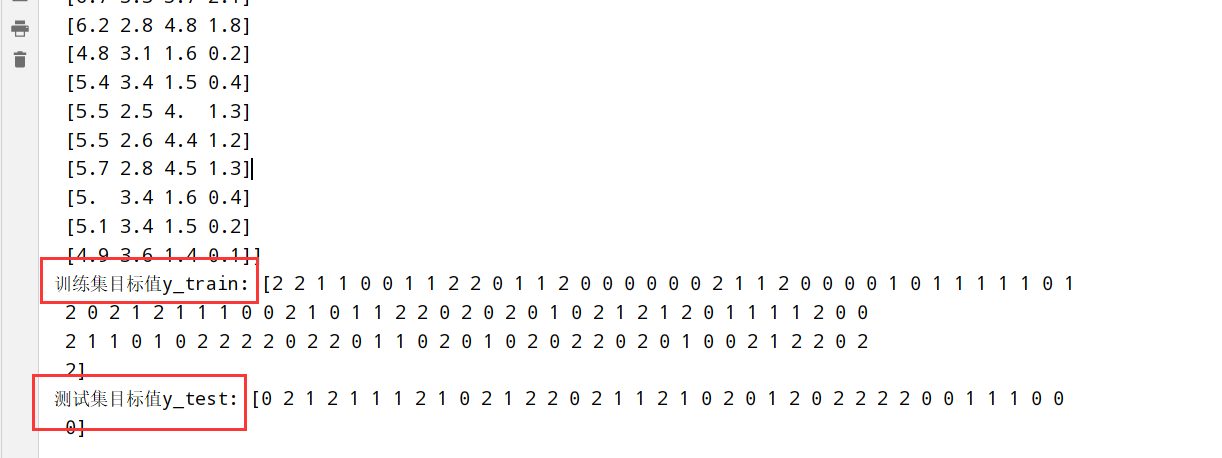
使用鸢尾花数据集:
1 | from sklearn import datasets |
特征工程介绍
特征提取(sklearn.feature_extraction)
- 任意数据(文本/图像) –> 数字特征(机器学习)
特征提取分类
1 | 1.字典特征提取(特征离散化) |
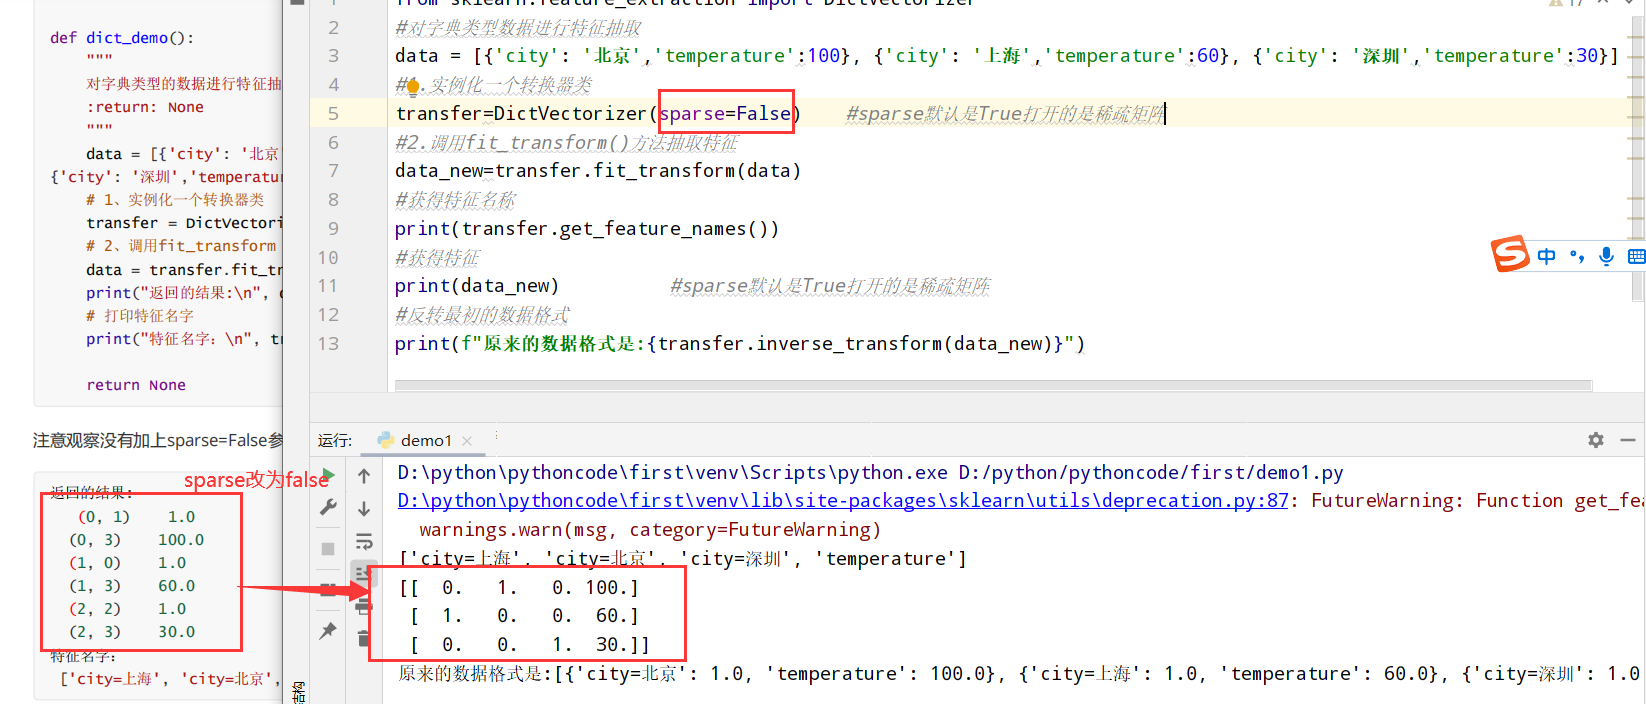
字典特征提取(DictVectorizer类)
1 | #有三个方法: |
以城市为例:
1 | from sklearn.feature_extraction import DictVectorizer |
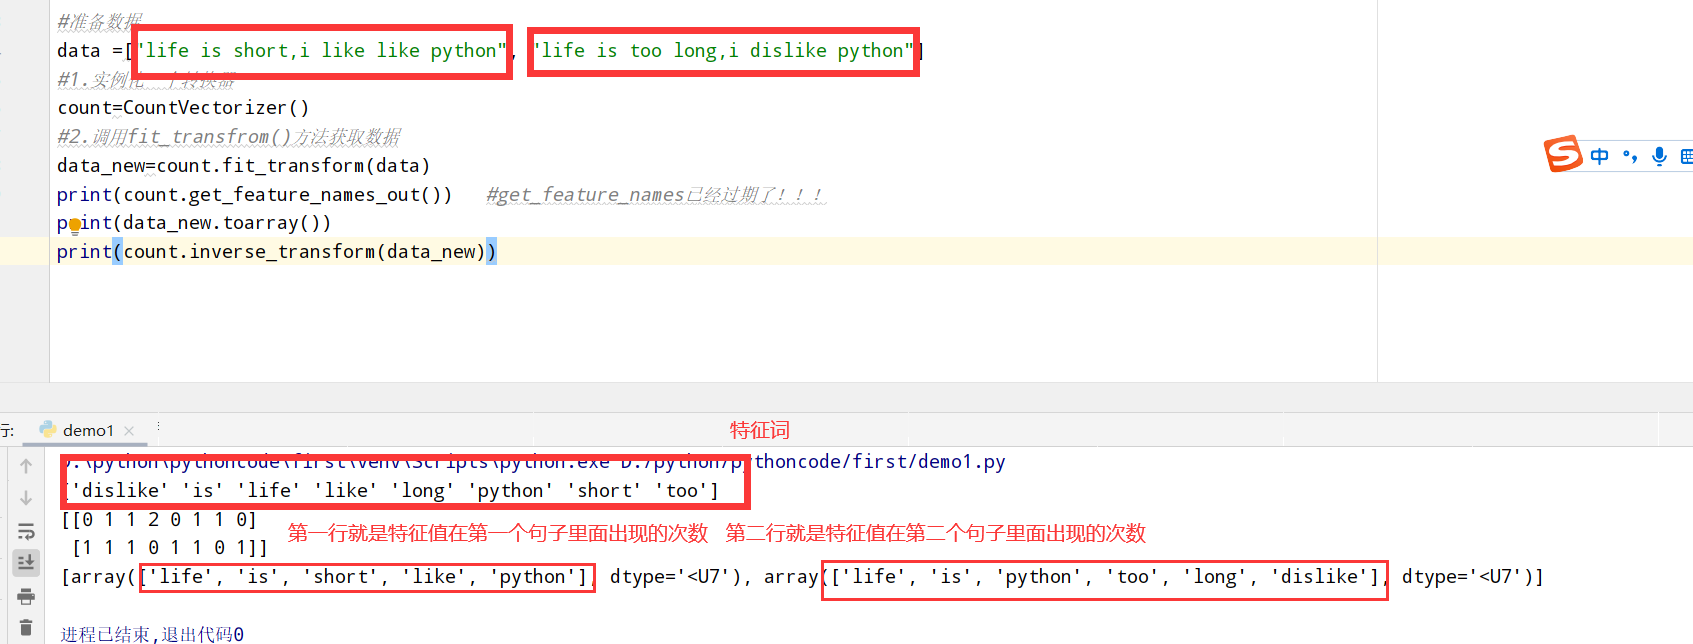
文本特征提取(CountVectorizer类统计特征词出现个数)
1 | #有三个方法: |
以英文段落为例:
1 | from sklearn.feature_extraction.text import CountVectorizer |
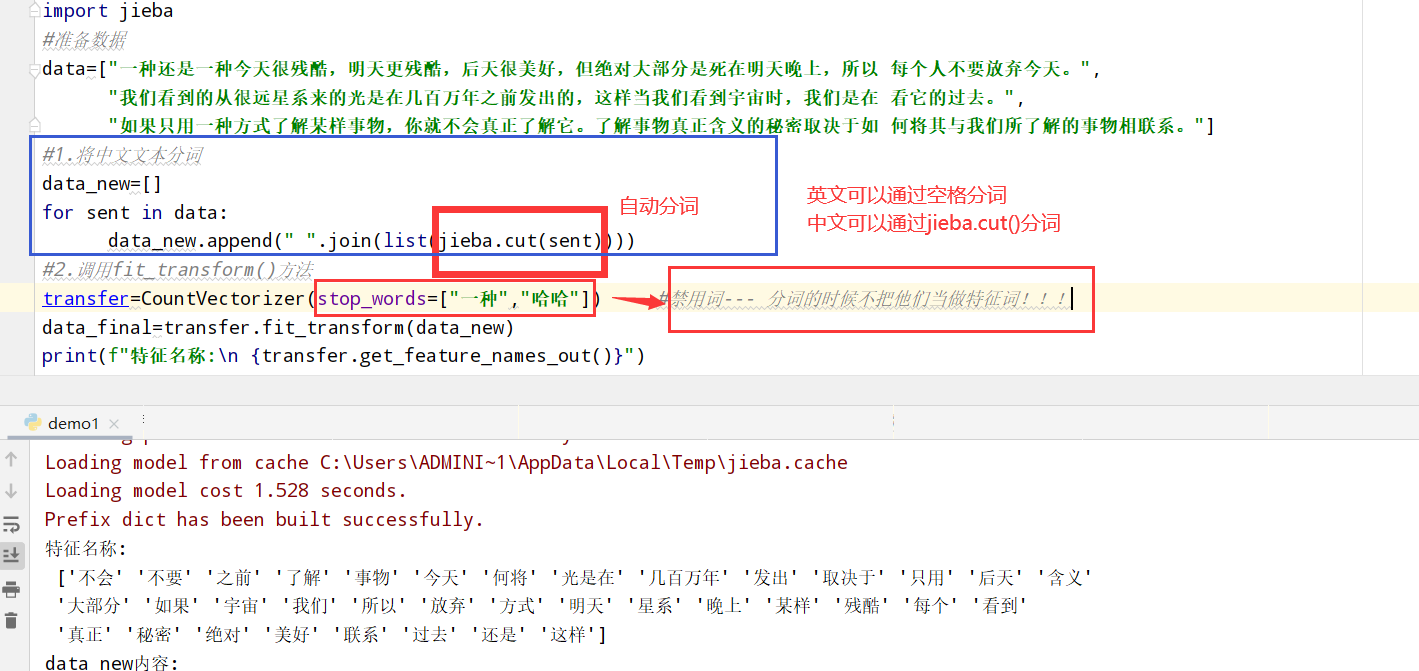
文本特征提取(TfidfVectorier类+jieba库的cut方法分词)
jieba库的cut方法
以中文段落为例:
1 | from sklearn.feature_extraction.text import CountVectorizer |
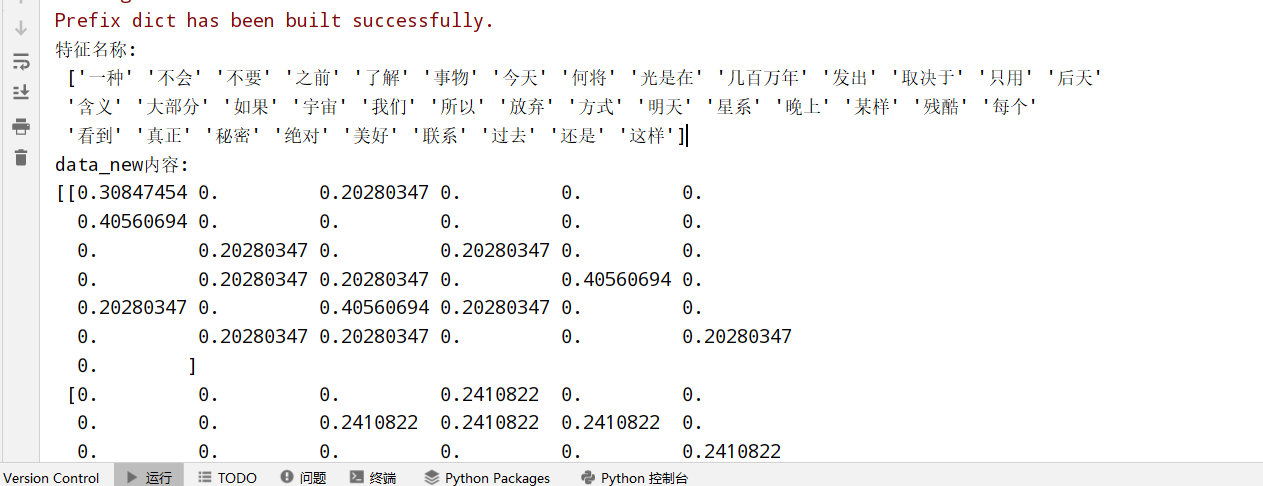
TfidfVectorier类
1 | 1.TF-IDF思想:某个词/短语在一篇文章中出现概率高,并且在其他文章中很少出现,则认为有很好的区分度,适合用来分类 |
以中文段落为例:
1 | from sklearn.feature_extraction.text import TfidfVectorizer |
特征预处理(sklearn.preprocessing)
1 | 特征预处理:特征数据 --(转换函数)--> 特征数据[更加适合算法模型] |
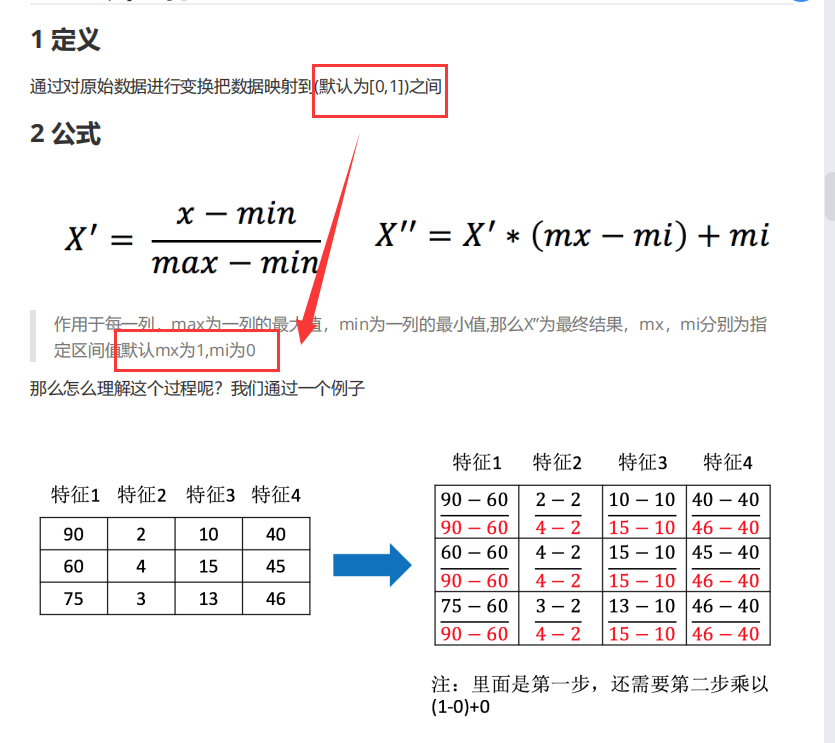
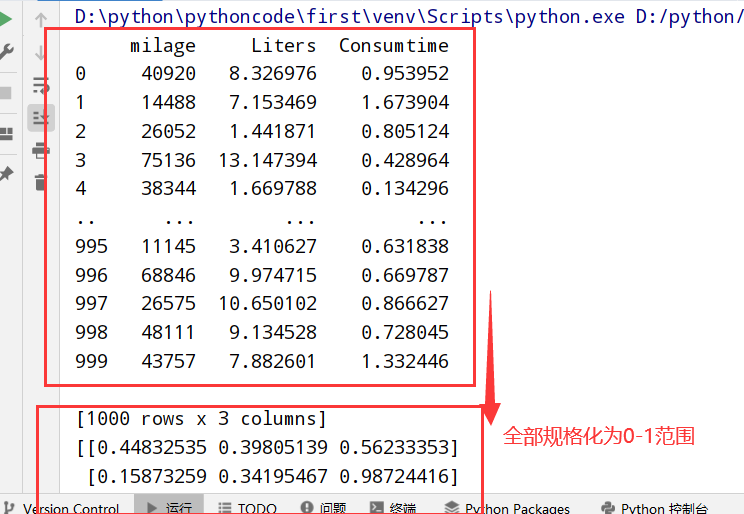
归一化(MinMaxScaler)
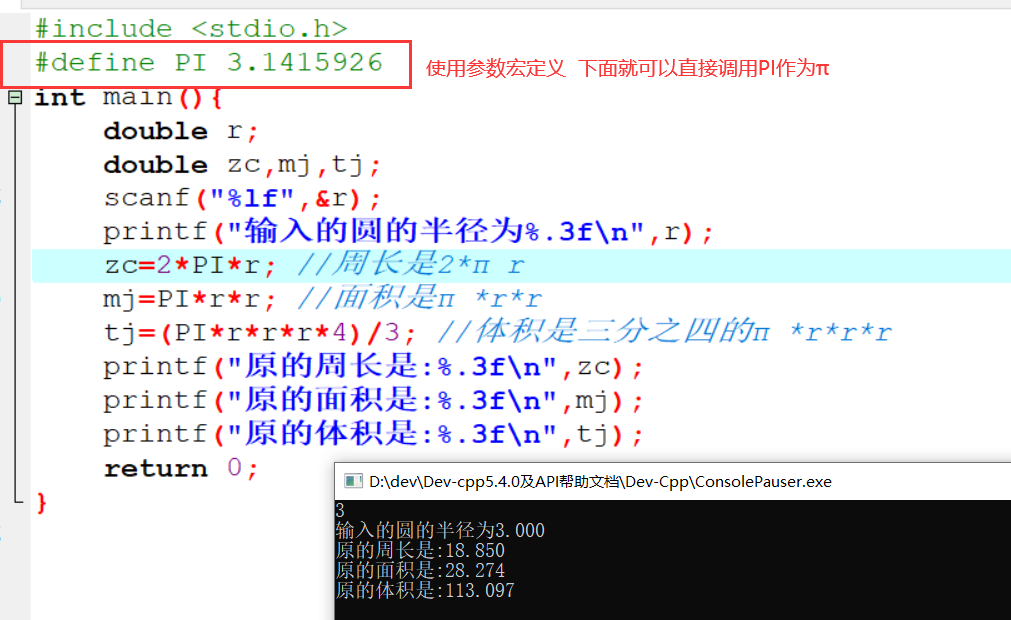
归一化推导公式:
1 | import pandas as pd |
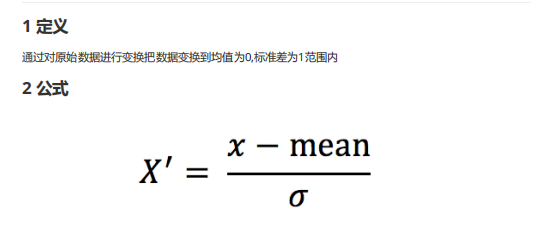
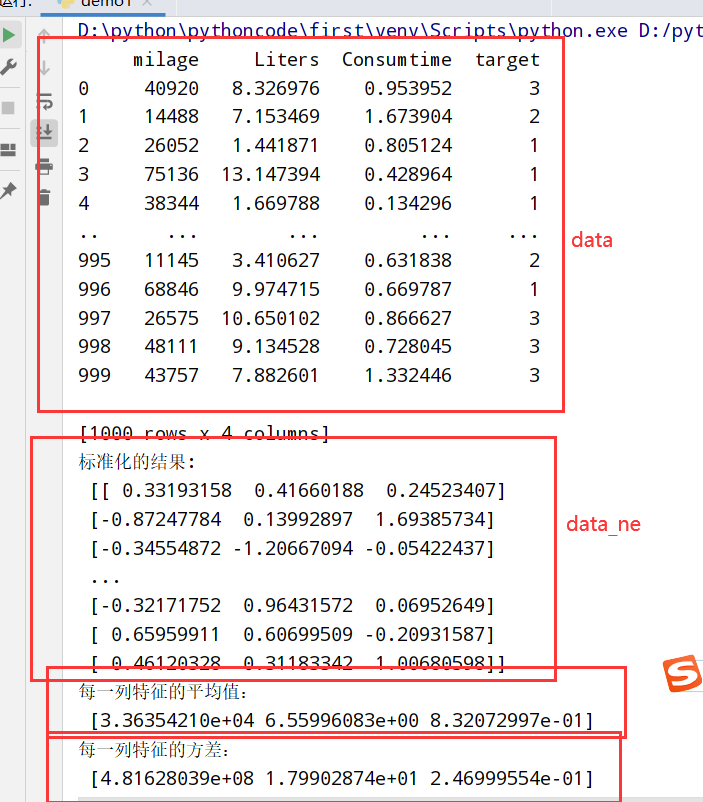
标准化(StandardScaler)
标准化推导公式:
1 | import pandas as pd |
特征降维
1 | 概念: |
特征选择
低方差特征过滤(varianceThreshold)
1 | 1.删除低方差的一些特征,再结合方差的大小来考虑这个方式的角度 |
筛选某些股票的指标特征
1 | import pandas as pd |
相关系数过滤(scipy)
1 | 1.皮尔逊相关系数:反映变量之间相关关系密切程度的统计指标 |
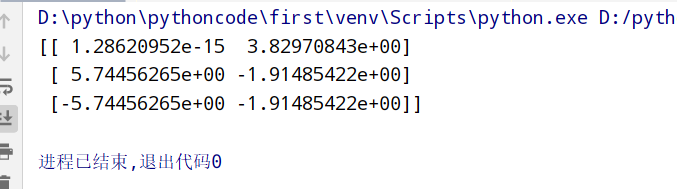
主成分分析(PCA降维保留信息)
1 | 1.API:通过矩阵运算得到一个合适的直线->主成分分析的结果 |
举例使用
1 | from sklearn.decomposition import PCA |
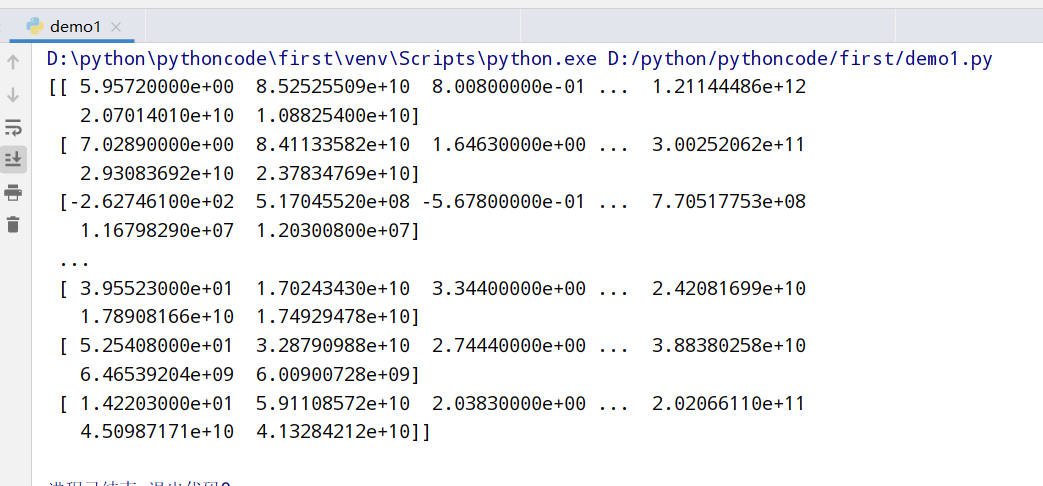
instacart降维案例
问题分析
1 | <探究用户对物品类别的喜好细分> |
具体实现
1 | import pandas as pd |
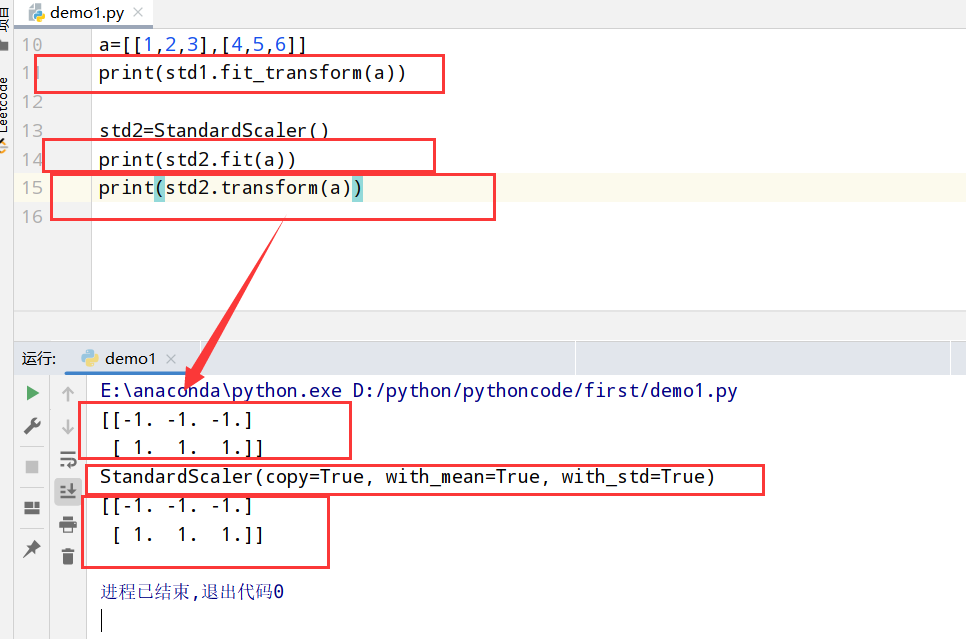
sklearn转换器和估计器
1 | 1.特征工程的步骤: |
转换器(fit_transform)
1 | import numpy as np |
估计器(estimator)
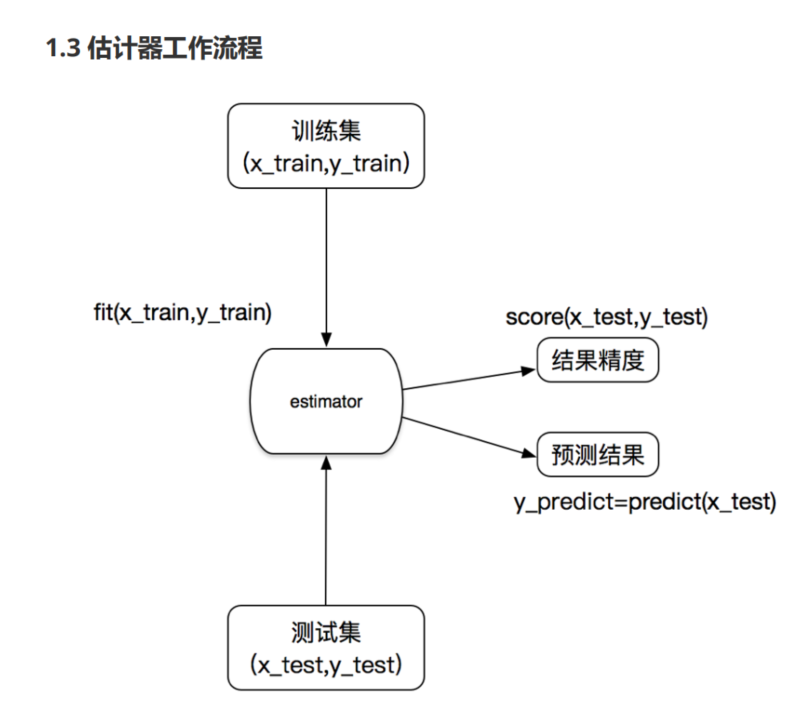
1 | 1.估计器的步骤: |
估计器的分类:
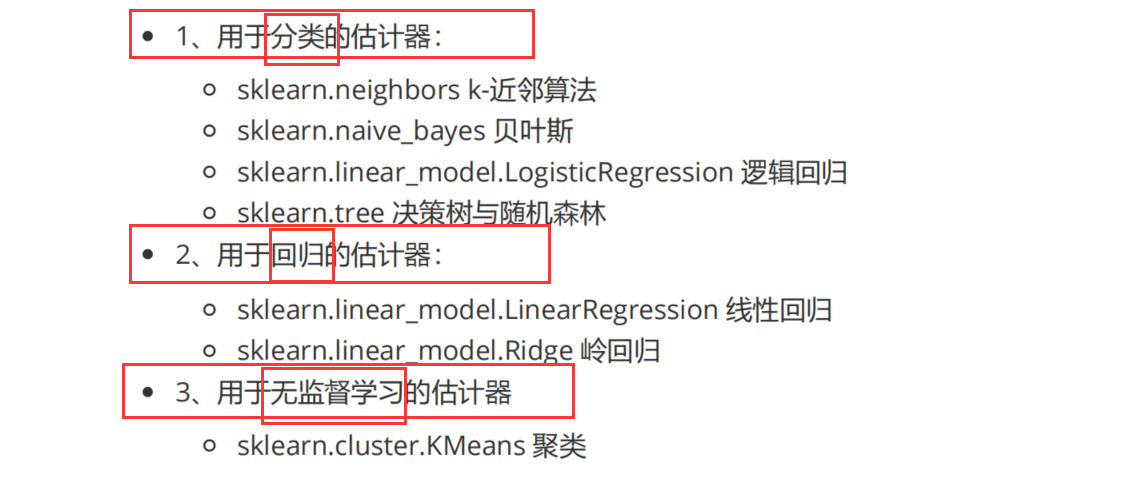
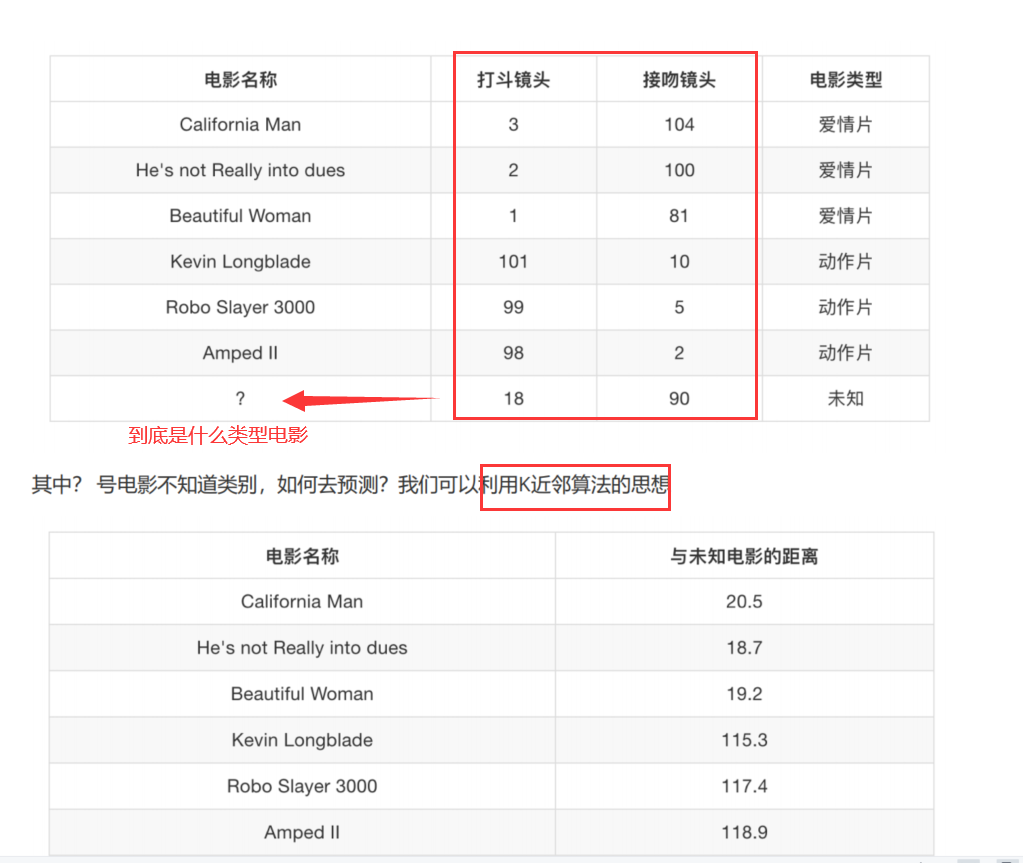
K-近邻算法(sklearn.neighbors.KNeighborsClassifier)
1 | 1.核心思想: 你的"邻居"来推断你的类别 |
模型选择与调优(sklearn.model_selection.GridSearchCV)
1 | 1.交叉验证(cross validation):为了让被评估的模型更加准确可信 |
电影类型分析
鸢尾花分析
1 | import numpy as np |
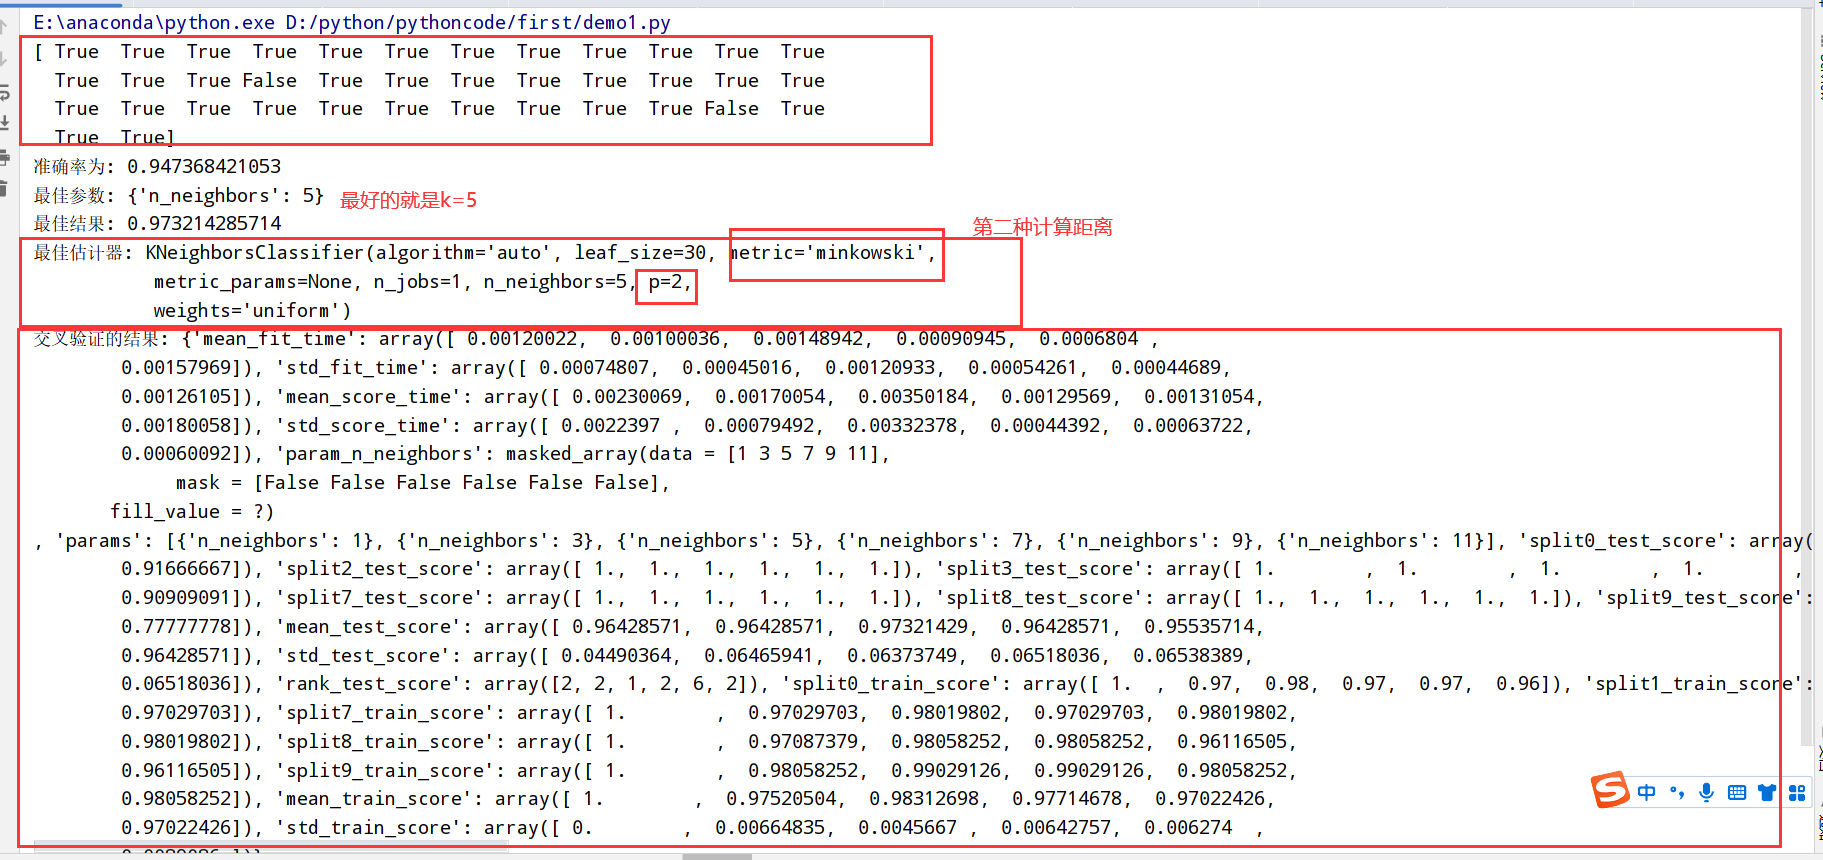
鸢尾花分析(添加网格搜索和交叉验证)
1 | import numpy as np |
预测facebook签到位置
1 | import numpy as np |
朴素贝叶斯算法(sklearn.naive_bayes.MultinomialNB(alpha=1.0))
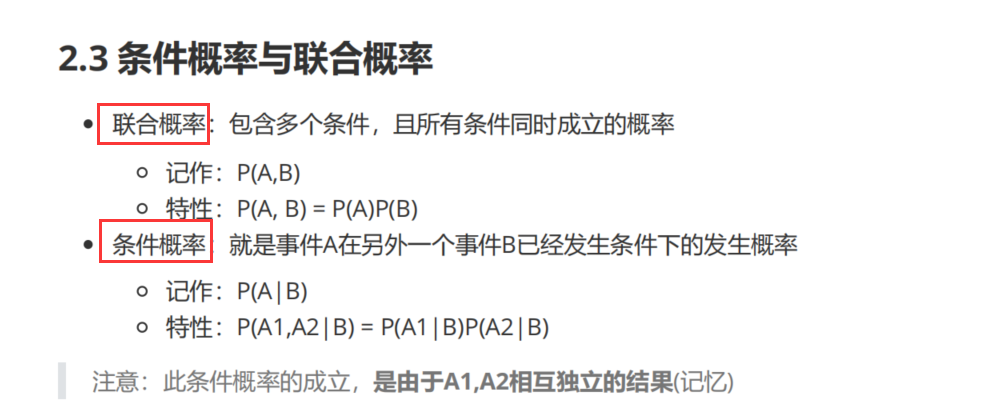
条件概率与联合概率
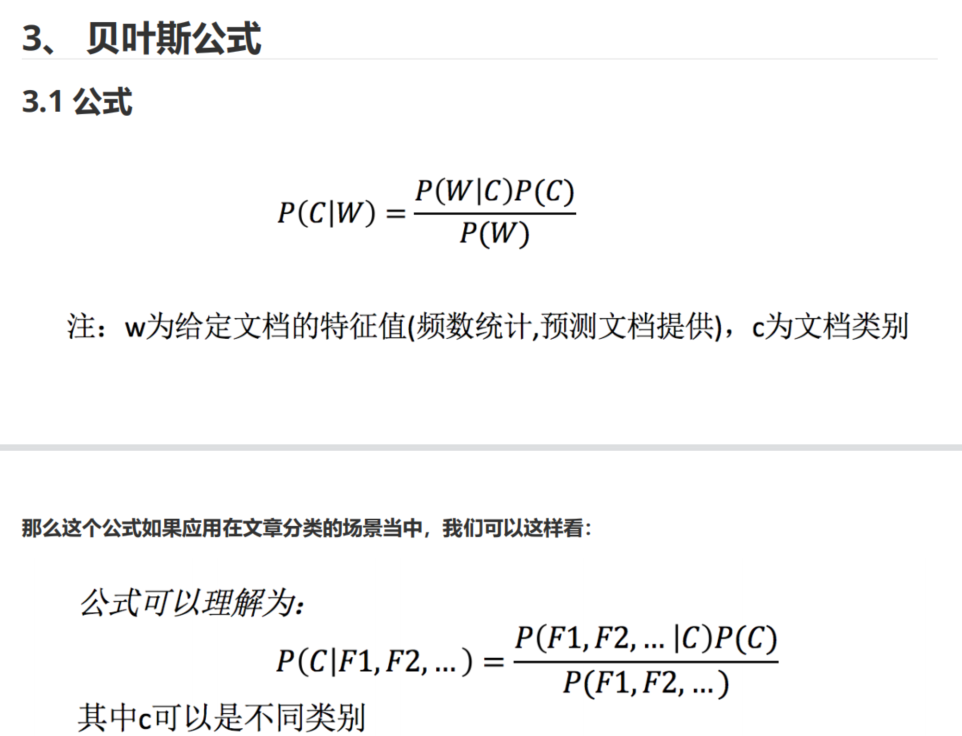
贝叶斯公式
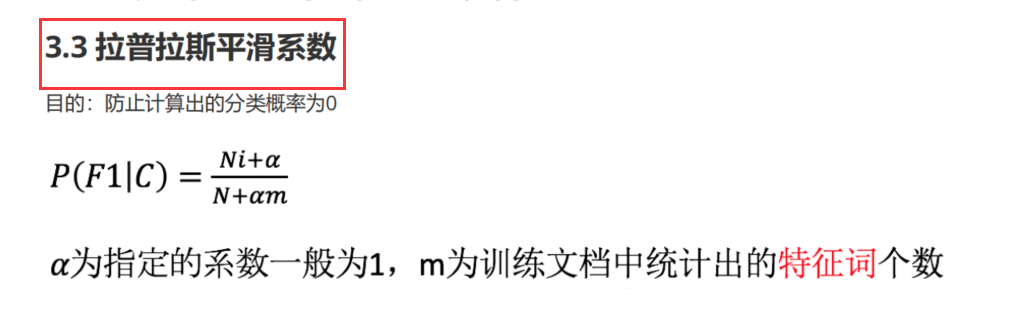
拉普拉斯平滑系数(防止计算出的分类概率为0)
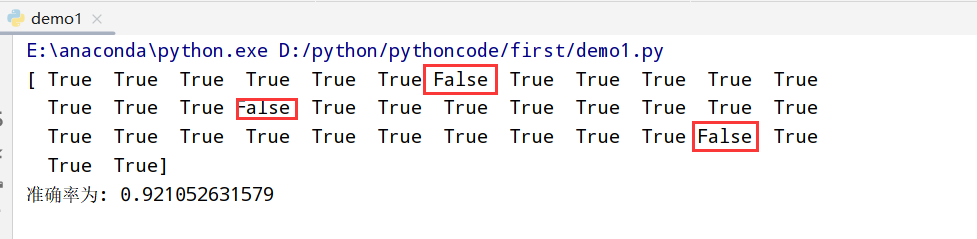
文本分类分析(新闻分类)
1 |
|
决策树(sklearn.tree.DecisionTreeClassifier)
信息论基础
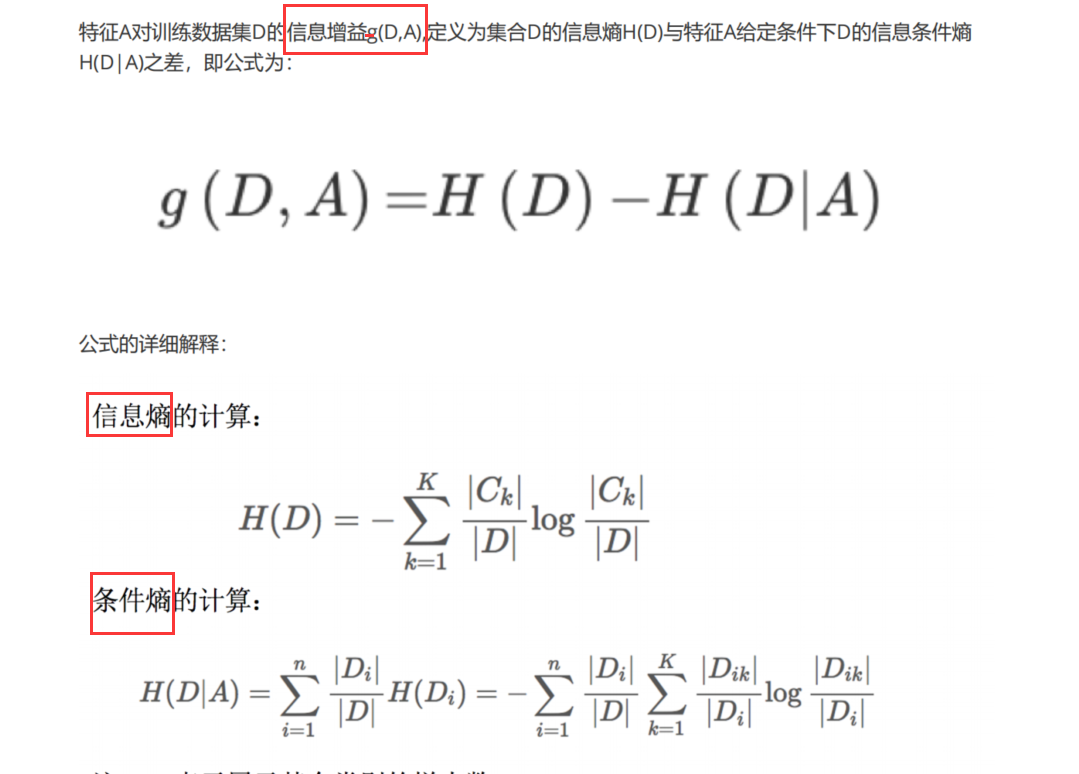
1 | 1.信息: |
决策树划分依据(3种)
1 | 1. ID3 信息增益(最大的准则) |
决策树的实现
1 | sklearn.tree.DecisionTreeClassifier(criterion='gini',max_depth=None,random_state=None) |
鸢尾花预测
1 | import numpy as np |

决策树可视化(sklearn.tree.export_graphviz()导出DOT格式)
1 | sklearn.tree.export_graphviz()该函数能够导出DOT格式 |

泰坦尼克号乘客生存预测
1 | import numpy as np |
随机森林(sklearn.ensemble.RandomForestClassifier)
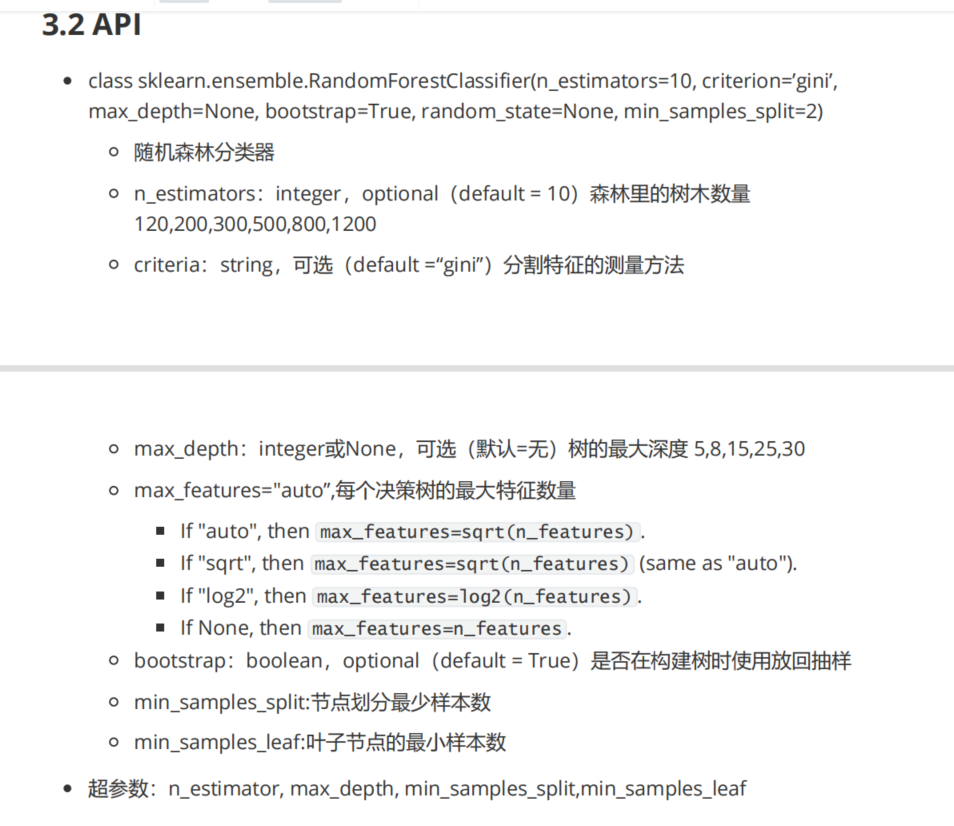
1 | 1.随机森林: 一个包含多个决策树的分类器(输出的类型是通过个别树输出的类别的众数决定) |
回归问题
线性回归
线性回归定义
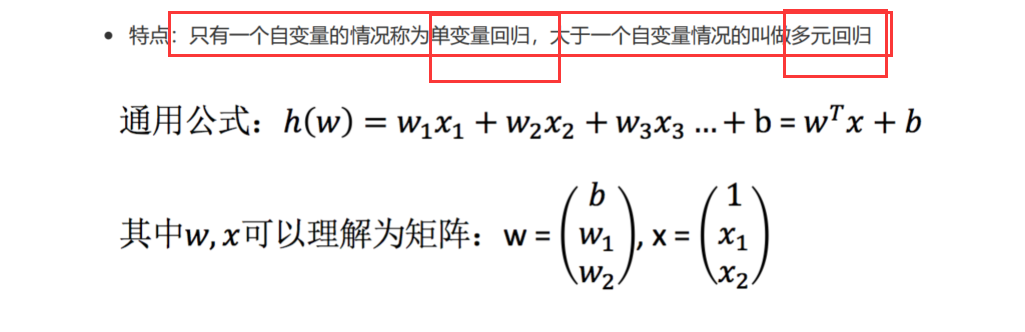
1 | 1.基本概念:通过回归方程(函数)对一个/多个自变量(特征值)和因变量(目标值)之间关系进行建模的一种分析方式 |
线性回归通用公式:
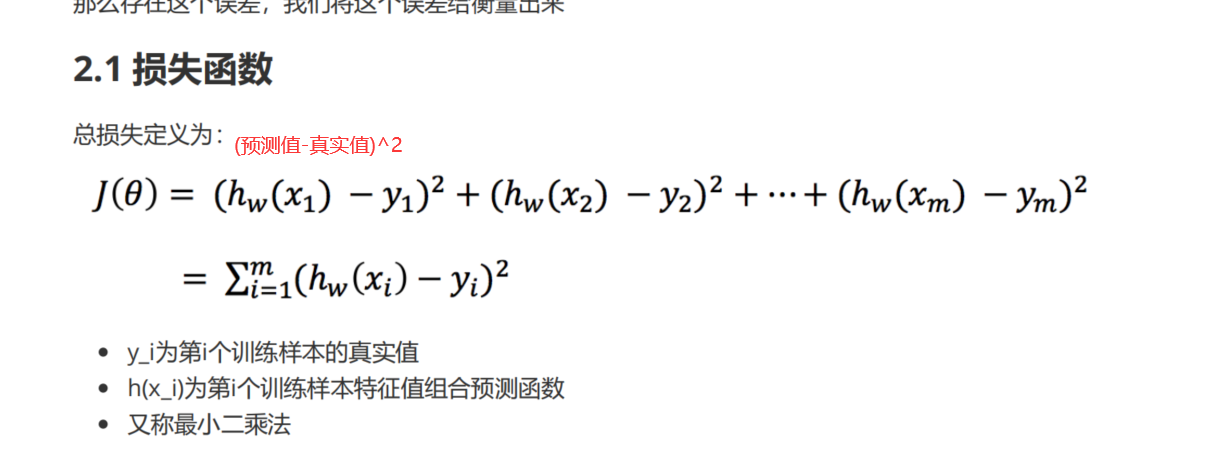
最小二乘法(损失函数)
最小二乘法公式:
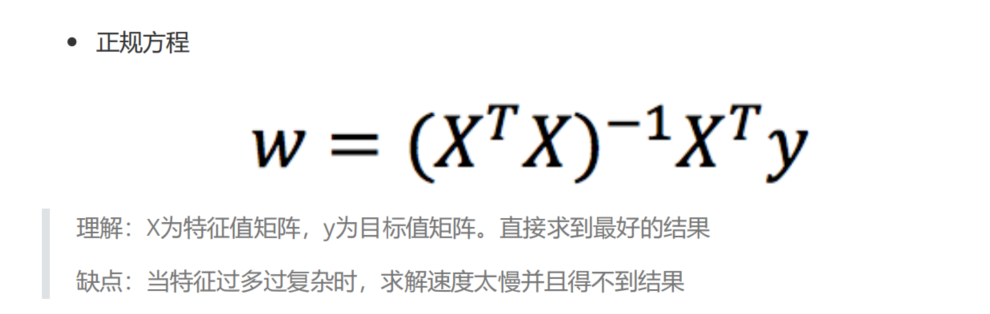
优化方法之正规方程(直接求解sklearn.linear_model.LinearRegression)
1 | sklearn.linear_model.LinearRegression(fit_intercept=True) |
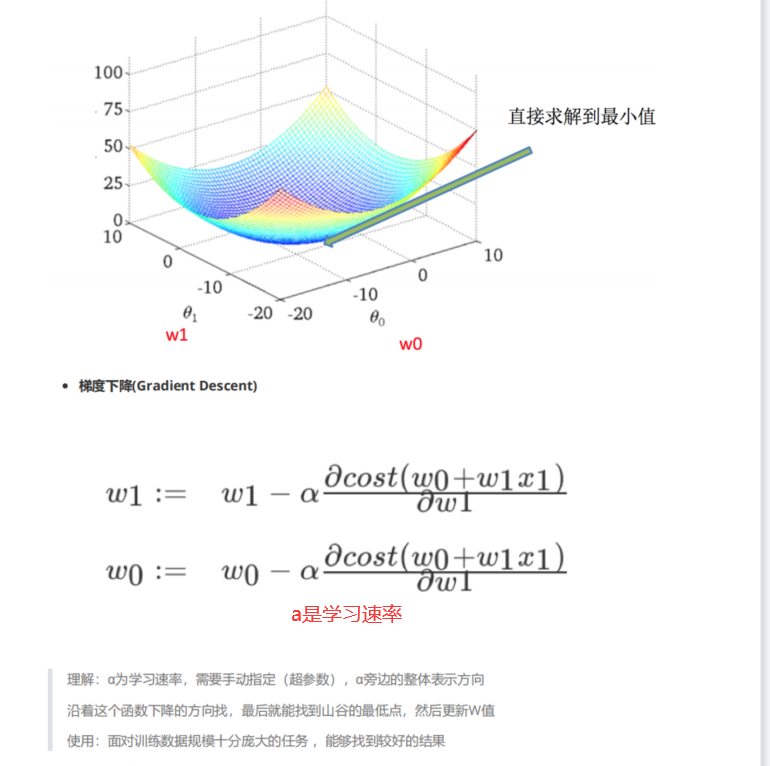
优化方法之梯度下降(不断试错sklearn.linear_model.SGDRegressor)
1 | sklearn.linear_model.SGDRegressor(loss="squared_loss",fit_intercept=True,learing_rate='invscaling',eta0=0.01) |
波士顿房价预测(正规方程和梯度下降对比)
正则方程
1 | import numpy as np |

梯度下降
1 | import numpy as np |

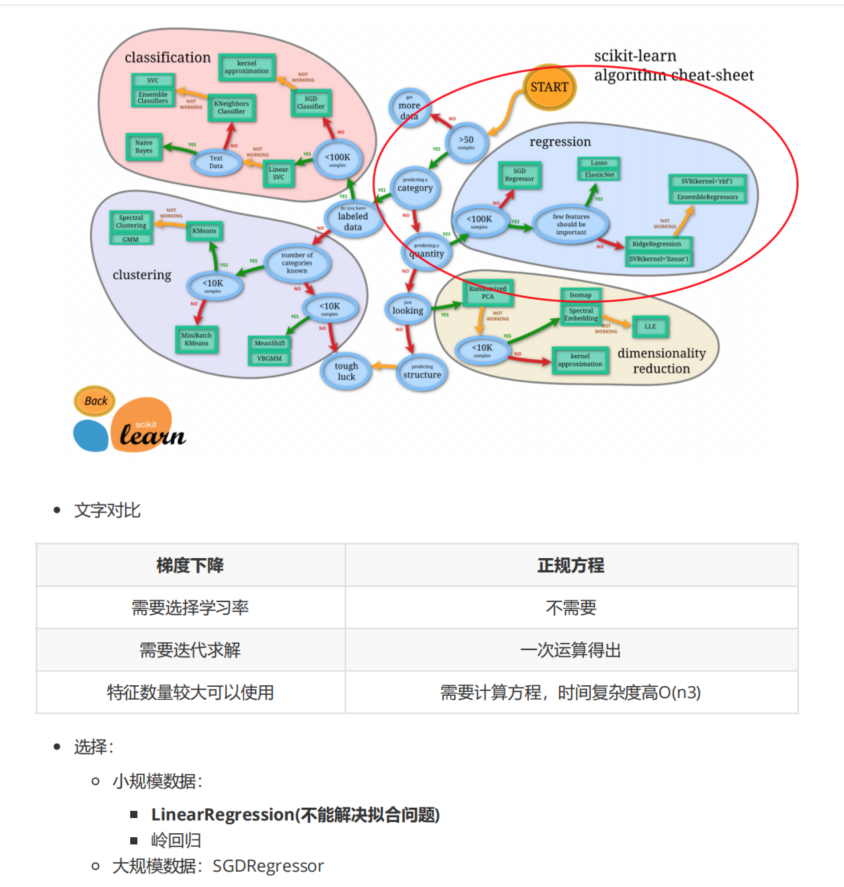
两者对比
回归性能评估(sklearn.metrics.mean_squared_error)
回归性能评估公式:
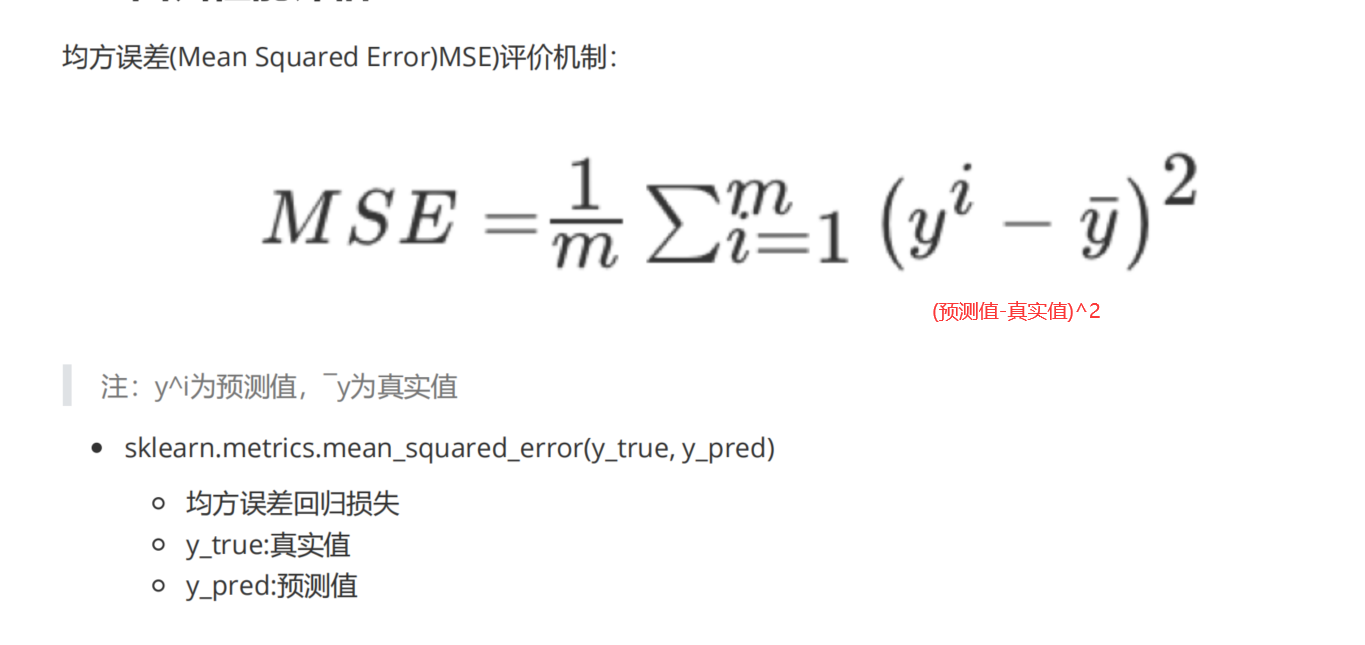
1 | 1.API: sklearn.metrics.mean_squared_error(y_true,y_pred) |
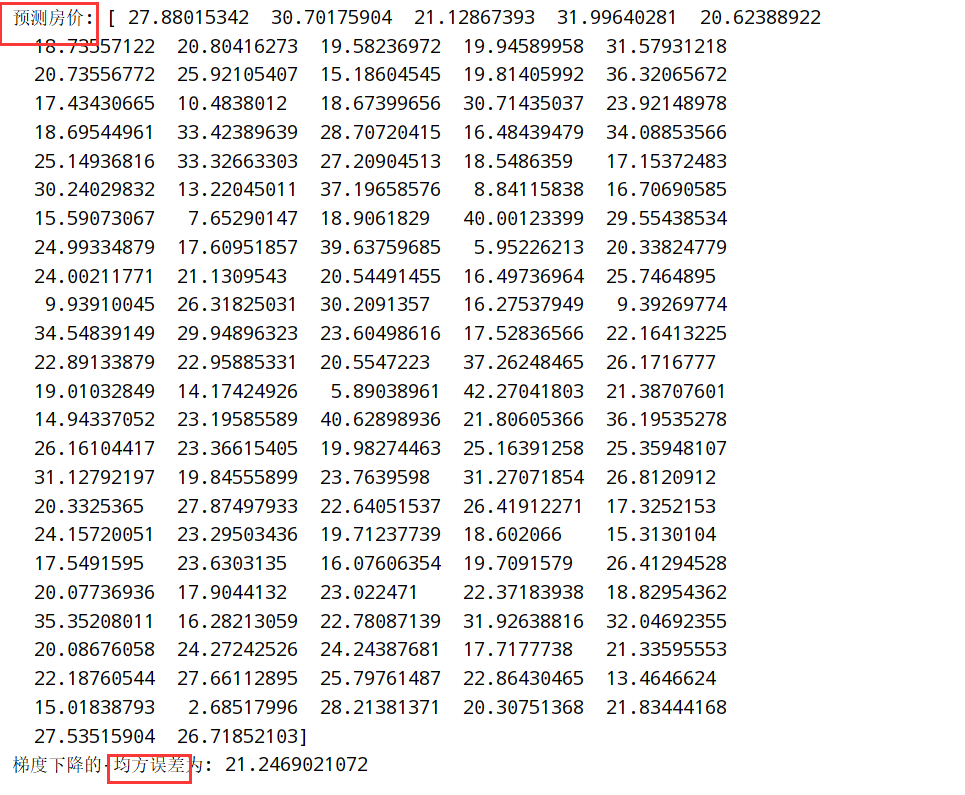
刚才的波士顿房价上进行预测:
梯度下降优化方法(GD/SGD/SAG)
1 | 1.GD(原始的):计算所有样本的值才能够得到梯度(计算量大) |
欠拟合与过拟合()
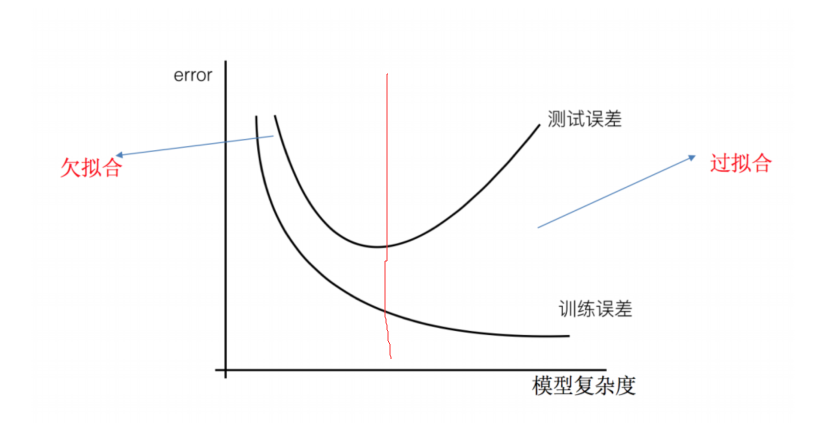
1 | 训练集很合理,测试集不行 |
正则化
1 | 1. L1正则化:可以使得其中一些w的值直接为0,删除这个特征的影响 (LASSO回归) |
岭回归(带L2正则化的线性回归)
1 | 1.API: sklearn.linear_model.Ridge(alpha=1.0,fit_intercept=True,solver="auto",normalize=False) |
波士顿房价预测(岭回归Ridge)
1 | import numpy as np |
分类算法
逻辑回归
逻辑回归概念
sigmoid函数
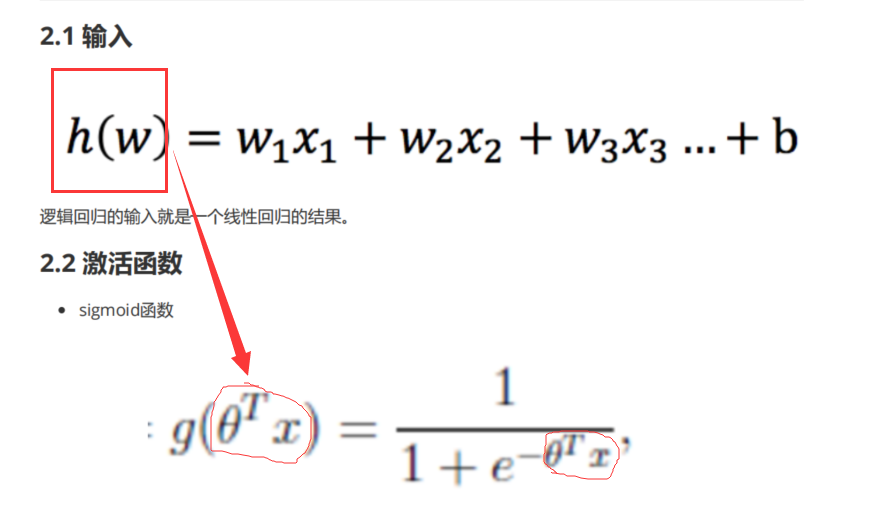
逻辑回归过程
流程:

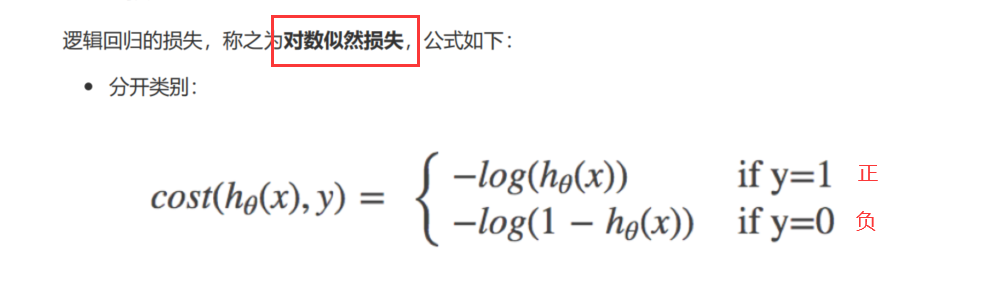
逻辑回归损失(对数似然损失)
对数似然损失:
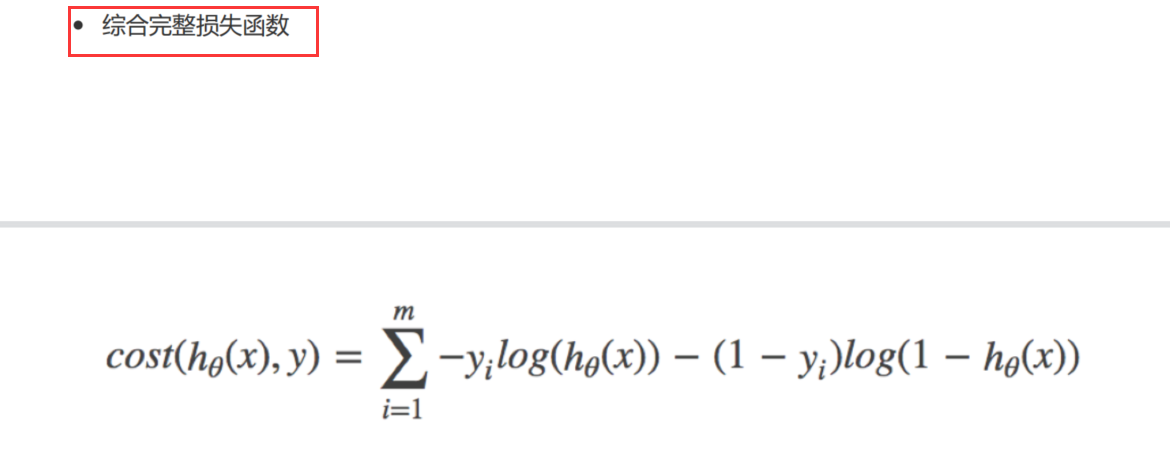
综合完整损失函数:
逻辑回归损失优化(梯度下降)
1 | 减少损失函数的值 --> 更新逻辑回归前面对应算法的权重参数 --> 提升原本属于1类别的概率,降低原本属于0类别的概率 |
逻辑回归API(sklearn.linear_model.LogisticRegression)
1 | 1. sklearn.linear_model.LogisticRegression(solver='liblinear',penalty='l2',c=1.0) |
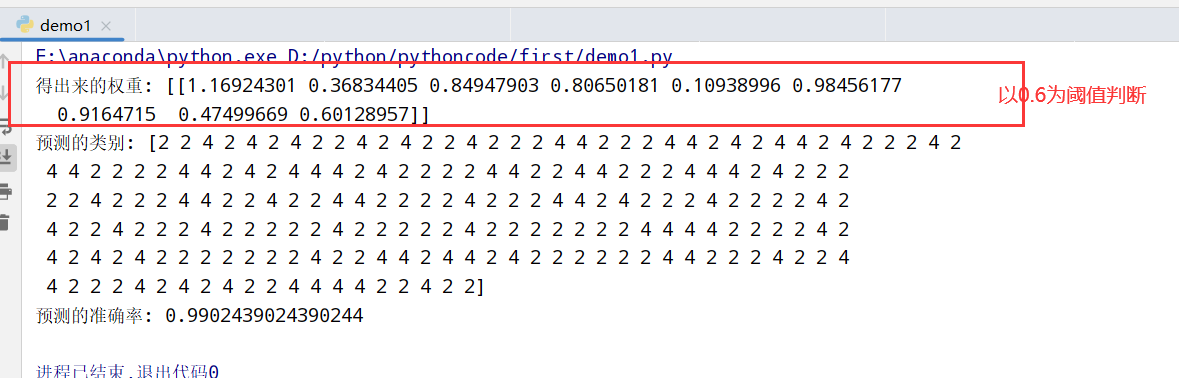
癌症分类
数据描述:
1 | 1.原始数据:https://archive.ics.uci.edu/ml/machine-learning-databases/breast-cancer-wisconsin/ |
代码实现
1 | import numpy as np |
分类的评估方法(sklearn.metrics.classification_report)
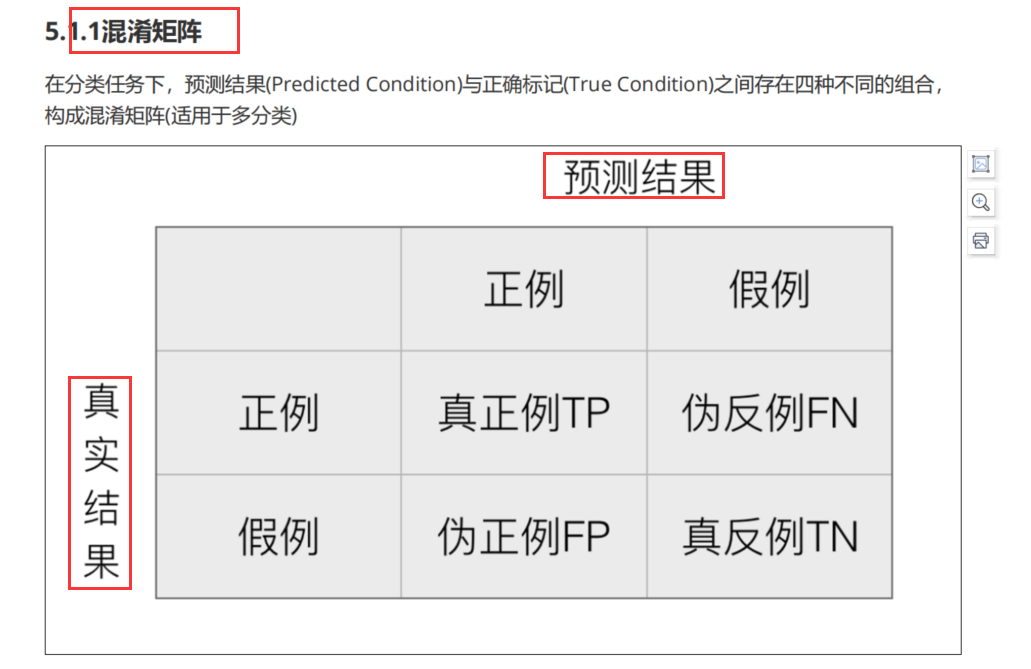
混淆矩阵
混淆矩阵:
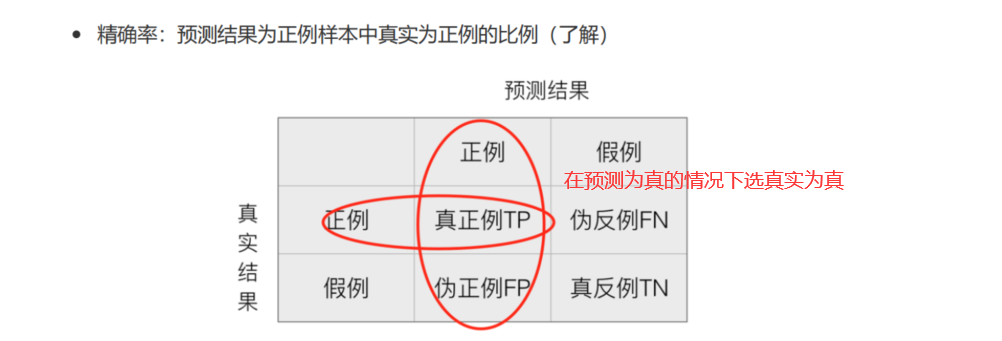
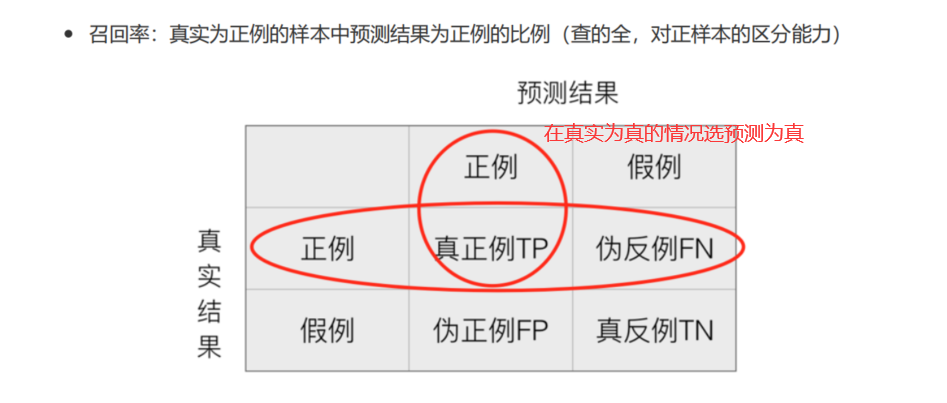
精确率(Precision)与召回率(Recall)
精确率:
召回率:
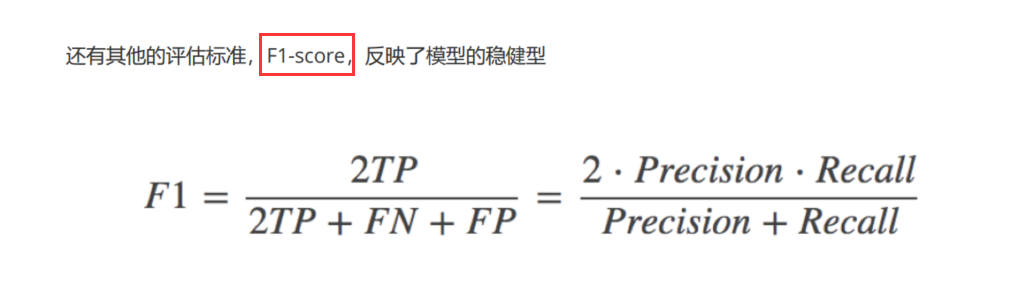
F1-score
分类评估预测API
1 | 1.sklearn.metrics.classification_report(y_true,y_pred,labels=[],target_names=None) |
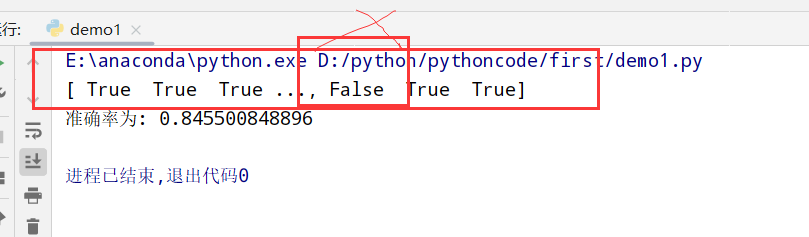
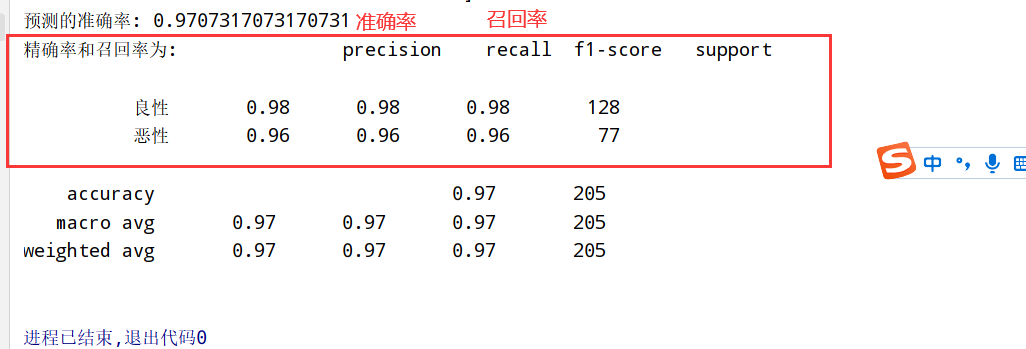
上面基础上加入分类评估
1 | import numpy as np |
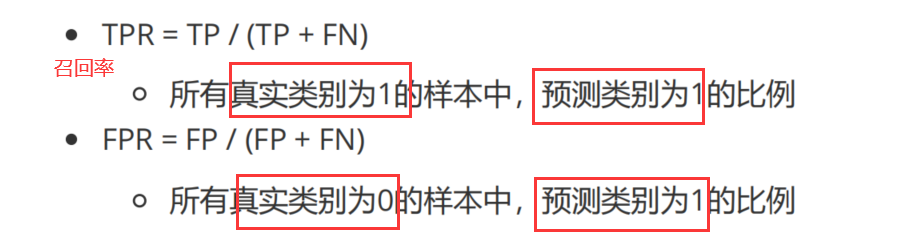
TPR和FPR
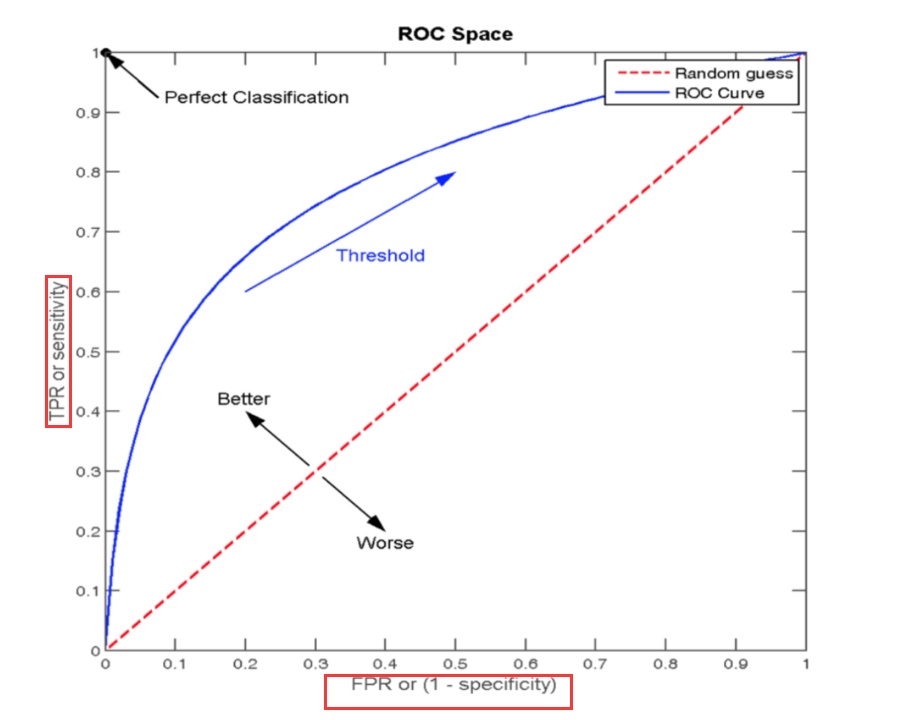
ROC曲线
通过FPR和TPR来构成:
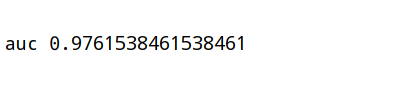
AUC指标(sklearn.metrics.roc_auc_score)
1 | 1.AUC的概率意义: 随机取一对正负样本,正样本得分>负样本的概率 |
上面基础上加入auc指标
1 | import numpy as np |
模型保存和加载(sklearn.externals.joblib)
sklearn模型API
1 | 1.sklearn.externals.joblib |
无监督学习
1 | 1.聚类: K-means算法(K均值聚类) |
K-means算法(sklearn.cluster.KMeans)
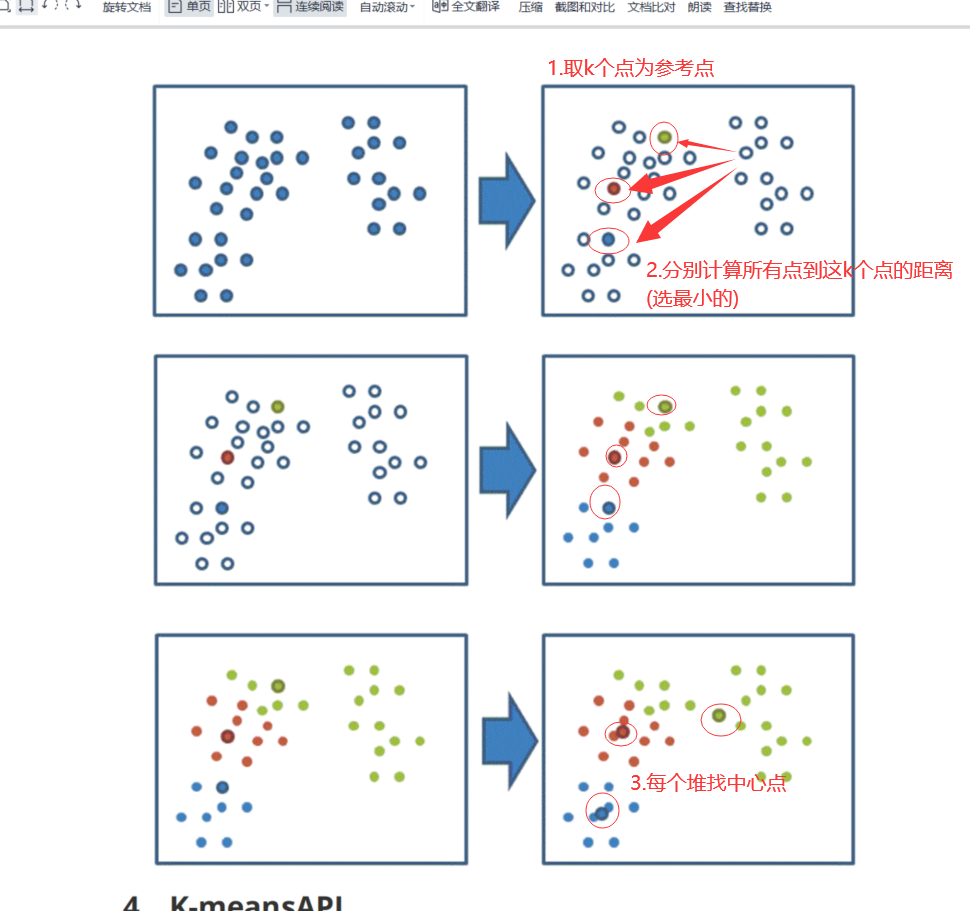
四步骤示意图
1 | 1、随机设置K个特征空间内的点作为初始的聚类中心 |
K-means算法API
1 | 1.API: sklearn.cluster.KMeans(n_clusters=8,init='k-means++') |
对Instacart Market用户聚类
1 | 1.降维后的数据 |
Kmeans性能评估指标(sklearn.metrics.silhouette_score)
轮廓系数

1 | 1.很像高级语言程序里面的"高内聚低耦合" |
轮廓系数API
1 | sklearn.metrics.silhouette_score(X,labels) |