前期准备
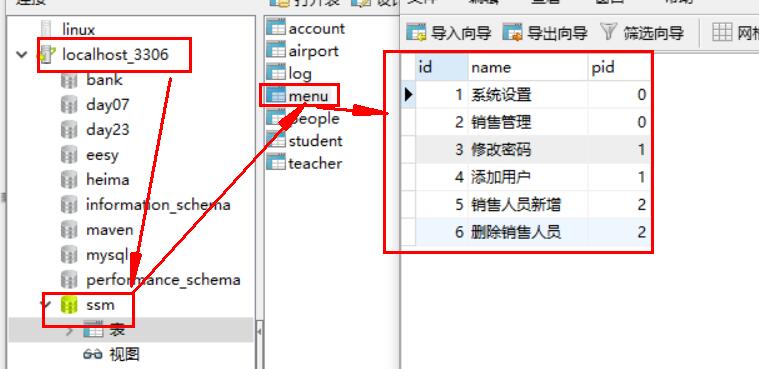
创建数据库

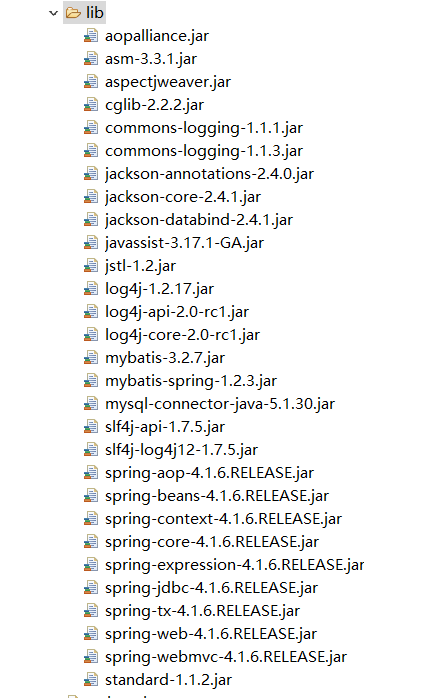
导入jar包

配置web.xml(四步)
1. spring的上下文参数(地址)
2. 监听器
3. springmvc的前端控制器(地址)
4. 字符编码过滤器(防止中文乱码)
具体代码
1
2
3
4
5
6
7
8
9
10
11
12
13
14
15
16
17
18
19
20
21
22
23
24
25
26
27
28
29
30
31
32
33
34
35
36
37
38
39
40
41
42
43
44
45
46
| <?xml version="1.0" encoding="UTF-8"?>
<web-app version="3.0" xmlns="http://java.sun.com/xml/ns/javaee"
xmlns:xsi="http://www.w3.org/2001/XMLSchema-instance"
xsi:schemaLocation="http://java.sun.com/xml/ns/javaee
http://java.sun.com/xml/ns/javaee/web-app_3_0.xsd">
<!-- spring的上下文参数 -->
<context-param>
<param-name>contextConfigLocation</param-name>
<param-value>classpath:applicationContext.xml</param-value>
</context-param>
<!-- spring的监听器 -->
<listener>
<listener-class>org.springframework.web.context.ContextLoaderListener</listener-class>
</listener>
<!-- SpringMVC的前端控制器 -->
<servlet>
<servlet-name>springmvc</servlet-name>
<servlet-class>org.springframework.web.servlet.DispatcherServlet</servlet-class>
<init-param>
<param-name>contextConfigLocation</param-name>
<param-value>classpath:springmvc.xml</param-value>
</init-param>
<load-on-startup>1</load-on-startup>
</servlet>
<servlet-mapping>
<servlet-name>springmvc</servlet-name>
<url-pattern>/</url-pattern>
</servlet-mapping>
<!-- 字符编码过滤器(防止中文乱码) -->
<filter>
<filter-name>encoding</filter-name>
<filter-class>org.springframework.web.filter.CharacterEncodingFilter</filter-class>
<init-param>
<param-name>encoding</param-name>
<param-value>utf-8</param-value>
</init-param>
</filter>
<filter-mapping>
<filter-name>encoding</filter-name>
<url-pattern>/*</url-pattern>
</filter-mapping>
</web-app>
|
配置application.xml(七步)
1. 注解扫描
2. 加载属性文件(要写好db.properties文件)
3. 数据源
4. 扫描器
5. 事务管理器
6. 声明式事务
7. aop
具体代码
1
2
3
4
5
6
7
8
9
10
11
12
13
14
15
16
17
18
19
20
21
22
23
24
25
26
27
28
29
30
31
32
33
34
35
36
37
38
39
40
41
42
43
44
45
46
47
48
49
50
51
52
53
54
55
56
57
58
59
60
61
62
| <?xml version="1.0" encoding="UTF-8"?>
<beans xmlns="http://www.springframework.org/schema/beans"
xmlns:xsi="http://www.w3.org/2001/XMLSchema-instance"
xmlns:aop="http://www.springframework.org/schema/aop"
xmlns:tx="http://www.springframework.org/schema/tx"
xmlns:context="http://www.springframework.org/schema/context"
xsi:schemaLocation="http://www.springframework.org/schema/beans
http://www.springframework.org/schema/beans/spring-beans.xsd
http://www.springframework.org/schema/aop
http://www.springframework.org/schema/aop/spring-aop.xsd
http://www.springframework.org/schema/context
http://www.springframework.org/schema/context/spring-context.xsd
http://www.springframework.org/schema/tx
http://www.springframework.org/schema/tx/spring-tx.xsd" default-autowire="byName">
<!-- 注解扫描 -->
<context:component-scan base-package="com.bjsxt.service.impl"></context:component-scan>
<!-- 加载属性文件 -->
<context:property-placeholder location="classpath:db.properties"/>
<!-- 数据源 -->
<bean id="dataSource" class="org.springframework.jdbc.datasource.DriverManagerDataSource">
<property name="driverClassName" value="${jdbc.driver}"></property>
<property name="url" value="${jdbc.url}"></property>
<property name="username" value="${jdbc.username}"></property>
<property name="password" value="${jdbc.password}"></property>
</bean>
<!-- SqlSessionFactory -->
<bean id="factory" class="org.mybatis.spring.SqlSessionFactoryBean">
<property name="dataSource" ref="dataSource"></property>
</bean>
<!-- 扫描器 -->
<bean class="org.mybatis.spring.mapper.MapperScannerConfigurer">
<property name="basePackage" value="com.bjsxt.mapper"></property>
<property name="sqlSessionFactoryBeanName" value="factory"></property>
</bean>
<!-- 事务管理器 -->
<bean id="txManage" class="org.springframework.jdbc.datasource.DataSourceTransactionManager">
<property name="dataSource" ref="dataSource"></property>
</bean>
<!-- 声明式事务 -->
<tx:advice id="txAdvice" transaction-manager="txManage">
<tx:attributes>
<tx:method name="ins*"/>
<tx:method name="del*"/>
<tx:method name="upd*"/>
<tx:method name="*" read-only="true"/>
</tx:attributes>
</tx:advice>
<!-- 配置aop -->
<aop:config>
<aop:pointcut expression="execution(* com.bjsxt.service.impl.*.*(..))" id="mypoint"/>
<aop:advisor advice-ref="txAdvice" pointcut-ref="mypoint"/>
</aop:config>
</beans>
|
db.properties文件:
1
2
3
4
| jdbc.driver=com.mysql.jdbc.Driver
jdbc.url = jdbc:mysql://localhost:3306/ssm
jdbc.username = root
jdbc.password = njdxrjgc7777777.
|
配置springmvc.xml(三步)
1. 扫描注解
2. 注解驱动
3. 静态资源
4. 视图解析器
1
2
3
4
5
6
7
8
9
10
11
12
13
14
15
16
17
18
19
20
21
22
23
24
25
26
27
28
29
30
31
32
| <?xml version="1.0" encoding="UTF-8"?>
<beans xmlns="http://www.springframework.org/schema/beans"
xmlns:xsi="http://www.w3.org/2001/XMLSchema-instance"
xmlns:mvc="http://www.springframework.org/schema/mvc"
xmlns:context="http://www.springframework.org/schema/context"
xsi:schemaLocation="http://www.springframework.org/schema/beans
http://www.springframework.org/schema/beans/spring-beans.xsd
http://www.springframework.org/schema/context
http://www.springframework.org/schema/context/spring-context.xsd
http://www.springframework.org/schema/mvc
http://www.springframework.org/schema/mvc/spring-mvc.xsd">
<!-- 扫描注解 -->
<context:component-scan base-package="com.bjsxt.controller"></context:component-scan>
<!-- 注解驱动 相当于配置了两个组件 -->
<!-- org.springframework.web.servlet.mvc.annotation.DefaultAnnotationHandlerMapping -->
<!-- org.springframework.web.servlet.mvc.annotation.AnnotationMethodHandlerAdapter -->
<mvc:annotation-driven></mvc:annotation-driven>
<!-- 静态资源 -->
<mvc:resources location="/js/" mapping="/js/**"></mvc:resources>
<mvc:resources location="/css/" mapping="/css/**"></mvc:resources>
<mvc:resources location="/images/" mapping="/images/**"></mvc:resources>
<!-- 视图解析器 -->
<bean id="viewResolver" class="org.springframework.web.servlet.view.InternalResourceViewResolver">
<property name="prefix" value="/"></property>
<property name="suffix" value=".jsp"></property>
</bean>
</beans>
|
书写代码
创建实体类
1
2
3
4
5
6
7
8
9
10
11
12
13
14
15
16
17
18
19
20
21
22
23
24
25
26
27
28
29
30
31
| public class Menu {
private int id;
private String name;
private int pid;
private List<Menu> children;
public int getId() {
return id;
}
public void setId(int id) {
this.id = id;
}
public String getName() {
return name;
}
public void setName(String name) {
this.name = name;
}
public int getPid() {
return pid;
}
public void setPid(int pid) {
this.pid = pid;
}
public List<Menu> getChildren() {
return children;
}
public void setChildren(List<Menu> children) {
this.children = children;
}
}
|
准备mapper下的接口和xml配置文件
1
2
3
4
5
6
7
8
9
10
11
12
13
14
15
16
17
18
19
20
21
22
23
24
25
26
27
28
29
| //准备接口写方法
public interface MenuMapper {
List<Menu> selByPid(int pid); //selByPid通过pid查询
}
//写配置文件
<?xml version="1.0" encoding="UTF-8"?>
<!DOCTYPE mapper
PUBLIC "-//mybatis.org//DTD Mapper 3.0//EN"
"http://mybatis.org/dtd/mybatis-3-mapper.dtd">
<mapper namespace="com.bjsxt.mapper.MenuMapper">
<resultMap type="menu" id="mymap"> //被调用之后
<id property="id" column="id"/> 通过id去查询
<collection property="children" select="com.bjsxt.mapper.MenuMapper.selByPid" column="id">
</collection>
</resultMap>
<select id="selByPid" parameterType="int" resultMap="mymap"> //因为list集合要通过resultMap查询
select * from menu where pid=#{0}
</select>
</mapper>
//application.xml文件 加别名
<!-- SqlSessionFactory -->
<bean id="factory" class="org.mybatis.spring.SqlSessionFactoryBean">
<property name="dataSource" ref="dataSource"></property>
<property name="typeAliasesPackage" value="com.bjsxt.pojo"></property> //给pojo的实体类取别名
</bean>
|
准备service和impl实现层
准备接口展示结果:
1
2
3
4
| //
public interface MenuService {
List<Menu> show(); // 展示方法
}
|
准备实现类
1
2
3
4
5
6
7
8
9
10
11
| @Service
public class MenuServiceImpl implements MenuService {
@Resource
private MenuMapper menuMapper;
@Override
public List<Menu> show() {
return menuMapper.selByPid(0); //使用对象调方法
}
}
|
准备controller层(springmvc容器)
1
2
3
4
5
6
7
8
9
10
11
12
13
14
15
| @Controller
public class MenuController {
//springmvc容器(当前类)调用spring容器中内容(impl实现类)
@Resource //通过byname查询
private MenuService menuServiceImpl;
@RequestMapping("show")
@ResponseBody
public List<Menu> show(){
return menuServiceImpl.show();
}
}
|
书写前端页面代码
导入js库

书写jsp页面
1
2
3
4
5
6
7
8
9
10
11
12
13
14
15
16
17
18
19
20
21
22
23
24
25
26
27
28
29
30
31
32
33
34
35
36
| <%@ page language="java" contentType="text/html; charset=UTF-8"
pageEncoding="UTF-8"%>
<!DOCTYPE html PUBLIC "-//W3C//DTD HTML 4.01 Transitional//EN" "http://www.w3.org/TR/html4/loose.dtd">
<html>
<head>
<meta http-equiv="Content-Type" content="text/html; charset=UTF-8">
<title>Insert title here</title>
<script type="text/javascript" src="js/jquery-1.7.2.js"></script>
<script type="text/javascript">
$(function(){
$.post("show",function(data){
var result ="";
for(var i=0;i<data.length;i++){
result+="<dl>";
result+="<dt style='cursor:pointer'>"+data[i].name+"</dt>";
for(var j=0;j<data[i].children.length;j++){
result+="<dd>"+data[i].children[j].name+"</dd>";
}
result+="</dl>";
}
$("body").html(result);
});
//对所有父菜单添加点击事件
//live("事件名,多个事件使用空格分割",function(){})
$("dt").live("click",function(){
//slow normal fast 数值
$(this).siblings().slideToggle(1000); ; // slideToggle慢慢隐藏 dd和dt同级 (用siblings)
});
})
</script>
</head>
<body>
</body>
</html>
|
最终结果
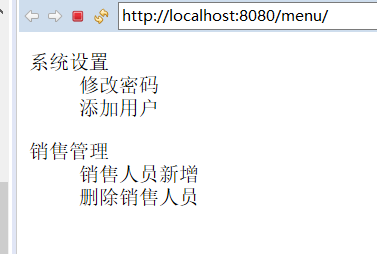
直接运行界面

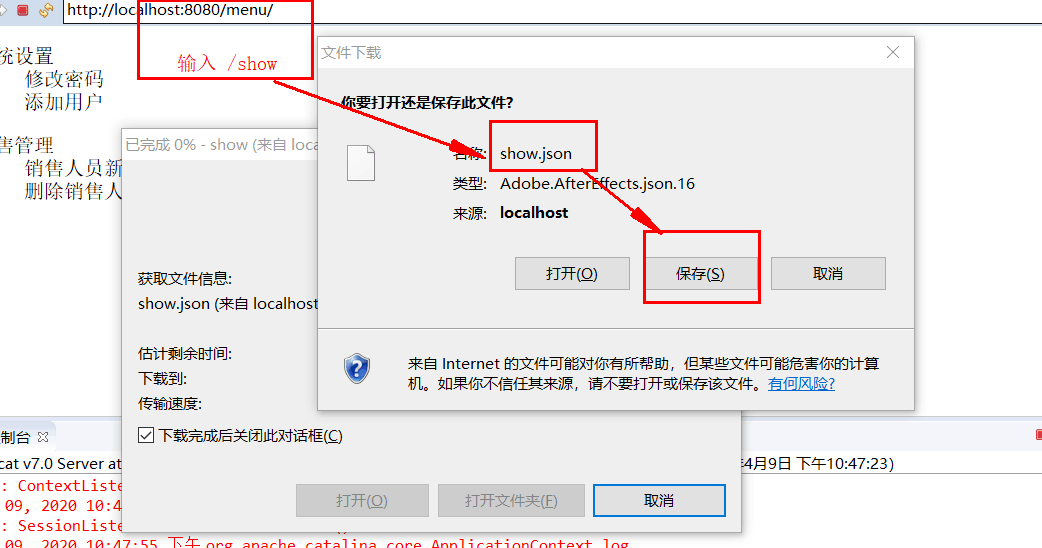
运行结果就会下载文件show.json

查看json文件内容


