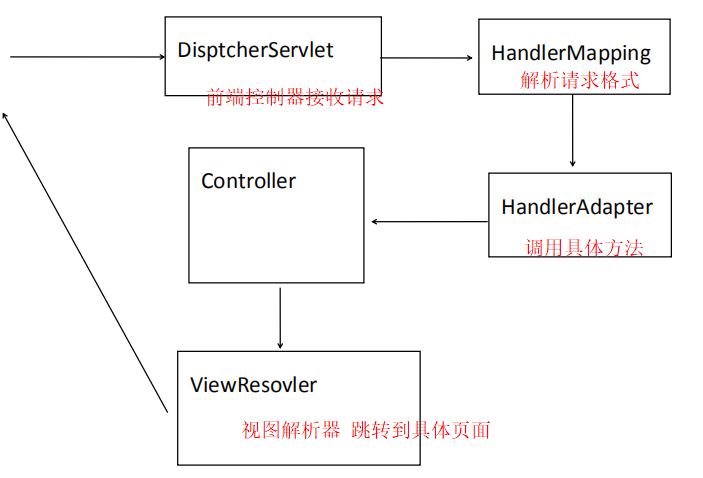
SpringMVC简介 SpringMVC中重要组件 1. DispatcherServlet : 前端控制器 (接收所有请求)
2. HandlerMapping : 解析请求格式 (判断执行哪个方法)
3. HandlerAdapter : 调用具体方法
4. ViewResovler : 视图解析器 (准备跳转到具体的物理视图)SpringMVC运行原理图
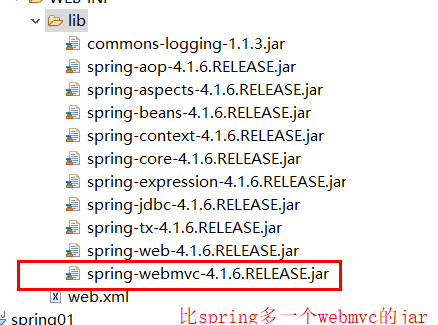
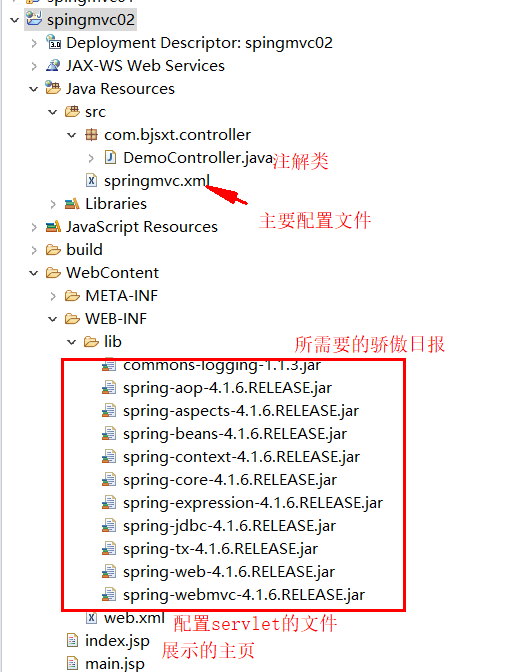
使用纯配置文件搭建SpringMVC环境 导入jar包
修改web.xml文件 1 2 3 4 5 6 7 8 9 10 11 12 13 14 15 16 17 18 19 20 21 22 23 24 25 <?xml version="1.0" encoding="UTF-8"?> <web-app version="3.0" xmlns="http://java.sun.com/xml/ns/javaee" xmlns:xsi="http://www.w3.org/2001/XMLSchema-instance" xsi:schemaLocation="http://java.sun.com/xml/ns/javaee http://java.sun.com/xml/ns/javaee/web-app_3_0.xsd"> <!-- 配置Servlet 找前端控制器 DispatcherServlet类 --> <servlet> <servlet-name>springmvc123</servlet-name> <servlet-class>org.springframework.web.servlet.DispatcherServlet</servlet-class> <!-- 修改配置文件路径和名称 --> <init-param> <param-name>contextConfigLocation</param-name> <param-value>classpath:springmvc.xml</param-value> //所有的配置文件去找src下的springmvc.xml文件 </init-param> <!-- 自启动 --> <load-on-startup>1</load-on-startup> </servlet> <servlet-mapping> <servlet-name>springmvc123</servlet-name> <url-pattern>/</url-pattern> </servlet-mapping> </web-app>
配置springmvc.xml文件 配置思路:
1 2 3 4 5 6 1. 导入spring的xmlns:xxx信息 2. 配置四个组件信息 2.1 配置HandlerMapping的底层simpleUrlHandlerMapping接口 2.2 配置simpleUrlHandlerMapping接口的实现类(新建DemoController类) 2.3 配置HandlerAdapter底层的SimpleControllerHandlerAdapter接口 2.4 配置ViewResovler底层的InternalResourceViewResolver接口
完整代码:
1 2 3 4 5 6 7 8 9 10 11 12 13 14 15 16 17 18 19 20 21 22 23 24 25 26 27 28 29 30 <?xml version="1.0" encoding="UTF-8"?> <beans xmlns="http://www.springframework.org/schema/beans" xmlns:xsi="http://www.w3.org/2001/XMLSchema-instance" xmlns:context="http://www.springframework.org/schema/context" xsi:schemaLocation="http://www.springframework.org/schema/beans http://www.springframework.org/schema/beans/spring-beans.xsd http://www.springframework.org/schema/context http://www.springframework.org/schema/context/spring-context.xsd"> <!-- 底层接口实现类 --> <bean id="demo123" class="com.bjsxt.controller.DemoController"></bean> <!-- 使用HandlerMapping底层的simpleUrlHandlerMapping接口 --> <bean id="handlerMapping" class="org.springframework.web.servlet.handler.SimpleUrlHandlerMapping"> <property name="urlMap"> <!-- 底层用map集合 --> <map> <entry key="demo" value-ref="demo123"></entry> <!-- key表示解析出控制器逻辑名 value-ref表示跳转到接口实现类 --> </map> </property> </bean> <!-- 使用HandlerAdapter底层的SimpleControllerHandlerAdapter接口 --> <bean class="org.springframework.web.servlet.mvc.SimpleControllerHandlerAdapter"></bean> <!-- 使用ViewResovler底层的InternalResourceViewResolver接口 --> <bean id="viewResovler" class="org.springframework.web.servlet.view.InternalResourceViewResolver"> <property name="prefix" value="/"></property> <!-- 视图解释器 可以方便的给要跳转的页面加好前置和后置信息 --> <property name="suffix" value=".jsp"></property> </bean> </beans>
配置前端控制器接口实现类 1 2 3 4 5 6 7 8 9 10 public class DemoController implements Controller{ @Override public ModelAndView handleRequest(HttpServletRequest request, HttpServletResponse response) throws Exception { System.out.println("执行了springmvc控制器"); ModelAndView mav=new ModelAndView("main"); //传递和传值 (跳转到main.jsp) return mav; } }
配置跳转到main.jsp页面 1 2 3 4 5 6 7 8 9 10 11 12 <%@ page language="java" contentType="text/html; charset=UTF-8" pageEncoding="UTF-8"%> <!DOCTYPE html PUBLIC "-//W3C//DTD HTML 4.01 Transitional//EN" "http://www.w3.org/TR/html4/loose.dtd"> <html> <head> <meta http-equiv="Content-Type" content="text/html; charset=UTF-8"> <title>Insert title here</title> </head> <body> main.jsp </body> </html>
新建test测试类 1 2 3 4 5 6 7 8 public class Test { public static void main(String[] args) { ApplicationContext ac=null; HandlerMapping hm=null; //设置默认的 HandlerAdapter ha=null; //设置默认的 } }
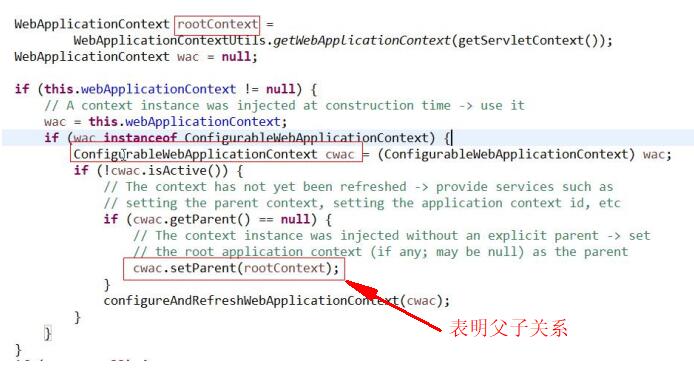
SpringMVC运行过程源码跟踪 Spring和SpringMVC关系
Spring容器和SpringMVC容器是父子容器(SpringMVC容器可以调用Spring容器中所有内容)
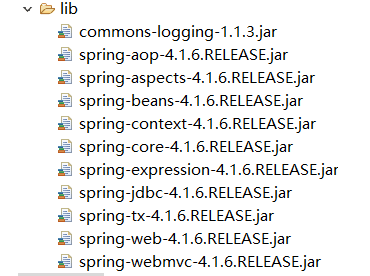
SpringMVC环境搭建(注解方式) 导入JAR包
编写web.xml文件 1 2 3 4 5 6 7 8 9 10 11 12 13 14 15 <!-- 配置前端控制器 --> <servlet> <servlet-name>jqk</servlet-name> <servlet-class>org.springframework.web.servlet.DispatcherServlet</servlet-class> <init-param> <param-name>contextConfigLocation</param-name> //配置要找的配置文件件地址 <param-value>Classpath:springmvc.xml</param-value> //配置要找的配置文件叫springmvc.xml </init-param> <load-on-startup>1</load-on-startup> //自启动 优先级为1 </servlet> <servlet-mapping> <servlet-name>jqk</servlet-name> <url-pattern>/</url-pattern> </servlet-mapping>
编写springmvc.xml文件 1 2 3 4 5 6 7 8 9 10 11 12 13 14 15 16 17 18 19 20 21 22 23 24 25 26 <?xml version="1.0" encoding="UTF-8"?> <beans xmlns="http://www.springframework.org/schema/beans" xmlns:xsi="http://www.w3.org/2001/XMLSchema-instance" xmlns:mvc="http://www.springframework.org/schema/mvc" //现在的mvc框架必备(减少不必要的组件配置) xmlns:context="http://www.springframework.org/schema/context" //注解必备 xsi:schemaLocation="http://www.springframework.org/schema/beans http://www.springframework.org/schema/beans/spring-beans.xsd http://www.springframework.org/schema/context http://www.springframework.org/schema/context/spring-context.xsd http://www.springframework.org/schema/mvc //后面两行是mvc的location地址 http://www.springframework.org/schema/mvc/spring-mvc.xsd"> <!-- 扫描注解(具体哪些包下的类有注解) --> <context:component-scan base-package="com.bjsxt.controller"></context:component-scan> <!-- 注解驱动 相当于配置了两个组件(下面两行注解的组件) --> <!-- org.springframework.web.servlet.mvc.annotation.DefaultAnnotationHandlerMapping --> <!-- org.springframework.web.servlet.mvc.annotation.AnnotationMethodHandlerAdapter --> <mvc:annotation-driven></mvc:annotation-driven> <!-- 静态资源 --> <mvc:resources location="/js/" mapping="/js/**"></mvc:resources> //location表明 当前代码框架下文件名 mapping表明用浏览器 localhost:8080/项目名/js/jssa.js的形式 <mvc:resources location="/css/" mapping="/css/**"></mvc:resources> <mvc:resources location="/images/" mapping="/images/**"></mvc:resources> </beans>
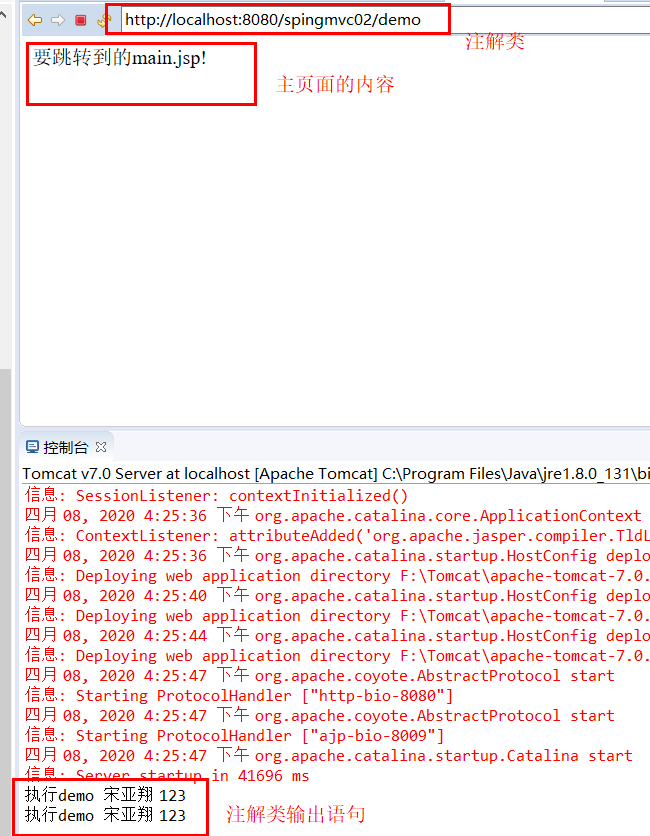
编写注解类 1 2 3 4 5 6 7 8 9 10 @Controller public class DemoController { @RequestMapping("demo") //浏览器访问的形式:localhost:8080/项目名/demo public String demo() { System.out.println("执行demo"); //控制台输出 return "main.jsp"; // 返回到main.jsp页面 } }
跳转到的main.jsp页面 1 2 3 4 5 6 7 8 9 10 11 12 <%@ page language="java" contentType="text/html; charset=UTF-8" pageEncoding="UTF-8"%> <!DOCTYPE html PUBLIC "-//W3C//DTD HTML 4.01 Transitional//EN" "http://www.w3.org/TR/html4/loose.dtd"> <html> <head> <meta http-equiv="Content-Type" content="text/html; charset=UTF-8"> <title>Insert title here</title> </head> <body> 要跳转到的main.jsp! //主页展示的内容 </body> </html>
总结 1. 导入jar包
2. 配置web.xml文件
2.1 配置servlet和servlet-mapping标签
2.2 在servlet标签中配置init-param标签 去配置springmvc.xml文件的地址和访问
3. 配置springmvc.xml文件
3.1 配置mvc框架的xmlns:mvc和location地址
3.2 扫描注解(context:component-scan标签 配置哪些类有注解)
3.3 注解驱动(mvc:annotation-driven标签 配置相当于配置了两个组件)
3.4 静态资源(mvc:resources标签 配置要访问的js/css/images地址)
4. 配置注解类
4.1 使用@Controller 注解整个类
4.2 使用@RequestMapping("xxx") 注解访问访问的地址
4.3 return 放入要返回的主页地址代码结构框架:
基本数据类型(参数)
把内容写到方法(HandlerMethod)参数内,springmvc只要有这个内容就会注入内容
在刚才的基础上新建index.jsp页面 1 2 3 4 5 <form action="demo" method="post"> <input type="text" name="name"/> <input type="text" name="age"/> <input type="submit" value="提交"/> </form>
web.xml中添加防止乱码(filter标签) 1 2 3 4 5 6 7 8 9 10 11 12 13 <filter> <filter-name>encoding</filter-name> <filter-class>org.springframework.web.filter.CharacterEncodingFilter</filter-class> <init-param> <param-name>encoding</param-name> <param-value>utf-8</param-value> </init-param> </filter> <filter-mapping> <filter-name>encoding</filter-name> <url-pattern>/*</url-pattern> </filter-mapping>
更改注解类(方法添加参数) 1 2 3 4 5 6 7 8 9 10 @Controller public class DemoController { @RequestMapping("demo") //路径要用的demo public String demo(String name,int age) { //添加了name和age两个参数 System.out.println("执行demo"+" "+name+" "+age); return "main.jsp"; // 返回到main.jsp页面 } }
运行项目 直接从项目运行(run)
填写信息(已经做了预防中文乱码的操作):
对象类型(参数)
把内容写到方法(HandlerMethod)参数内,springmvc只要有这个内容就会注入内容
新建实体类 1 2 3 4 5 6 7 8 9 10 11 12 13 14 15 16 17 18 public class People { private String name; private int age; public String getName() { return name; } public void setName(String name) { this.name = name; } public int getAge() { return age; } public void setAge(int age) { this.age = age; } }
修改注解类(参数修改) 1 2 3 4 5 6 7 8 9 public class DemoController { @RequestMapping("demo") //路径要用的demo public String demo(People peo,String name,int age) { //可以将整个people对象放进来 System.out.println("执行demo"+peo+" "+name+" "+age); return "main.jsp"; // 返回到main.jsp页面 } }
基本数据类型 - 参数问题(@RequestParam注解) (默认)参数和传递参数名相同 1 2 3 4 5 6 7 8 9 10 11 12 13 14 //主页面(请求传递参数名为name和age) <form action="demo" method="post"> <input type="text" name="name"/> <input type="text" name="age"/> <input type="submit" value="提交"/> </form> //方法传递为name和age @RequestMapping("demo") //路径要用的demo public String demo(String name,int age) { System.out.println("执行demo"+" "+name+" "+age); return "main.jsp"; // 返回到main.jsp页面 }
参数和传递参数名不同(@RequestParam(value=”前端的参数名”))
例如:前端程序员和后端java对于同一个name和age不同!! (使用@RequestParam(value=”前端的参数名”))方式让匹配上 )
1 2 3 4 5 6 7 8 9 10 11 12 13 14 15 16 17 //主页面(请求传递参数名为name1和age1) <form action="demo" method="post"> <input type="text" name="name1"/> <input type="text" name="age1"/> <input type="submit" value="提交"/> </form> //方法传递为name和age @RequestMapping("demo") //路径要用的demo //使用 value="前端的参数名" [value=可以省略] 让两者匹配 public String demo(@RequestParam(value="name1") String name,@RequestParam(value="age1")int age) { System.out.println("执行demo"+" "+name+" "+age); return "main.jsp"; // 返回到main.jsp页面 }
方法参数没赋值(防止执行500)
设置默认值解决500问题 (@RequestParam(defaultValue=”XXX”) )
1 2 3 4 5 6 7 8 @RequestMapping("page") //使用defaultValue="xxx" 设置一个基础值 public String page(@RequestParam(defaultValue="2") int pageSize,@RequestParam(defaultValue="1") int pageNumber) { System.out.println(pageSize+" "+pageNumber); return "main.jsp"; }
强制有参数
设置必要值为true (@RequestParam(required) )
1 2 3 4 5 6 7 8 @RequestMapping("demo2") //设置 required=true 达到强制有参数的条件 public String demo2(@RequestParam(required=true) String name) { System.out.println("必须传name参数"); return "main.jsp"; }
对象类型 - 参数问题 请求参数中含多个同名参数(List集合)
复选框传递的参数是多个同名参数 (@RequestParam(“复选框的name名”)List x)
1 2 3 4 5 6 7 8 9 10 11 12 13 14 15 16 17 18 19 20 21 22 23 24 //index.jsp页面 <form action="demo5" method="post"> //通过post方式提交到demo5的方法内 <input type="text" name="name"/> <input type="text" name="age"/> <input type="checkbox" name="hover" value="学习"/> //爱好是复选框 <input type="checkbox" name="hover" value="写代码"/> <input type="checkbox" name="hover" value="看视频"/> <input type="checkbox" name="hover" value="看笔记"/> <input type="submit" value="提交"/> </form> //注解类 @RequestMapping("demo5") //name和age还是普通的方式 爱好就需要List来传递 (@RequestParam("页面内复选框的name名")) public String demo5(String name,int age,@RequestParam("hover")List<String> a) { System.out.println(name+" "+age+" "+a); return "main.jsp"; }
请求参数(对象.属性) 1 2 3 4 5 6 7 8 9 10 11 12 13 14 15 //页面中: <input type="text" name="peo.name"/> <input type="text" name="peo.age"/> //新建一个类(对象名和参数中(.)之前的名称对应) // peo和peo.name对应 private People peo; //传people实体类对象 //注解类 @RequestMapping("demo6") public String demo6(Demo demo) { //直接传整个类对象 System.out.println(demo); return "main.jsp"; }
请求参数传递集合对象(对象[X].属性) 1 2 3 4 5 6 7 8 9 10 11 12 13 14 15 16 17 //页面中: <input type="text" name="peo[0].name"/> <input type="text" name="peo[0].age"/> <input type="text" name="peo[1].name"/> <input type="text" name="peo[1].age"/> //新建一个类(对象名和参数中(.)之前的名称对应) // peo和peo.name对应 private List<People> peo; //传list集合 //注解类 @RequestMapping("demo6") public String demo6(Demo demo) { //直接传整个类对象 System.out.println(demo); return "main.jsp"; }
restful传值方式
简化jsp中参数编码格式
jsp中特定格式 1 2 <a href="demo07/123/abc">跳转</a> //就是去找注解是demo07而且第一个值123 第二个是abc的注解类
注解类 注意事项:
1 2 3 1. @RequestMapping里面一定要和请求格式对应 1.1 {}里面随便写名称 2. @PathVariable 获取@RequestMapping中的内容(默认按照方法参数名找)
具体代码:
1 2 3 4 5 @RequestMapping("demo7/{id}/{name}") public String demo7(@PathVariable String name,@PathVariable("id") int age) { System.out.println(name+" "+age); return "main.jsp"; }
跳转方式 1. 默认跳转方式 请求转发
2. 设置返回字符串内容
2.1 添加 redirect:资源路径 (重定向)
2.2 添加 forward:资源路径/省略forward (转发) 视图解析器(Spring默认提供)
可以自定义使用ViewResovler底层的InternalResourceViewResolver接口
1 2 3 4 5 <!-- 使用ViewResovler底层的InternalResourceViewResolver接口 --> <bean id="viewResovler" class="org.springframework.web.servlet.view.InternalResourceViewResolver"> <property name="prefix" value="/"></property> <!-- 视图解释器 可以方便的给要跳转的页面加好前置和后置信息 --> <property name="suffix" value=".jsp"></property> </bean>
** 如果希望不执行自定义视图解析器,可以在注解类方法返回值前添加forward: / redirect: **
1 2 3 4 5 6 7 8 9 10 11 12 //注解类 @RequestMapping("demo10") public String demo10() { //直接传整个类对象 return "forward:demo11"; //使用forward: demo11 的形式(不适用自定义视图解析器) } @RequestMapping("demo11") public String demo11() { //直接传整个类对象 System.out.println("demo11"); //加了视图解析器会简化不写前缀和后缀 所以写main就行(原来是main.jsp) return "main"; }
@ResponseBody(恒不跳转)
一般使用@RequestMapping (恒跳转)
返回值满足key-value形式(对象/map) 1. 响应头设置为 application/json;charset=utf-8
2. 方法返回值 : 输出流返回值不满足key-value形式(String等) 1. 响应头设置为 text/htmln;charset=utf-8
2. 方法返回值 : 流底层使用Jackson进行json转换
一定要导入jackson的jar包
spring4.1.6对jackson不支持较高版本(jackson2.7无效)
