AOP 面向切面编程
在原有纵向执行流程中添加横切面(不需要修改原有代码)
面向切面编程 特性:
1. 高扩展性
2. 原有代码释放了部分逻辑(横切面会分担一些功能)
面向切面编程:
在程序原有纵向执行流程中,针对某一个/某一些方法添加通知,形成横切面过程 -- 面向切面编程
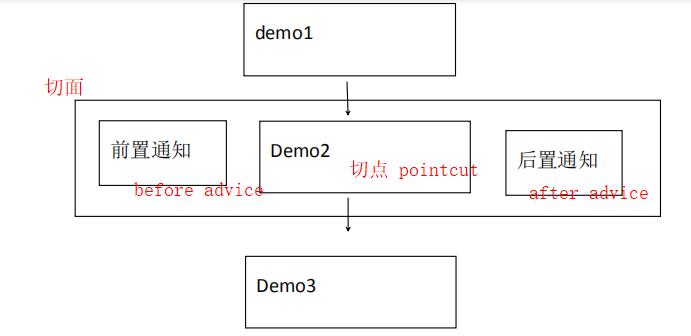
面向切面编程概念图:

1. 原有功能: 切点(pointcut)
2. 前置通知: 切点之前执行的功能 (before advice)
3. 后置通知: 切点之后执行的功能 (after advice)
4. 异常通知: 切点执行过程中出现异常 (throws advice)
5. 切面: 所有功能总称
6. 织入: 将切面嵌入到原有功能的过程
两种AOP实现方式
1. Schema-based
    1. 每个通知都需要实现接口/类
    2. 配置spring配置文件在<aop:config>配置

2. AspectJ
    1. 每个通知不需要实现接口/类
    2. 配置spring配置文件在<aop:config>的子标签<aop:aspect>中配置
使用Schema-based方式
总体实现步骤
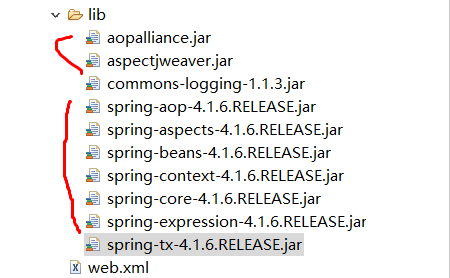
1.导入jar包
2.编写demo类(具有几个方法)
3.编写配置文件
    3.1 导入aop的xmls和location
    3.2 编写aop的相关信息(切点 前置和后置通知类的连接)
    3.3 前置通知类/后置通知类/demo类的bean方法
4.编写前置通知类(实现MethodBeforeAdvice接口)
5.编写后置通知类(实现AfterReturningAdvic接口)
6.编写测试类(IOC 控制反转)
具体实现代码
1.导入jar包

2.Demo类
1
2
3
4
5
6
7
8
9
10
11
12
13
14
15
| public class Demo {
public void demo1(){
System.out.println("demo1");
}
public void demo2(){
System.out.println("demo2"); //切点是demo02方法
}
public void demo3(){
System.out.println("demo3");
}
}
|
3.配置文件
1
2
3
4
5
6
7
8
9
10
11
12
13
14
15
16
17
18
19
20
21
22
| <?xml version="1.0" encoding="UTF-8"?>
<beans xmlns="http://www.springframework.org/schema/beans"
xmlns:xsi="http://www.w3.org/2001/XMLSchema-instance"
xmlns:aop="http://www.springframework.org/schema/aop" <!-- 导入aop的xmlns -->
xsi:schemaLocation="http://www.springframework.org/schema/beans
http://www.springframework.org/schema/beans/spring-beans.xsd
http://www.springframework.org/schema/aop <!-- 导入aop的地址 -->
http://www.springframework.org/schema/aop/spring-aop.xsd">
<bean id="mybefore" class="com.bjsxt.advice.MyBeforeAdvice"></bean> <!-- 前置通知类 -->
<bean id="myafter" class="com.bjsxt.advice.MyAfterAdvice"></bean> <!-- 后置通知类 -->
<aop:config>
<aop:pointcut expression="execution(* com.bjsxt.test.Demo.demo02())" id="mypoint"/> <!-- 要给aop的pointcut切点编程 execution(* )的格式 -->
<aop:advisor advice-ref="mybefore" pointcut-ref="mypoint"/> <!-- 将前置通知类加到上面的切点 -->
<aop:advisor advice-ref="myafter" pointcut-ref="mypoint"/> <!-- 将后置通知类加到上面的切点 -->
</aop:config>
<bean id="demo" class="com.bjsxt.test.Demo"></bean> <!-- 找方法的bean 用于test类找 -->
</beans>
|
4.前置通知类
1
2
3
4
5
6
| public class MyBeforeAdvice implements MethodBeforeAdvice{
@Override
public void before(Method arg0, Object[] arg1, Object arg2) throws Throwable {
System.out.println("执行前置通知!");
}
}
|
5.后置通知类
1
2
3
4
5
6
| public class MyAfterAdvice implements AfterReturningAdvice {
@Override
public void afterReturning(Object arg0, Method arg1, Object[] arg2, Object arg3) throws Throwable {
System.out.println("执行后置通知!");
}
}
|
6.测试类
1
2
3
4
5
6
7
8
9
10
11
12
13
14
15
16
17
18
| public class Test {
public static void main(String[] args) {
//原来的写法:
//Demo demo=new Demo();
//demo.demo1();
//demo.demo2();
//demo.demo3();
//因为我们是IOC 控制反转 将new和管理对象给了spring
ApplicationContext ac=new ClassPathXmlApplicationContext("applicationContext.xml");
Demo demo = ac.getBean("demo",Demo.class); //通过找配置文件中的bean
demo.demo1();
demo.demo2();
demo.demo3();
}
}
|
总结
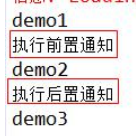
执行结果

前置通知实现的接口方法参数
1
2
3
4
5
6
7
8
9
10
| public class MyBeforeAdvice implements MethodBeforeAdvice{
@Override
public void before(Method arg0, Object[] arg1, Object arg2) throws Throwable {
//agr0 切点方法对象 Method对象
//agr1 切点方法参数
//agr2 切点在那个对象中
}
}
|
后置通知实现的接口方法参数
1
2
3
4
5
6
7
8
9
10
11
| public class MyAfterAdvice implements AfterReturningAdvice {
@Override
public void afterReturning(Object arg0, Method arg1, Object[] arg2, Object arg3) throws Throwable {
//agr0 切点方法返回值
//agr1 切点方法对象
//agr2 切点方法参数
//agr3 切点方法所在类的对象
}
}
|
配置异常通知(AspectJ方式)
只要切点报异常才能触发 异常通知(throws advice)
不实现接口(方法随便写) 然后配置在aop:aspect标签下面
准备类和异常通知方法
1
2
3
4
5
| public class MtThrowAdvice {
public void myexception(Exception e) {
System.out.println("异常了!!!"+e.getMessage()); //自己写的报错的方法 输出错误原因
}
}
|
创建Demo类(切点方法)
1
2
3
4
5
6
7
8
| public class Demo {
public void demo1(){
int i=5/0; //这里出异常
System.out.println("demo1");
}
}
|
更改配置文件
1
2
3
4
5
6
7
8
9
10
11
12
13
14
15
16
17
18
19
20
21
22
| <?xml version="1.0" encoding="UTF-8"?>
<beans xmlns="http://www.springframework.org/schema/beans"
xmlns:xsi="http://www.w3.org/2001/XMLSchema-instance"
xmlns:aop="http://www.springframework.org/schema/aop"
xsi:schemaLocation="http://www.springframework.org/schema/beans
http://www.springframework.org/schema/beans/spring-beans.xsd
http://www.springframework.org/schema/aop
http://www.springframework.org/schema/aop/spring-aop.xsd">
<bean id="mythrow" class="com.bjsxt.advice.MtThrowAdvice"></bean> //给写的异常类写bean
<aop:config>
<aop:aspect ref="mythrow"> //相比于schema-based方式它可以自动找是前置还是后置通知 我们的aspectJ需要明确ref跳到哪个异常类
<aop:pointcut expression="execution(* com.bjsxt.test.Demo.demo01())" id="mypoint"/> //这行主要写切点: 是哪个包哪个类的哪个方法 然后给切点一个id
<aop:after-throwing method="myexception" pointcut-ref="mypoint" throwing="e"/> //异常通知: 方法是刚才那个类的哪个 然后切点是哪个 扔出来的信息是方法的哪个对象
</aop:aspect>
</aop:config>
<bean id="demo" class="com.bjsxt.test.Demo"></bean> //给切点的类写bean
</beans>
|
添加测试类
1
2
3
4
5
6
7
8
9
10
11
12
13
14
15
16
| public class Test {
public static void main(String[] args) {
//原来的写法:
//Demo demo=new Demo();
//demo.demo1();
//demo.demo2();
//demo.demo3();
//因为我们是IOC 控制反转 将new和管理对象给了spring
ApplicationContext ac=new ClassPathXmlApplicationContext("applicationContext.xml");
Demo demo = ac.getBean("demo",Demo.class);
demo.demo1(); //测试方法
}
}
|
异常通知(Schema-based)
实现接口(方法必须叫afterThrowing) 然后配置在aop:config下面
准备异常类
1. 必须实现throwsAdvice接口
2. 实现的方法有两种 (1个参数 / 4个参数)
3. 异常类型必须要和切点报错的异常一致(一般就写最大的Exception!!!!)
1
2
3
4
5
6
7
8
| public class MyThrow implements ThrowsAdvice {
//第一种
public void afterThrowing(Exception ex) throws Throwable{ //里面用最大的Exception
System.out.println("aaaa");
}
}
|
准备配置文件(展示细节)
只在aop:config标签里面去写
1
2
3
4
| <aop:config>
<aop:pointcut expression="execution(* com.bjsxt.test.Demo.demo01())" id="mypoint"/>
<aop:advisor advice-ref="mythrow" pointcut-ref="mypoint"/>
</aop:config>
|
对比两种方法的区别
1
2
3
4
5
6
7
| 1.AspectJ:
1.1 不实现接口(显示异常的方法随便取名字)
1.2 配置文件结构 aop:config -- aop:aspect(ref写跳转的异常类位置) -- aop:pointcut(切点) /aop:after-throwing(异常通知)
2.schema-based:
2.1 实现throwsAdvice接口(显示异常的方法必须叫afterThrowing)
2.2 配置文件结构 aop:config -- aop:pointcut(切点) / aop :advisor (前置/后置/异常通知都在这)
|
环绕通知(Schema-based)
前置和后置通知 –> 一个通知(环绕)
创建类实现MethodInterceptor接口
1
2
3
4
5
6
7
8
9
10
11
| public class MyArround implements MethodInterceptor{
@Override
public Object invoke(MethodInvocation arg0) throws Throwable {
System.out.println("环绕-前置");
Object result = arg0.proceed(); //放行 调用切点方式
System.out.println("环绕-后置");
return result;
}
}
|
配置文件(展示细节)
1
2
3
4
5
6
7
8
| <bean id="myarround" class="com.bjsxt.advice.MyArround"></bean>
<aop:config>
<aop:pointcut expression="execution(* com.bjsxt.test.Demo.demo01())" id="mypoint"/> //配置切点
<aop:advisor advice-ref="myarround" pointcut-ref="mypoint" /> //配置环绕的信息
</aop:config>
<bean id="demo" class="com.bjsxt.test.Demo"></bean>
|
环绕通知(AspectJ)
创建MyAdvice类(不实现接口)
1
2
3
4
5
6
7
8
9
10
11
12
13
14
15
16
17
18
19
20
21
22
23
24
25
26
27
|
public class MyAdvice {
	public void mybefore(String name1,int age1) {
		System.out.println("前置"+name1+"  "+age1);
	}

	public void myafter1() {
		System.out.println("后置1");
	}

	public void myafter2() {
		System.out.println("后置2");
	}

	public void mythrow() {
		System.out.println("异常");
	}

	public Object myarround(ProceedingJoinPoint p) throws Throwable {   //环绕的类  ProceedingJoinPoint就是需要的类
		System.out.println("执行环绕");
		System.out.println("环绕-前置");
		Object result = p.proceed();    //和另外一种方法一样的执行
		System.out.println("环绕-后置");
		return result;
  }

}
|
创建Demo类(切点方法)
1
2
3
4
5
6
7
8
| public class Demo {
public void demo1(String name,int age){ //现在切点传入的是name 和 age (后面会在配置和自己写的方法内的属性不同!!!)
//int i=5/0;
System.out.println("demo1"+name+" "+age);
}
}
|
配置文件
1
2
3
4
5
6
7
8
9
10
11
12
13
14
15
16
17
18
19
20
21
| <bean id="myarround" class="com.bjsxt.advice.MyArround"></bean>
<bean id="myadvice" class="com.bjsxt.advice.MyAdvice"></bean> //自己写的环绕的类
<aop:config>
<aop:aspect ref="myadvice"> //弹到我们写的类(环绕 前置 后置等方法)
<aop:pointcut expression="execution(* com.bjsxt.test.Demo.demo01(String,int)) and args(name1,age1)" id="mypoint"/> //切点信息
<aop:before method="mybefore" pointcut-ref="mypoint" arg-names="name1,age1" /> //前置通知信息
//有两种:
1.after 异常也可以执行
2.after-returning 异常就不会执行
<aop:after method="myafter1" pointcut-ref="mypoint"/>
<aop:after-returning method="myafter2" pointcut-ref="mypoint"/>
<aop:after-throwing method="mythrow" pointcut-ref="mypoint"/> //异常通知信息
<aop:around method="myarround" pointcut-ref="mypoint"/> //环绕的具体标签 aop:around
</aop:aspect>
</aop:config>
<bean id="demo" class="com.bjsxt.test.Demo"></bean> //Demo类信息
|
测试Test类
1
2
3
4
5
6
7
8
| public class Test {
public static void main(String[] args) {
//因为我们是IOC 控制反转 将new和管理对象给了spring
ApplicationContext ac=new ClassPathXmlApplicationContext("applicationContext.xml");
Demo demo = ac.getBean("demo",Demo.class); //通过bean去找
demo.demo1("zhangsan",123); //传入参数执行方法
}
}
|
关于配置文件中的细节
1. 关于后置的标签(执行顺序和配置顺序有关):
    1.1 after 异常也可以执行
    1.2 after-returning 异常就不会执行

2. 关于前置标签的属性和使用问题
        <aop:pointcut expression="execution(* com.bjsxt.test.Demo.demo01(String,int)) and args(name1,age1)" id="mypoint"/>
        <aop:before method="mybefore" pointcut-ref="mypoint" arg-names="name1,age1" />
    注:     2.1 execution(* com.bjsxt.test.Demo.demo01()) 在后面加 and args()
         2.2 args()有几个参数 下面的arg-names就要有几个参数
         2.3 arg-names="" 里面的参数名称必须和通知方法参数名对应(和你写的前置方法的参数一样!!)
使用注解(基于Aspect)
告诉spring哪些类下的包有注解(默认不会自动找)
配置文件(引入xmlns:context)
1
2
3
4
5
6
7
8
9
10
| <beans xmlns="http://www.springframework.org/schema/beans"
xmlns:xsi="http://www.w3.org/2001/XMLSchema-instance"
xmlns:aop="http://www.springframework.org/schema/aop"
xmlns:context="http://www.springframework.org/schema/context" // 1. 引入这一行 xmlns:context
xsi:schemaLocation="http://www.springframework.org/schema/beans
http://www.springframework.org/schema/beans/spring-beans.xsd
http://www.springframework.org/schema/aop
http://www.springframework.org/schema/aop/spring-aop.xsd
http://www.springframework.org/schema/context // 2. 引入相关的location地址
http://www.springframework.org/schema/context/spring-context.xsd">
|
@Component
1. 相当于bean标签(引入相关类)
2. 相当于bean id=""  @Component(没有参数) -- 将类名首字母变小写(Demo -- demo)
3. @Component(可以随意自定义名称)
实现步骤
配置文件注解在哪些包
1
2
| //多个包就用逗号隔开
<context:component-scan base-package="com.bjsxt.advice,com.bjsxt.test"></context:component-scan>
|
配置Demo切片类
1
2
3
4
5
6
7
| @Component //加这个注解 表明现在是给切片类写了id="demo"
public class Demo {
@Pointcut("execution(* com.bjsxt.test.Demo.demo01())") //demo01是切片
public void demo1(){
System.out.println("demo01");
}
}
|
配置前置/后置类
1
2
3
4
5
6
7
8
9
10
11
12
13
14
15
| @Component //要引入Demo切片类
@Aspect //告诉我是一个切片类
public class MyAdvice {
@Before("com.bjsxt.test.Demo.demo01()") //方法前面要用是哪个切片
public void mybefore() {
System.out.println("前置");
}
@After("com.bjsxt.test.Demo.demo01()")
public void myafter() {
System.out.println("后置");
}
}
|
配置文件更改代理
1
2
3
4
5
6
7
|
<!--
		    true  使用cglib动态代理(注解)
			false 使用jdk动态代理
	-->

<aop:aspectj-autoproxy proxy-target-class="true"></aop:aspectj-autoproxy>
|


