Spring概述
Rod Johnson提出轮子理论 :不用重复发明轮子(直接使用写好的代码)
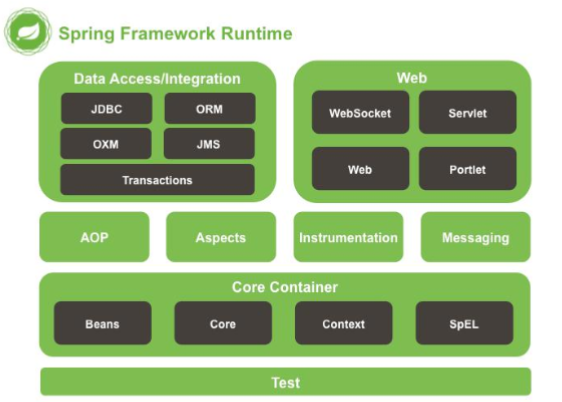
框架分析 框架图(八个部分)
具体讲解 Test test:spring提供测试功能Core Container 1. Beans:创建类对象并管理对象
2. Core:核心类
3. Context:上下文参数 获取外部资源/管理注解
4. spEl:expression.jarAOP AOP:实现aop功能需要依赖Aspects Aspects:切面AOP依赖的包Instrumentation Messaging Data Access / Integration 1. JDBC: spring对于JDBC封装后的代码
2. ORM:封装持久层框架的代码(ssh里面的Hibernate)
3. transactions:对应spring-tx.jar -- 声明式事务使用Web spring完成web相关功能
例:tomcat加载spring配置文件时需要sping-web包spring容器 1. 容器(Container):Spring当作一个大容器
2. ApplicationContext接口(老版本的BeanFactory接口)的子接口
3. Spring3之后将sping框架的功能拆分为多个jarIoc 控制反转(Inversion of Control)
将原来要new实例化对象 –> 交给spring完成
控制: 控制类的对象
反转: 交给spring负责
Ioc最大作用 :解耦
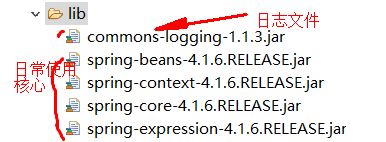
Spring环境搭建 导入jar
新建applicationContext.xml配置文件 关于配置文件的知识点:
1
2
3
4
1. Spring配置文件信息内容 --> Spring容器ApplicationContext 2. Spring配置文件基于schema(文件扩展名.xsd) 3. schema是DTD升级版 4. Spring配置文件引入一个xsd就有一个namespace(xmlns就是去找相关文档位置)
具体写法:
1
2
3
4
5
6
7
8
9
10
11
12
<?xml version="1.0" encoding="UTF-8"?> <beans xmlns="http://www.springframework.org/schema/beans" xmlns:xsi="http://www.w3.org/2001/XMLSchema-instance" xsi:schemaLocation="http://www.springframework.org/schema/beans http://www.springframework.org/schema/beans/spring-beans.xsd"> <!-- id 表示获取到对象标识 class 创建哪个类的对象 --> <bean id="peo" class="com.bjsxt.pojo.People"/> // bean标签去创建对象 id用来之后getBean中第一个参数调用 class是写具体类的全路径 </beans>
编写实体类 1 2 3 4 5 6 7 8 9 10 11 12 13 14 15 16 17 18 19 20 21 22 public class People { private int id; private String name; public int getId() { return id; } public void setId(int id) { this.id = id; } public String getName() { return name; } public void setName(String name) { this.name = name; } @Override public String toString() { return "People [id=" + id + ", name=" + name + "]"; } }
编写测试类 分析使用 1. 对比getBean()和getBeanDefinitionNames()方法
getBean()方法两个参数:
第一个:配置文件中bean标签id值
第二个:返回值类型(默认Object)
getBeanDefinitionNames() Spring容器中目前所有管理的所有对象
2. 要使用ApplicationContext容器 -- 我们暂时用ClassPathXmlApplicationContext去获取资源具体实现 1 2 3 4 5 6 7 8 9 10 11 12 13 14 15 public class Test { public static void main(String[] args) { ApplicationContext ac = new ClassPathXmlApplicationContext("applicationContext.xml"); People people = ac.getBean("peo",People.class); System.out.println(people); String[] names = ac.getBeanDefinitionNames(); for (String string : names) { System.out.println(string); } } }
Spring创建对象的三种方式 1. 构造方法创建
无参构造创建:默认
有参构造创建:需要明确配置
2. 实例工厂
3. 静态工厂构造方法创建(bean标签更改) 实体类创建好无参构造方法和有参构造方法
1 2 3 4 5 6 7 8 9 10 11 12 13 14 15 16 17 18 public People(){ super(); System.out.println("执行无参构造方法"); } public People(int id,String name){ super(); this.id=id; this.name=name; System.out.println("执行有参构造方法1"); } public People(String name,int id){ super(); this.id=id; this.name=name; System.out.println("执行有参构造方法2"); }
无参构造方法 1 <bean id="peo" class="com.bjsxt.pojo.People"/> //直接简单的写id和class即可
有参构造方法(constructor-arg标签)
四个属性(可以区别用哪个有参构造方法 默认是用最下面的!!!!)
index:参数索引(0开始)
value:参数对应值
name:参数名
type:区别关键字和封装类(int和Integer)
1 2 3 4 <bean id="peo" class="com.bjsxt.pojo.People"> <constructor-arg index="0" name="id" type="int" value="123"></constructor-arg> <constructor-arg index="1" name="name" type="java.lang.String" value="zhangsan"></constructor-arg> </bean>
实例工厂(先工厂后对象)# 生成一个实例工厂 1 2 3 4 5 public class PeopleFactory{ public People newInstance(){ //一般都叫newInstance() return new People(1,"测试"); } }
配置文件配置工厂对象 1 2 3 4 5 6 7 // 原来代码格式: PeopleFactory factory=new PeopleFactory() People P1=factory.newInstance(); <bean id="factory" class="com.bjsxt.pojo.PeopleFactory"></bean> //用了后面类创建了一个工厂对象叫factory <bean id="p1" factory-bean="factory" factory-method="newInstance"></bean> //用上面的factory工厂对象调用newInstance方法 返回为p1
静态工厂(快速创建对象) 不需要工厂(静态方法直接用) 1 2 3 4 5 public class PeopleFactory{ public static newInstance(){ //一般都叫newInstance() static静态!!!! return new People(1,"测试"); } }
配置文件调用方法 1 2 3 4 // 原来代码格式: People P2=PeopleFactory.newInstance(); <bean id="p2" class="com.bjsxt.pojo.PeopleFactory" factory-method="newInstance"></bean> //直接调用静态newInstance方法
<
Spring给Bean注入
Mybatis运行原理总结
>


