一、改写JDBCUtil代码(一直调用的类) 1 2 3 4 5 6 7 8 9 10 11 12 13 14 15 16 17 18 19 20 21 22 23 24 25 26 27 28 29 30 31 32 33 34 35 36 37 38 39 40 41 42 43 44 45 46 47 48 49 50 51 52 53 54 55 56 57 58 59 60 61 62 63 64 65 66 67 package util; import java.io.FileInputStream; import java.io.InputStream; import java.sql.Connection; import java.sql.DriverManager; import java.sql.ResultSet; import java.sql.SQLException; import java.sql.Statement; import java.util.Properties; import com.mchange.v2.c3p0.ComboPooledDataSource; public class JDBCUtil2 { static ComboPooledDataSource dataSource =new ComboPooledDataSource(); //获取连接对象 public static Connection getConn() throws SQLException{ return dataSource.getConnection(); //已经更改为和C3P0有关的ComboPooledDataSource类 } // 释放资源(数据库连接池最后需要释放资源) public static void release(Connection conn , Statement st , ResultSet rs){ closeRs(rs); closeSt(st); closeConn(conn); } public static void release(Connection conn , Statement st ){ closeSt(st); closeConn(conn); } private static void closeRs(ResultSet rs){ try { if(rs != null){ rs.close(); } } catch (SQLException e) { e.printStackTrace(); }finally{ rs = null; } } private static void closeSt(Statement st){ try { if(st != null){ st.close(); } } catch (SQLException e) { e.printStackTrace(); }finally{ st = null; } } private static void closeConn(Connection conn){ try { if(conn != null){ conn.close(); } } catch (SQLException e) { e.printStackTrace(); }finally{ conn = null; } } }
二、开源DBUtils的使用步骤
导入commons-dbutils-1.4.jar文件
新建类主要是使用QueryRunner类 去加载C3P0开源数据池ComboPooledDataSource类 的对象,然后调用QueryRunner类的方法就可以。
增删查改的方法:
1
2
3
4
//针对增加、删除、修改 //qu.update(sql); //针对查询 //qu.query(sql, rsh);
三、DBUtils的增删改(1行) 步骤分析
1
2
3
4
5
6
7
8
//1.使用两种数据池中其中一种的C3P0开源数据池---通过对象去获取数据池 ComboPooledDataSource dataSource =new ComboPooledDataSource(); //2.获取连接进行sql操作---通过DBUtils专有的QueryRunner类去接开源数据池的对象 QueryRunner qu=new QueryRunner(dataSource); //只是去简化了CRUD的代码 //3.增加/删除/插入 这三种方式只需要一行的update方法 ---要更改的参数前面写?,后面写具体值 qu.update("insert into account values(null,?,?)","aa",1000);
完整代码如下:
1
2
3
4
5
6
7
8
9
10
11
12
13
14
15
16
17
18
19
20
21
22
23
24
25
26
package dbutils; import java.sql.SQLException; import org.apache.commons.dbutils.QueryRunner; import org.junit.Test; import com.mchange.v2.c3p0.ComboPooledDataSource; public class TestDBUtils { @Test public void testinsert() throws SQLException { //测试插入功能 //1.使用两种数据池中其中一种的C3P0开源数据池 ComboPooledDataSource dataSource =new ComboPooledDataSource(); //2.获取连接进行sql操作 QueryRunner qu=new QueryRunner(dataSource); //只是去简化了CRUD的代码 //3.增加 //qu.update("insert into account values(null,?,?)","aa",1000); //3.删除 //qu.update("delte from account where id=?",5); //3.更新 //qu.update("update account set money=? where id=?",1000000,6); } }
四、DBUtils查询(2行) 查询单条 1. ResultSetHandler()匿名内部类:
1
2
3
4
5
6
7
8
9
10
11
12
13
14
15
16
17
18
19
20
//3.查询单条 查询到的数据还是由那个result里面,然后调用下面的handle方法(手动封装) Account account=qu.query("select * from account where id=?",new ResultSetHandler<Account>() { //使用匿名内部类 @Override public Account handle(ResultSet rs) throws SQLException { Account account=new Account(); //创建一个Account类对象 while(rs.next()) { String name=rs.getString("name"); //rs获取name int money = rs.getInt("money"); //rs获取money account.setName(name); //对象设置name account.setMoney(money); //对象设置money } return account; } },6); System.out.println(account.toString()); //调用Account类的输出方法(Account类写获取name和money的方法等)
2. BeanHandler()匿名内部类:
1
2
3
4
5
/* Account account=qu.query("select * from account where id=?",new BeanHandler<Account>(Account.class),2); ////使用第一种方式下面的BeanHandler<T>的方式匿名内部类 System.out.println(account.toString()); //调用Account类的输出方法(Account类写获取name和money的方法等) */
查询所有 ** BeanListHandler()**
1
2
3
4
5
List<Account> list=qu.query("select * from account",new <AcBeanListHandlercount>(Account.class)); //Account.class可以自己封装---类的字节码获取类的实例 for(Account account:list) { System.out.println(account.toString()); //调用Account类的输出方法(Account类写获取name和money的方法等) }
五、完整代码(3部分) 具体实现代码框架(红色√):
第一部分:要用C3P0数据池必须要配置xml文件:
1
2
3
4
5
6
7
8
9
10
11
12
13
14
15
16
17
18
19
20
21
22
23
24
25
26
27
28
29
30
31
32
33
34
35
36
37
38
39
40
<?xml version="1.0" encoding="UTF-8"?> <c3p0-config> <!-- default-config 默认的配置, --> <default-config> <property name="driverClass">com.mysql.jdbc.Driver</property> <!-- 要和不用配置文件的set方法的后面一样 --> <property name="jdbcUrl">jdbc:mysql://localhost/bank</property> <property name="user">root</property> <property name="password">njdxrjgc7777777.</property> <property name="initialPoolSize">10</property> <property name="maxIdleTime">30</property> <property name="maxPoolSize">100</property> <property name="minPoolSize">10</property> <property name="maxStatements">200</property> </default-config> <!-- This app is massive! --> <named-config name="oracle"> <!-- oracle数据库用 --> <property name="acquireIncrement">50</property> <property name="initialPoolSize">100</property> <property name="minPoolSize">50</property> <property name="maxPoolSize">1000</property> <!-- intergalactoApp adopts a different approach to configuring statement caching --> <property name="maxStatements">0</property> <property name="maxStatementsPerConnection">5</property> <!-- he's important, but there's only one of him --> <user-overrides user="master-of-the-universe"> <property name="acquireIncrement">1</property> <property name="initialPoolSize">1</property> <property name="minPoolSize">1</property> <property name="maxPoolSize">5</property> <property name="maxStatementsPerConnection">50</property> </user-overrides> </named-config> </c3p0-config>
第二部分:具体实现的TestDBUtils类:
1
2
3
4
5
6
7
8
9
10
11
12
13
14
15
16
17
18
19
20
21
22
23
24
25
26
27
28
29
30
31
32
33
34
35
36
37
38
39
40
41
42
43
44
45
46
47
48
49
50
51
52
53
54
55
56
57
58
59
60
61
62
63
64
65
package dbutils; import java.sql.ResultSet; import java.sql.SQLException; import java.util.List; import org.apache.commons.dbutils.QueryRunner; import org.apache.commons.dbutils.ResultSetHandler; import org.apache.commons.dbutils.handlers.BeanHandler; import org.apache.commons.dbutils.handlers.BeanListHandler; import org.junit.Test; import com.mchange.v2.c3p0.ComboPooledDataSource; import demain.Account; public class TestDBUtils { @Test public void testinsert() throws SQLException { //测试插入功能 //1.使用两种数据池中其中一种的C3P0开源数据池 ComboPooledDataSource dataSource =new ComboPooledDataSource(); //一定要记得导入c3p0-config.xml文件(配置文件) //2.获取连接进行sql操作 QueryRunner qu=new QueryRunner(dataSource); //只是去简化了CRUD的代码 //3.增加 //qu.update("insert into account values(null,?,?)","aa",1000); //3.删除 //qu.update("delte from account where id=?",5); //3.更新 //qu.update("update account set money=? where id=?",1000000,6); //3.查询单条 查询到的数据还是由那个result里面,然后调用下面的handle方法(手动封装) /* Account account=qu.query("select * from account where id=?",new ResultSetHandler<Account>() { //使用匿名内部类 @Override public Account handle(ResultSet rs) throws SQLException { Account account=new Account(); //创建一个Account类对象 while(rs.next()) { String name=rs.getString("name"); //rs获取name int money = rs.getInt("money"); //rs获取money account.setName(name); //对象设置name account.setMoney(money); //对象设置money } return account; } },6); System.out.println(account.toString()); */ //3.查询单条 /* Account account=qu.query("select * from account where id=?",new BeanHandler<Account>(Account.class),2); ////使用第一种方式下面的BeanHandler<T>的方式匿名内部类 System.out.println(account.toString()); */ //3.查询所有的信息 List<Account> list=qu.query("select * from account",new BeanListHandler<Account>(Account.class)); //Account.class可以自己封装---类的字节码获取类的实例 for(Account account:list) { System.out.println(account.toString()); } } }
第三部分:要生成和存取的Account类:
1
2
3
4
5
6
7
8
9
10
11
12
13
14
15
16
17
18
19
20
21
22
23
24
25
26
27
28
29
30
package demain; public class Account { private String name; //写数据库的两个属性 private int money; //下面是两个属性的set和get方法 public String getName() { return name; } public void setName(String name) { this.name = name; } public int getMoney() { return money; } public void setMoney(int money) { this.money = money; } //输出的tostring方法 @Override public String toString() { return name+" "+money; } }
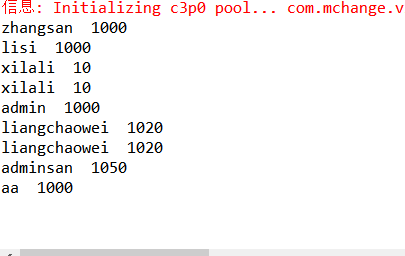
结果展示:
<
DBUtils通用的增删查改
数据库连接池
>


