一、ServletContext(Servlet 上下文)
每个web工程都只有一个ServletContext对象。 说白了也就是不管在哪个servlet里面,获取到的这个类的对象都是同一个。
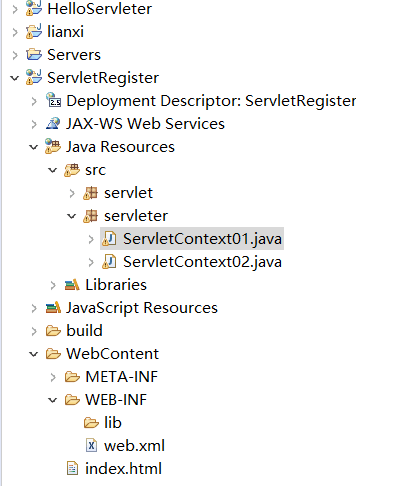
举例步骤: 新建一个项目–java Resources–src右键新建Servlet–填写类名和包名
自动生成代码如下:
1
2
3
4
5
6
7
8
9
10
11
12
13
14
15
16
17
18
19
20
21
22
23
24
25
26
27
28
29
30
31
32
33
34
35
36
37
38
package servleter; import java.io.IOException; import javax.servlet.ServletException; import javax.servlet.http.HttpServlet; import javax.servlet.http.HttpServletRequest; import javax.servlet.http.HttpServletResponse; /** * Servlet implementation class ServletContext01 */ public class ServletContext01 extends HttpServlet { private static final long serialVersionUID = 1L; /** * @see HttpServlet#HttpServlet() */ public ServletContext01() { super(); // TODO Auto-generated constructor stub } /** * @see HttpServlet#doGet(HttpServletRequest request, HttpServletResponse response) */ protected void doGet(HttpServletRequest request, HttpServletResponse response) throws ServletException, IOException { // TODO Auto-generated method stub response.getWriter().append("Served at: ").append(request.getContextPath()); } /** * @see HttpServlet#doPost(HttpServletRequest request, HttpServletResponse response) */ protected void doPost(HttpServletRequest request, HttpServletResponse response) throws ServletException, IOException { // TODO Auto-generated method stub doGet(request, response); } }
###如何得到对象(和ServletConfig相似)
//1. 获取对象
    ServletContext context = getServletContext();
二、ServletContext获取全局参数 ServletConfig----在servlet里面对<init-paramd>写具体的参数
ServletContext---对根标签servlet外面对<context-param>写全局参数
使用了直接右键server所以不用自己配
web.xml的完整内容:
1
2
3
4
5
6
7
8
9
10
11
12
13
14
15
16
17
18
19
20
21
22
23
24
25
26
27
28
29
30
31
32
33
34
35
36
37
38
39
40
41
42
43
44
45
46
<?xml version="1.0" encoding="UTF-8"?> <web-app xmlns:xsi="http://www.w3.org/2001/XMLSchema-instance" xmlns="http://java.sun.com/xml/ns/javaee" xsi:schemaLocation="http://java.sun.com/xml/ns/javaee http://java.sun.com/xml/ns/javaee/web-app_2_5.xsd" id="WebApp_ID" version="2.5"> <display-name>ServletRegister</display-name> <welcome-file-list> <welcome-file>index.html</welcome-file> <welcome-file>index.htm</welcome-file> <welcome-file>index.jsp</welcome-file> <welcome-file>default.html</welcome-file> <welcome-file>default.htm</welcome-file> <welcome-file>default.jsp</welcome-file> </welcome-file-list> <context-param> //在这加context-param标签!!!!!!!!!!!!!!! <param-name>address</param-name> <param-value>shenzhen</param-value> </context-param> <servlet> <servlet-name>Demo</servlet-name> <servlet-class>servlet.Demo</servlet-class> </servlet> <servlet-mapping> <servlet-name>Demo</servlet-name> <url-pattern>/Demo</url-pattern> </servlet-mapping> <servlet> <description></description> <display-name>ServletContext01</display-name> <servlet-name>ServletContext01</servlet-name> <servlet-class>servleter.ServletContext01</servlet-class> </servlet> <servlet-mapping> <servlet-name>ServletContext01</servlet-name> <url-pattern>/ServletContext01</url-pattern> </servlet-mapping> <servlet> <description></description> <display-name>ServletContext02</display-name> <servlet-name>ServletContext02</servlet-name> <servlet-class>servleter.ServletContext02</servlet-class> </servlet> <servlet-mapping> <servlet-name>ServletContext02</servlet-name> <url-pattern>/ServletContext02</url-pattern> </servlet-mapping> </web-app>
ServletContext01/02代码几乎一样都是创建对象然后输出
1
2
3
4
5
6
7
8
9
10
11
12
13
14
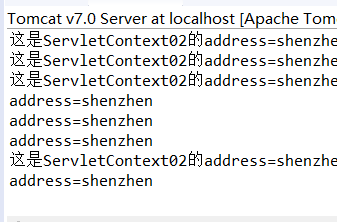
public class ServletContext02 extends HttpServlet { protected void doGet(HttpServletRequest request, HttpServletResponse response) throws ServletException, IOException { //1.获取对象 ServletContext context=getServletContext(); //2.获得address String address=context.getInitParameter("address"); System.out.println("这是ServletContext02的address="+address); } protected void doPost(HttpServletRequest request, HttpServletResponse response) throws ServletException, IOException { doGet(request, response); } }
01通过浏览器去刷新/02通过eclipse自带的页面浏览器刷新
三、ServletContext获取Web应用中的资源
获取资源在tomcat里面的绝对路径(getRealpath()方法)
1
2
3
4
5
6
7
8
9
10
11
12
13
14
15
16
17
18
19
20
21
22
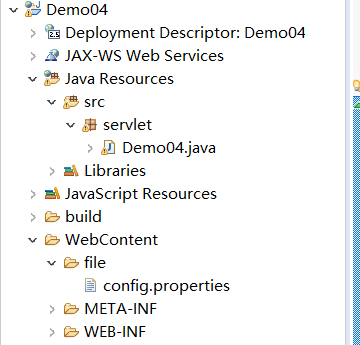
public class Demo04 extends HttpServlet { protected void doGet(HttpServletRequest request, HttpServletResponse response) throws ServletException, IOException { //1.获取对象 ServletContext context=getServletContext(); String path=context.getRealPath("file/config.properties"); //获取给定的文件在服务器上面的绝对路径 ---如果“”里面没有东西意思就是找到根目录 System.out.println("path="+path); //1.创建属性对象 Properties properties=new Properties(); InputStream is=new FileInputStream(path); //通过InputStream数据流连接path properties.load(is); //加载输入流 //3.获取name属性的值 String name=properties.getProperty("name"); System.out.println("name="+name); } protected void doPost(HttpServletRequest request, HttpServletResponse response) throws ServletException, IOException { doGet(request, response); } }
代码结果如下:
ServletContext对象.getResourceAsStream 获取资源流对象
1
2
3
4
5
6
7
8
9
10
11
12
13
14
15
16
17
18
19
20
21
22
public class Demo04 extends HttpServlet { protected void doGet(HttpServletRequest request, HttpServletResponse response) throws ServletException, IOException { //test01(); test02(); } private void test02() throws IOException { //1.获取对象 Properties properties=new Properties(); ServletContext context=getServletContext(); //创建ServletContext对象 InputStream is=context.getResourceAsStream("file/config.properties"); //直接写文件路径(不需要path) properties.load(is); //加载文件 //3.获取name属性的值 String name=properties.getProperty("name"); System.out.println("name22="+name); } protected void doPost(HttpServletRequest request, HttpServletResponse response) throws ServletException, IOException { doGet(request, response); } }
通过classloader 去获取web工程下的资源
要想让classloader回到Demo03的位置:
1
2
//获得该java文件吧内磨机片的class然后获取到加载这个class的虚拟机中的那个类加载器对象 InputStream is=this.getClass().getClassLoader().getResourceAsStream("../../file/config.properties");
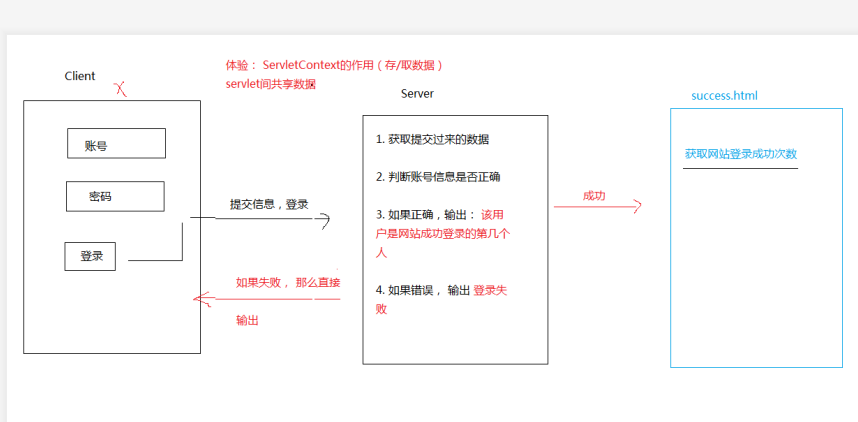
四、ServletContext存取数据 此为web代码框架:
实现界面分析:
步骤:
Client客户端: 主要是要有两个html的客户端代码:server服务器端: 主要是两个类:
LoginServlet类代码:
1
2
3
4
5
6
7
8
9
10
11
12
13
14
15
16
17
18
19
20
21
22
23
24
25
26
27
28
29
30
31
32
33
34
35
36
37
38
39
40
41
42
43
44
45
46
47
48
public class LoginServlet extends HttpServlet { protected void doGet(HttpServletRequest request, HttpServletResponse response) throws ServletException, IOException { //1.获取数据 String username=request.getParameter("username"); //request 包括请求的信息 String password=request.getParameter("password"); System.out.println(username+password); //2.校验数据 PrintWriter pw=response.getWriter(); //response 响应数据给浏览器 if("admin".equals(username)&&"123".equals(password)) { //System.out.println("登陆成功!"); //pw.write("login success.."); //1.成功的次数累计加一 Object obj=getServletContext().getAttribute("count");//使用ServeletContext对象的getAttribute方法获取count数 //默认是0次 int totalCount=0; //计数用 if(obj!=null) { totalCount=(int) obj; //如果不为0就把obj强转给计数用的totalCount } System.out.println("已经登陆成功的次数是:"+totalCount); //给count赋新的值 getServletContext().setAttribute("count",totalCount+1); //输出之后可以使用ServletContext对象的setAttribute方法更改count数字(当前输出的数字加一付给count) //2.跳转到成功的界面 //设置状态码 response.setStatus(302); //定位----->跳转去 login_success.html response.setHeader("Location","login_success.html"); } else { System.out.println("登录失败!"); pw.write("login failed.."); } } protected void doPost(HttpServletRequest request, HttpServletResponse response) throws ServletException, IOException { doGet(request, response); } }
CountServlet类代码:
1
2
3
4
5
6
7
8
9
10
11
12
13
14
public class CountServlet extends HttpServlet { protected void doGet(HttpServletRequest request, HttpServletResponse response) throws ServletException, IOException { //1.取值 int count=(int) getServletContext().getAttribute("count"); //2.输出到界面 response.getWriter().write("当前网站成功登录总次数为"+count+"次"); } protected void doPost(HttpServletRequest request, HttpServletResponse response) throws ServletException, IOException { doGet(request, response); } }
login_success.html代码:
1
2
3
4
5
6
7
8
9
10
11
12
<!DOCTYPE html> <html> <head> <meta charset="UTF-8"> <title>Insert title here</title> </head> <body> <h2>登录成功了</h2> <a href="CountServlet">获取网站登录成功总数 </a> <!--href找的是xml里面 url标签的内容--> </body> </html>
login.html代码:
1
2
3
4
5
6
7
8
9
10
11
12
13
14
15
<!DOCTYPE html> <html> <head> <meta charset="UTF-8"> <title>Insert title here</title> </head> <body> <h2>请输入以下内容,完成登陆</h2> <form action="LoginServlet" method="get"> <!--action找的是xml里面 url标签的内容--> 账号:<input type="text" name="username"/><br> 密码:<input type="text" name="password"/><br> <input type="submit" value="登录"/> </form> </body> </html>
<
Linux
HTTPServletReauest和HTTPServletResponse
>


